Поиск ошибок и различных проблем. Поможем решить и исправить
Что такое код ошибки 1407
Summary: Are you encountering error code 1407 on your Mac? The error doesn’t let you delete some of your files or transfer them to an external storage device. If you’re frustrated and don’t know what to do, don’t worry. Read this article to learn how to resolve the Apple Mac error code 1407 quickly. In case you face any unexpected data loss due to this error, download free Mac file recovery software to recover lost data on your macOS Ventura or earlier versions.
Contents
Force Quit Finder
Unlock the File
Restart Mac
Use First Aid of Disk Utility
Reinstall macOS
Use a Free Mac File Recovery Software
Conclusion
The Apple Mac error code 1407 appears on your Mac when you try to drag and drop a file to Trash or move it to an external SD card, USB flash drive, HDD, or SSD. The error code appears along with a notification, such as “The operation can’t be completed because an unexpected error occurred. (Error Code -1407)”.
Reasons for the Mac Error Code 1407
The file is locked
The file is interfered by another program
Finder is using the file
You need to resolve the error to complete the file deletion or file transfer process. The next sections describe several ways to troubleshoot the error on your Mac.
Force Quit Finder
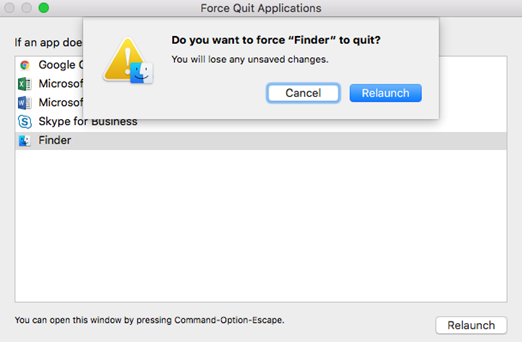
To do away with the error code 1407, you should try quitting the Finder application forcefully. The steps are as follows:
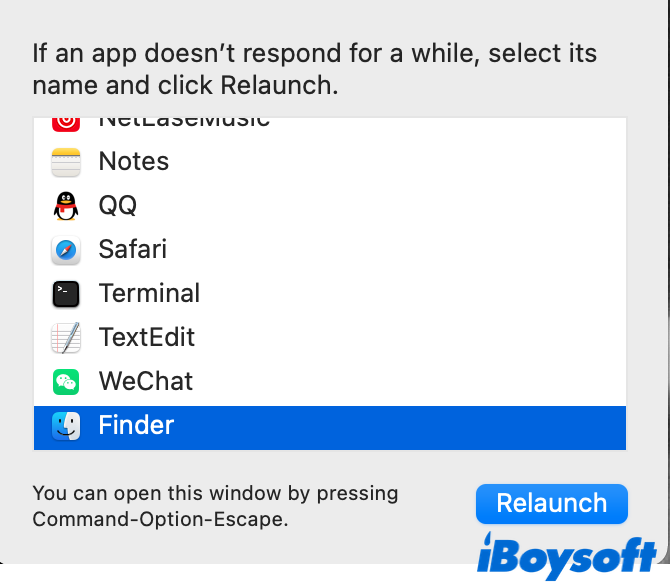
a) Press the Option + Command + Esc keys simultaneously to open a window named Force Quit.
b) Select Finder from the list of options and click Force Quit. Then, select Relaunch.
Image: Force Quit Application Window
Now, try to delete or move your file. If you get the same error, then proceed to the next troubleshooting method.
Unlock the File
Try to unlock the file that you can’t delete or move to an external storage medium due to the error code 1407. The steps are as follows:
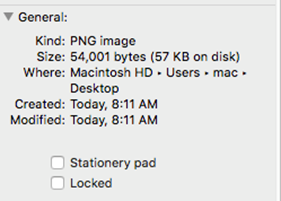
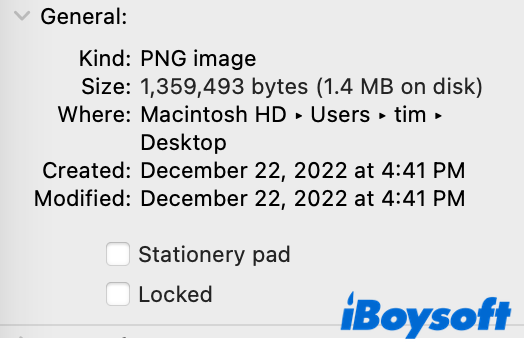
a) Select the file you want to delete or move, then go to File > Get Info.
b) Ensure the locked checkbox is unchecked to unlock the file.
Image: Unselect Locked File
Or, you can use Terminal to unlock a file or folder. Steps are explained next:
a) Go to Applications > Utilities > Terminal to launch Terminal.
b) In the Terminal window, type sudo chflags – R nouchg P#, then press Return.
Here, replace P# with the path of the file or folder that you wish to unlock. You can drag and drop the file or folder to the command line to automatically add the path.
c) Enter the password when prompted. The file or the folder with the locked files are unlocked.
Hopefully, you can delete or move your files. If the error persists, go through the next method.
Restart Mac
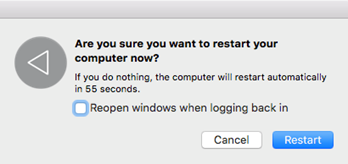
Try restarting your Mac to resolve the error code 1407. The steps are as follows:
a) Go to Apple menu > Restart.
b) If prompted, click Yes to confirm the restart.
Image: Confirmation Message Box
When the Mac starts again, try deleting or moving the files. When the error appears again, read the next troubleshooting method.
Use First Aid of Disk Utility
Try repairing your Mac storage drive to eliminate the error code 1407. Watch the following video for a quick overview on how to repair your Macintosh HD Startup Disk using Disk Utility:
The complete repair steps using Disk Utility are as follows:
a) Start or restart your Mac that throws the error code 1407. Then, immediately press and hold Command + R keys until Apple logo appears. Your Mac boots into macOS Recovery mode.
b) In macOS Utilities window, select Disk Utility, then click Continue to launch Disk Utility.
c) From the sidebar of Disk Utility, select the startup disk, then click First Aid from the top.
d) Click Run to initiate the Mac startup disk repair process. Wait till the repair is complete.
Hopefully, the error code 1407 is fixed. If the above method doesn’t help, proceed to the next troubleshooting procedure.
Reinstall macOS
When the Disk Utility’s repair method fails, you need to reinstall macOS. Steps to reinstall macOS are as follows:
Warning: Reinstalling macOS erases your Mac storage drive; so, back up your startup disk using Time Machine or manually save your files to an external hard drive. After the backup is over, reinstall macOS. The reinstallation steps are as follows:
a) Start or restart your Mac, then immediately press and hold the Command + R keys.
b) Release the keys when you see the Apple logo. Mac boots into macOS Recovery mode.
c) From macOS Utilities window, select Reinstall macOS, then click Continue.
d) Erase the Mac storage drive when prompted, then perform the on-screen instructions.
e) After the reinstallation of macOS, restore the backed-up files to your Mac storage drive.
Indeed, the Apple Mac error code 1407 is resolved. For any data loss event, read on.
Use a Free Mac File Recovery Software
Suppose you didn’t back up your Mac and lost data during troubleshooting of error 1407, leverage a free Mac file recovery software to recover your lost or deleted data.
Watch the following video for a quick overview:
The complete software steps are as follows:
a) Download & install *Stellar Data Recovery Free Edition for Mac.
b) Launch the software and select the required file types, then click Next.
c) Select the drive location, toggle on Deep Scan, and then click Scan.
d) Preview your files and select the essential ones, then click Recover.
e) Click Browse to specify an external hard drive as recovery location, then click Save.
*Stellar Data Recovery Free Edition for Mac software recovers up to 1 GB of files for free. To recover unlimited data, upgrade the software to the Professional or Premium edition. Also, all Stellar software products have a 30-day money-back guarantee, just in case.
Conclusion
Now you know how to resolve the Apple Mac error code 1407 efficiently. Start the troubleshooting procedure by force quitting Finder, unlocking the locked files, restarting your Mac, running First Aid of Disk Utility, or reinstalling macOS in Recovery mode. And, in case of any unexpected data loss event, consider using Stellar Data Recovery Free Edition for Mac to recover your lost, deleted, or inaccessible data.
About The Author
Santosh
Santosh is a technical writer with 10-year experience in writing. He writes troubleshooting blogs, articles, and other web content on a variety of topics, including data recovery, data security, and data backup. His hobbies include solving puzzles, gardening & painting.
Best Selling Products
Stellar Data Recovery Professional for Windows
Stellar Data Recovery has the right Windows Recovery tool for all your data recovery
Read More
Stellar Data Recovery Professional for Mac
Stellar Data Recovery for Mac program performs safe..
Read More
Stellar Photo Recovery
A comprehensive photo recovery software to restore photos, music & video files
Read More
Stellar Repair for Video
Powerful video repair tool for repairing corrupt or damaged MOV and other video files
Read More
Автор
Тема: внешний диск WD MyBook 2 Tb — не удаляются файлы (код ошибки 1407) (Прочитано 3538 раз)
s0l
Начинающий
Офлайн
Сообщений: 46
WWW
Вот такое окошко появляется, когда я пытаюсь удалить что-то с внешнего диска, купленного неделю назад и на днях потерпевшего падение с высоты около метра
Что означает этот код ошибки и можно ли как-то «вылечить» это, чтоб файлы опять могли удаляться?
Записан
s0l Начинающий Офлайн
Сообщений: 46
WWW
Всё, прошло само собой. Просто выключила и опять включила iMac.
Записан
SanSan
Постоянный посетитель
Офлайн
Сообщений: 257
Записан
s0l Начинающий Офлайн
Сообщений: 46
WWW
а у вас такой же код ошибки?
Записан
Информация о материале
Категория: MacOSX
Создано: 19.04.2021 10:32
Просмотров: 15447
Всем привет сегодня поговорим о ошибке 1309 в Mac OS она появляется при копировании файлов. Что с этим делать дальше разберем в статье.
Базовые действия
Проверить состояние жесткого диска на ошибки
Проверить целостность файлов
Проверить файловую сестему. На FAT 32 максимально передоваемый обем 4 гб. Для больших обемов даннхы нужен NТFS или MacSO extended.
MacOS работа с NTFS
MacOS может считать данные из диска форматированного в NTFS но записать на него не позволит. Для этого используеют сторонию ултелиту Paragon NTFS
Проверяем пусть к файлу который нужно скопировать
В нем не должно быть никаких спец символов типа ! » № ; % ( ) [ ] а также не желательна кириллица.
Очищаем .DS_store филы через терминал
Открываем«Терминал» для этого в строке поиска Spotlight вводим слово «Терминал» и нажимаем «Enter»
В терменале вводим «dot_clean /Путь к папке или файлу который нужно копировать» и нажимаем «Enter»
Когда dot_clean завершит свою работу, пробуем снова скопировать файл.
Например, если копируем папку С:/ Volumes/ Elements/Фотоархив то можно просто взять эту папку и перекинуть ее в терминал и путь сам появится
Копируем через файловый менеджер «Commander One»
Это хорошая альтернатива штатному файловому менеджеру скачиваем его с Apple Store и пробуем через него перекинуть нужные файлы
Проверяем целостность жесткого диска
Откройте Дисковую утилиту в папке /Программы/Утилиты/.
Выберите жёсткий диск из списка слева.
Найдите на экране пункт «Статус S.M.A.R.T.».
Если рядом с ним указано «Проверен», то состояние диска хорошее.
Если статус SMART отображает «Ошибку», это значит что у жёсткого диска есть серьёзная проблема, по причине которого может возникать ошибка 1309 в этом случаи нужно как можно скорее сохранить копию своих данных и заменить диск.
Ошибка 1309 при передачи файлов с Mac на Windows server
В данном случа можно попробовать поменять штатный протокол передачи данных с AFP на SMB
На этом все это все советы, которые у нас есть по ошибке 1309 в Mac OS. Пишем комментарии по теме данной стати будет интересно почитать. Спасибо!
Комментарии ()
Оставьте свой комментарий
Как восстановить права доступа к диску и исправить ошибки на Mac OS X | Яблык
Как восстановить права доступа к диску и исправить ошибки на Mac OS X
Когда система OS X начинает работать нестабильно, первое, что рекомендуют делать специалисты — проверить диск на наличие ошибок, исправить их и восстановить права доступа к диску. В этом материале мы расскажем как это сделать.
Внимание! Перед началом проверки и исправления ошибок на системном диске (где установлена OS X), а также восстановлением прав доступа, настоятельно рекомендуем закрыть все программы (Command (?) + Q) и не запускать никакие процессы.
Проверка и исправление ошибок на дисках в Mac OS X
Компьютерам, как и людям, свойственно ошибаться. Главное в случае ухудшения работы системы OS X вовремя исправлять эти ошибки. Сделать это достаточно просто, благо, инженеры Apple позаботились об этом и встроили «Дисковую утилиту», которая в несколько кликов выявит проблему и позволит её исправить.
1. Откройте Finder > Программы > Утилиты > Дисковая утилита или воспользуйтесь поиском Spotlight.
2. В левой боковой колонке выберите необходимый жёсткий диск.
3. В рабочей области перейдите во вкладку «Первая помощь».
4. Выберите пункт «Проверить диск» и дождитесь окончания проверки, длительность которой будет варьироваться в зависимости от объёма накопителя, его наполненности и мощности самого Mac.
5. Если Дисковая утилита найдёт ошибки, то нажмите кнопку «Исправить диск».
Как восстановить права доступа к диску на Mac OS X через Дисковую утилиту?
Иногда случается так, что права доступа в системе могут быть исправлены на некорректные. В большинстве случаев это происходит по вине неправильно работающих установщиков программ. Из-за этого система может не получить доступ к важным системным настройкам, компонентам и расширениям.
1. Откройте Finder > Программы > Утилиты > Дисковая утилита или воспользуйтесь поиском Spotlight.
2. В левой боковой колонке выберите необходимый жёсткий диск.
3. В рабочей области перейдите во вкладку «Первая помощь».
4. Выберите пункт «Проверить права доступа» и дождитесь окончания проверки.
5. Нажмите кнопку «Исправить права доступа».
Как восстановить права доступа к диску на Mac OS X через Терминал?
1. Откройте Finder > Программы > Утилиты > Терминал или воспользуйтесь поиском Spotlight.
2. Введите следующую команду:
Sudo diskutil repairPermissions /
Когда начнётся процесс, вы увидите сообщение типа:
Started verify/repair permissions on disk0s2 Macintosh HD
Чтобы исправить права доступа к другому (несистемному) диску, замените «/» на имя другого диска, например:
Способы устранения ошибки 50 в iTunes
Ошибка 50 говорит пользователю о том, что возникли проблемы с получением iTunes мультимедийных файлов iPhone. Ниже мы рассмотрим несколько способов, которые позволят устранить данную ошибку.
Способ 1: перезапуск компьютера и Apple-устройства
Ошибка 50 может появиться из-за обычного системного сбоя, который мог возникнуть как по вине компьютера, так и Apple-устройства.
Просто выполните перезагрузку компьютера и вашего iPhone. В случае с iPhone рекомендуем выполнить принудительную перезагрузку: зажмите одновременно клавиши включения о «Домой» на 10 секунд. Клавиши можно отпустить только тогда, когда произойдет резкое отключение устройства.
Способ 2: чистка папки iTunes_Control
Ошибка 50 могла возникнуть и из-за некорректных данных в папке ITunes_Control. Все, что вам понадобится в данном случае – это удалить данную папку на устройстве.
В данном случае вам потребуется прибегнуть к помощи файлового менеджера. Мы вам рекомендуем воспользоваться программой iTools – мощной альтернативной iTunes с функцией файлового менеджера.
Попав в память устройства, вам потребуется удалить папку iTunes_Control, а затем выполнить перезагрузку устройства.
Способ 3: отключение антивируса и брандмауэра
Антивирус или брандмауэр может мешать iTunes связаться с серверами Apple, в связи с чем на экране появляется ошибка 50.
Просто отключите на время работу всех защитных программ и проверьте наличие ошибки.
Способ 4: обновление iTunes
Если вы давно не обновляли на компьютере программу iTunes, то самое время выполнить данную процедуру.
Способ 5: переустановка iTunes
Ошибка 50 могла возникнуть и по вине некорректной работы программы iTunes. В данном случае мы хотим предложить вам выполнить переустановку программы.
Но прежде чем вы установите новую версию iTunes, старую необходимо удалить с компьютера, но сделать это необходимо полностью. Для данной цели рекомендуем вам воспользоваться программой Revo Uninstaller. Более подробно о полном удалении iTunes мы уже рассказывали в одной из наших статей.
И только после того, как вы удалите iTunes и перезагрузите компьютер, можно приступать к загрузке и установке свежей версии медиакомбайна.
В статье перечислены основные способы, позволяющие бороться с ошибкой 50. Если у вас есть свои рекомендации по решению данной проблемы, расскажите о них в комментариях.
Мы рады, что смогли помочь Вам в решении проблемы.
Помимо этой статьи, на сайте еще 11956 инструкций.
Добавьте сайт Lumpics. ru в закладки (CTRL+D) и мы точно еще пригодимся вам.
Отблагодарите автора, поделитесь статьей в социальных сетях.
Опишите, что у вас не получилось. Наши специалисты постараются ответить максимально быстро.
Мусорная корзина Finder представляет собой смесь нескольких различных каталогов:
~/.Trash/
/.Trashes/<uid>/ на каждом томе (включая загрузочный том)
например, /Volumes/Big Media Volume/.Trashes/501/
Большинство операций по удалению корзины перемещают удаляемый элемент в каталог под вашим домашним каталогом. Однако, если вы удалите что-то на отдельном томе, Finder переместит элемент в каталог /.Trashes/<uid>/ этого тома (потому что перемещение файла в место на том же томе происходит очень быстро, а копирование файла с другого тома в каталог корзины вашего домашнего каталога может быть довольно медленным).
Попробуйте проверить основной каталог корзины (в окне Terminal):
Это создаст для вас новый каталог ~/.Trash'. Вы можете исследовать содержимое файла/каталога.Trash.old`, чтобы попытаться определить его происхождение.
Если проблема связана с каталогом корзины на каждом томе, вы можете использовать ту же идею: переместите его в сторону, извлеките его, затем перемонтируйте его (отключите и снова подключите внешний диск, откройте образ диска, используйте Disk Utility для перемонтирования внутреннего тома):
If you are encountering the error code 1407 on your Mac during any of the file transfer or trying to delete your files, this could be due to problems with the disk or storage drives. The article provides you a few tested and tried troubleshooting methods to fix the error code 1407 on your Mac system.
The Mac Error 1407 is encountered when you try to copy, deleted or transfer files to any external drives like HDD, SSD, USB flash drives or SD card. The error shows up stating:
The operation can’t be completed because an unexpected error occurred. (Error Code -1407).
Reasons for Error code 1407 on Mac
When Hard disk fails to execute read/write permissions: As HDD always use a mechanical means to read or write data to the disk, any damage caused to these parts eventually lead to the disk failure of the storage device.
Unsupported drive volume formats: When File is been transferred to other storage device, the formats should be synchronized with both the devices.
When file is locked by the system: When file is locked by the system, you will not be able to transfer, copy or delete the file from the system. Trying to do so, will lead to Mac error code 1047.
If the file is being used by another program: When a file is open or used by another program, you will be unable to move the files to other devices. This works similar in Windows as well.
Now, to transfer your files or to delete the files from your Mac all you need to do is resolve the error 1407. Here are the tried methods to fix the Mac 1407 error and help you transfer your files.
How to Resolve the Mac Error Code 1407?
1: Fix the Error 1407 by Repair all Disk Permissions
FinderHard Disk Drive(Click here if Finder is not responding on your macOS)
Click on the Get Info icon. Now you see the Macintosh HD window on the screen.
When you see the hard drives list, Select the hard disk type and click the on Repair Disk Permissions
2: Format the Drive with another drive format to fix the error
Disk Utility program
Now, Select the Eraser tab from the various tabs present on it. You can see the options of drives to your left hand side. Select the drive
You will be given an option to delete the drive with a different drive/ volume format. Make sure you specify a proper name for the drive.
Lastly, click the erase
Although the above mentioned method erases all the data from the drive, formatting is one of the most used methods to fix any errors on the hard drives. Data once formatted cannot be retrieved back unless an effective recovery method is used to recover data from the Mac
If you have lost any data from the Mac hard disk, SFWare Mac data recovery tool helps you recover data from the formatted drive in just a few minutes. The software supports all the Mac versions including the macOS Big Sur, Catalina, Mojave, high sierra and others.
3: Force Quit the Finder
If your files are used by Finder Force Quitting Finder helps you fix the issue
Click on the AppleCommand + Options + Esc icon at the same time
Now window with the Force quit option appears
FinderForce Quit
Now, click the Relaunch
4: Use the Terminal
Terminal is a command line interface comes built-in with Mac OS. Terminal helps you fix errors on the drive using the appropriate command. Using terminal commands you can tryrecovering hidden files from Mac
Now, type the command sudo chflags –R nouchg. This is the command to unlock “locked” files on Mac OS.
Next, press the return icon. Enter the password when prompted to do so and click the Return
5: Remove the Apple Finder PList
PList is an extension used to save the preference of application. These are files in XML format and hold the properties and configuration setting for various programs. Removing the finder plist from the system helps to fix the error 1407.
Finder first. Hold down the Options key and navigate to the Go button
Click on the LibraryPreferences
Remove the file written as: apple.finder.plist
Logout and re-login
With the help of above mentioned methods you can easily resolve the Mac error code 1407.
Four Tested Solutions to Troubleshoot Mac Error Code 1407
If you encounter The operation can’t be completed because an unexpected error occurred. (Error Code -1407), this post will offer five working solutions to fix the Mac error code 1407.
The operation can’t be completed because an unexpected error occurred. (Error Code -1407). Does this Mac error message look familiar to you? This error shows up when you try to send files to the Trash or transfer data to your external storage devices, say, HDD, SSD, USB thumb drive, or SD card.
What is Mac error code 1407 and how to fix it? This post will give an overview of it and show you four working solutions to troubleshoot this Mac error code with step-by-step guides. Let’s move forward.
Table of Contents:
Overview of Mac error code 1407
You don’t have read/write permissions to the file. If you are not the administrator, chances are you have limited read-write access to certain files.
Your macOS system locks the file. You’ll find unable to move, copy, or remove a file from the system if it’s locked. Mac error code 1047 will appear if you attempt to do so.
The file is being used by another program. For example, you won’t be able to delete a Word document if it’s still running behind. Or, Finder is using the file you want to delete or transfer.
Abrupt termination that results in a damaged file. When the Mac shuts down while you are working on the file, possibly, the file will get damaged and can’t be deleted or transferred.
The file format is not supported by your connecting device. When you transfer files from your Mac to another storage device, check the file system compatibility.
Check and change the permission
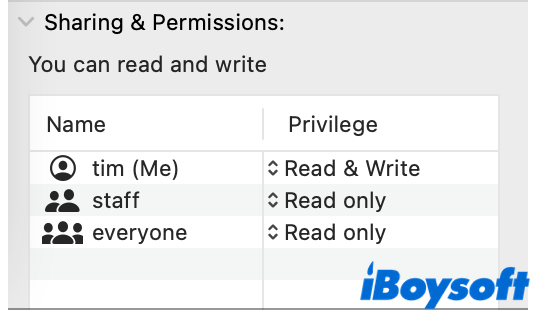
The file permission determines who can read and write files on your Mac computer. You can change permission settings for a file, folder, or disk in the Finder. Hopefully, the Mac error code 1407 will disappear when you have the correct permissions.
Step 1. Right-click on the file > Get Info.
Step 2. Scroll down to Sharing & Permissions section.
Unlock the file from the system
Step 1. Similarly, right-click on the item and choose Get Info.
Step 2. Under General, check if the box in front of Locked is ticked or not. If the file is locked, uncheck the box to set it free.
Alternatively, you can run sudo commands in Terminal to unlock a file. Here’s how:
Step 1. Bring out Terminal from Finder > Applications > Utilities.
sudo chflags – R nouchg P#
P# should be changed to the path of the file you want to unlock. To add the path automatically, drag and drop the file to the command line.
Step 3. You’ll be asked to enter the password. Enter it to confirm the change.
Quit Finder by force
If your file is being occupied by Finder or any other programs, you can force quit apps to fix the Mac error code 1407.
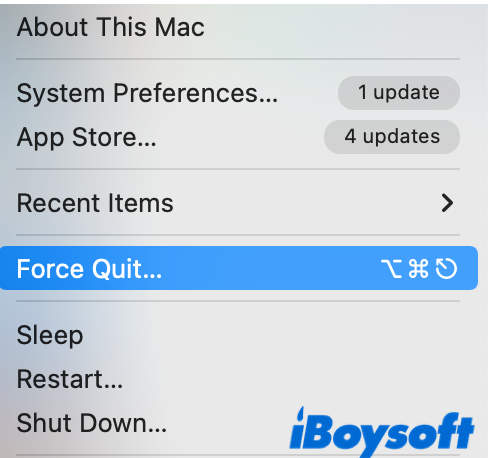
Step 1. Click on the Apple menu in the top-left corner of your screen and a context menu list should appear.
Step 2. Click the Force Quit option and all running applications will show up in the list. Select Finder and click on the Relaunch button.
If you know the exact program that’s keeping your file up, click on it and choose Force Quit. Then you should be able to delete and transfer the file without any hassle.
Format the drive with an Apple supported file system
As mentioned above, you can’t transfer data to external storage media that’s not holding a compatible file system with the macOS. One example is that NTFS drives are read-only on Mac. Lucky you, you can format the drive into a macOS-compatible one to fix the Mac error code 1407.
One thing you need to know is that formatting will erase everything on your drive. Therefore, before formatting, you should either prepare a full copy of your data or recover data from the drive first.
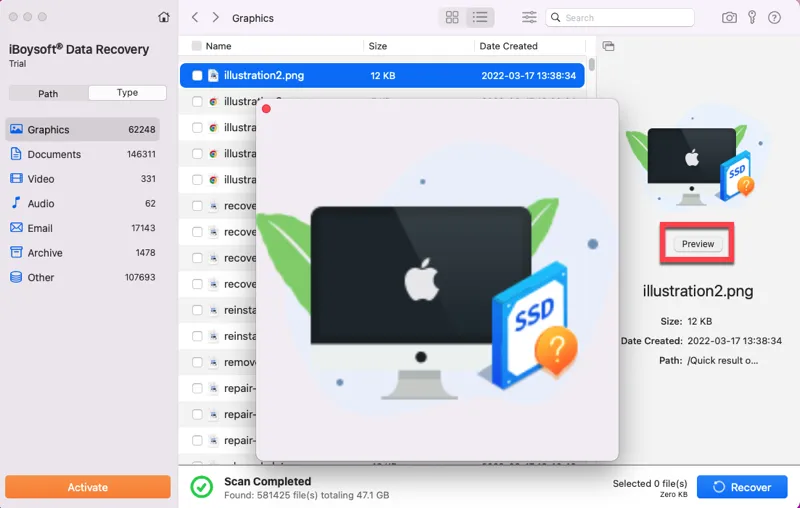
iBoysoft Data Recovery for Mac is versatile Mac data recovery software that fully meets your data recovery needs in all cases. It is possible to successfully restore all deleted and lost data from portable HDDs, SSDs, SD cards, USB drives, and other storage on your Mac. It can also recover data from corrupted external hard drives or formatted ones.
To use iBoysoft Data Recovery for Mac:
Step 1. Download & install iBoysoft Data Recovery for Mac.
Download iBoysoft Data Recovery for Mac for free and finish installation within a few clicks. Remember to enable Full Disk Access and allow system extensions during the initial installation. Then launch it in Finder > Applications.
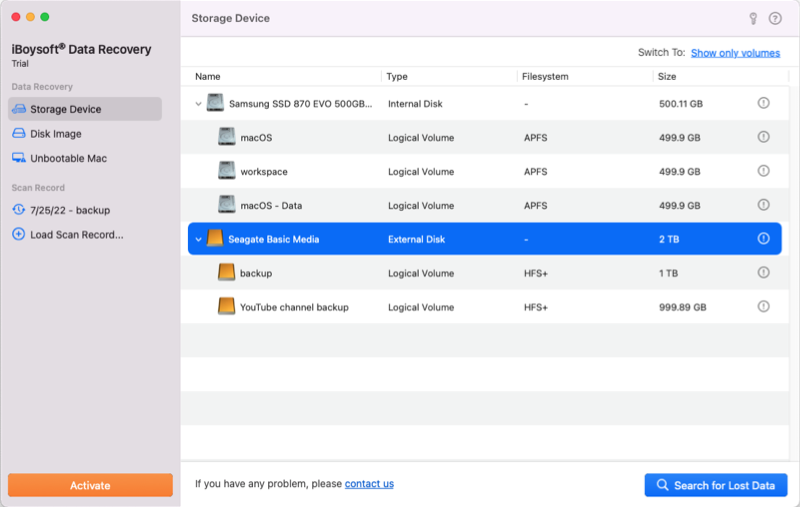
Step 2. Choose and scan your external drive.
Under the Data Recovery column, choose Storage Device to find your external disk, then click Search for Lost Data to begin the scan process.
Step 3. Preview and recover data.
Filter files using path and type, then preview the files that can be recovered. Click the Recover button after selecting the desired files. The restored files should be saved in a different location.
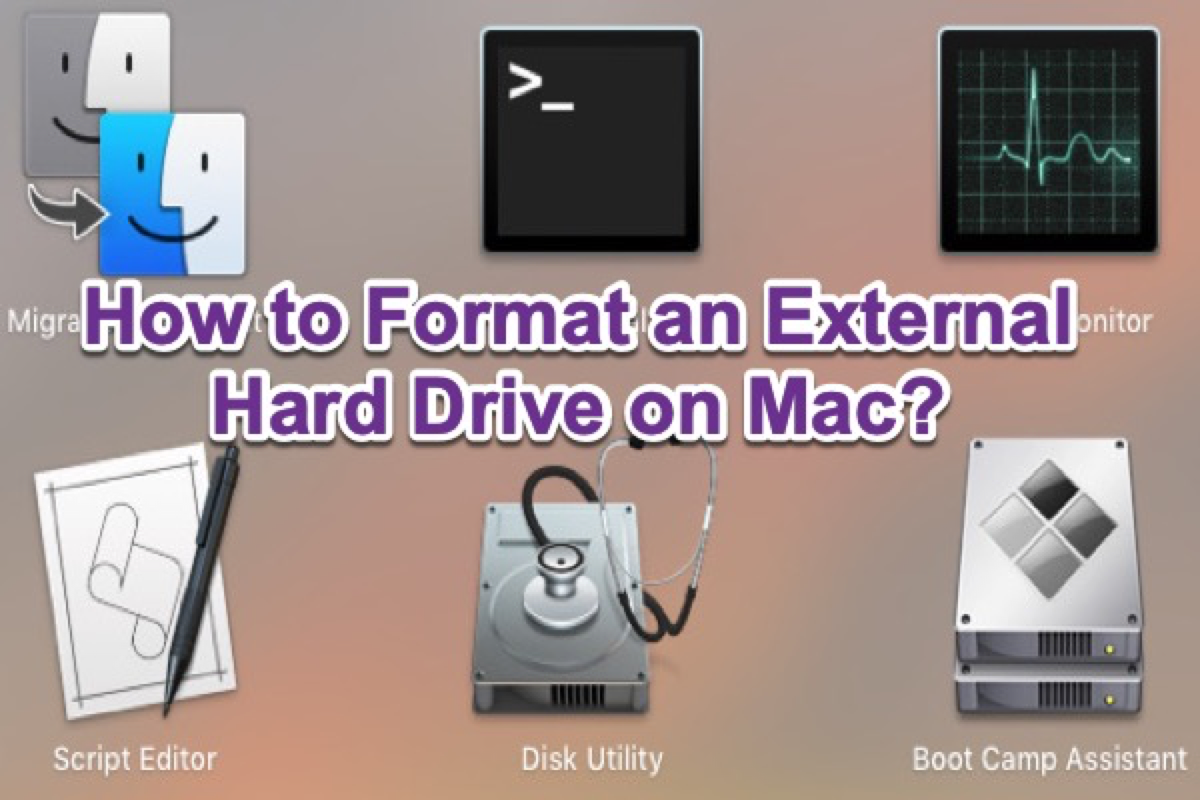
Once you’ve recovered important files from the incompatible drive, you can check the article below for a detailed guide on how to format a drive on Mac.
How to Format an External Hard Drive on Mac?
Conclusion
FAQs about Mac error code 1407
You can fix error code 1407 on Mac by changing file permissions, unlocking the file, force-quitting Finder, or formatting the external storage media. Then you should be able to move the item to Trash and drag-drop files to external hard drives.
If an item is locked by the system, you have to unlock it first before moving it to Trash. First, right-click on the object, then click File > Get Info (or press Command + I), and then uncheck the Locked checkbox to unlock it.
“The operation can’t be completed because an unexpected error occurred. (Error Code -1407).”
इस पोस्ट को हिंदी में पढ़ने के लिए यहां क्लिक करें
This blog lists the reasons behind the error code 1407 and some effective solutions to resolve it.
Reasons behind Apple Error Code 1407
Below we have mentioned some common reasons that may result in the error code 1407 on Mac:
Hard disk fails to execute read/write permissions
Unsupported drive volume formats
The file is locked
The file is being used by another program
Also Read:Why is Safari not Working after Update?
Methods to Fix Mac Error Code 1407
Method 1: Force Quit the Finder
Simultaneously press the Option + Command + Esc keys to open the Force Quit window.
Select Finder from the available options and then click on Force Quit, followed by Relaunch.
Lastly, try to delete or move your file.
Method 2: Unlock the File
Select the file you want to delete or move. Then, go to File menu and select Get Info.
Make sure to unmark the locked checkbox to unlock the file.
Follow the below-given steps to unlock the file using Terminal:
Go to Applications, followed by Utilities and Terminal to launch the Terminal option.
Type sudo chflags – R nouchg P# in the Terminal window and then click on Return.
Here, you have to replace P# with the path of the file or folder you want to unlock.
When prompted, enter the password. It will unlock the locked file or folder.
Method 3: Use Disk Utility
Start or restart your Mac that throws the error code 1407.
Then, press and hold the Command + R keys until Apple logo appears. This boots your Mac into macOS Recovery Mode.
Further, select Disk Utility from the macOS Utilities window and then click on Continue to launch Disk Utility.
Then, select the startup disk from the sidebar and then click on First Aid.
Click on Run to begin the Mac startup disk repair process and wait until the repair process completes.
Method 4: Reinstall macOS
Try to reinstall macOS if the Disk Utility repair method fails. Here’re the steps to reinstall macOS:
Note: Make sure to back up your startup disk using Time Machine or save your files to an external hard drive before reinstalling macOS as it erases your Mac storage drive.
Start or restart your Mac.
Then press and hold the Command + R keys and release them when the Apple logo appears.
Mac boots into macOS Recovery Mode.
Select Reinstall macOS from the macOS Utilities window and then click Continue.
When prompted, erase the Mac storage drive and follow the on-screen instructions.
Once you have reinstalled macOS, restore the backed-up files to your Mac storage drive.
Also Read: How to Recover Data after macOS update?
Use Free Mac File Recovery Software
If you end up losing your crucial data while resolving the error 1407, use a Mac data recovery software, such as Stellar Data Recovery for Mac to recover your lost or deleted data. It is a DIY software that effectively recovers data after emptying Trash, crashed Mac, drive corruption, and macOS upgrade. It allows recovery of deleted documents, photos, and audio files with ease. The software helps regain data lost due to any logical data loss situation and is 100% accurate and efficient in recovering data. The software is compatible with macOS Ventura 13.0 and lower versions.
Note: Stellar also provide free Mac data recovery software. It offers free scan, free preview, and up to 1 GB of free data recovery to help you determine its effectiveness. However, to recover unlimited data, you can upgrade to the Standard, Professional, Premium, or Technician edition of the software. Also, all the editions of Stellar Data Recovery for Mac software come with a 30-day money-back guarantee.
Finder’s trash can is an amalgam of several different directories:
~/.Trash/
/.Trashes/<uid>/ on each volume (including the startup volume)
e.g. /Volumes/Big Media Volume/.Trashes/501/
Most trash operations will move the trashed item to the directory under your home directory. If you trash something on an separate volume, however, Finder will move the item into the volume’s /.Trashes/<uid>/ directory instead (because moving a file to a location on the same volume is very fast, but copying a file from some other volume to your home directory’s trash directory could be quite slow).
Try checking your main trash directory (in a Terminal window):
ls -ld ~/.Trash
If the result does not look like start with drwx------ and show your user’s “short name” twice (the second is actually a group name), then your personal trash directory has probably been fouled. You can move it aside then logout and login again:
cd ~ && mv .Trash .Trash.old
# now logout and re-login
This should create a new ~/.Trash directory for you. You may want to investigate the contents of the .Trash.old file/directory to try to determine its origin.
If the problem is with a per-volume trash directory, you should be able to use the same idea: move it aside, eject it, then remount it (disconnect and reconnect an external disk, reopen a disk image, use Disk Utility to remount an internal volume):
cd '/Volume/whereever' && mv .Trashes .Trashes.old
# then eject and remount
You may need … && sudo mv … if the volume has “Owners Enabled”.
Summary: You may get the Apple Mac error code 1407 while deleting the files or transferring them to an external storage device. This blog lists all the possible reasons and some effective solutions to fix the error.
Sometimes, while moving files to Trash or any external storage device, like USB flash drive, SD card, HDD, or SSD, you encounter the Apple Mac error code 1407. The following error message appears on your screen:
“The operation can’t be completed because an unexpected error occurred. (Error Code -1407).”
इस पोस्ट को हिंदी में पढ़ने के लिए यहां क्लिक करें
User Query “I am trying to get rid of some applications on my Mac that I never use. But when I try to move them to Trash, I get a message with error code -1407. Any ideas?”
This blog lists the reasons behind the error code 1407 and some effective solutions to resolve it.
Reasons behind Apple Error Code 1407
Below we have mentioned some common reasons that may result in the error code 1407 on Mac:
Hard disk fails to execute read/write permissions
Unsupported drive volume formats
The file is locked
The file is being used by another program
Also Read:Why is Safari not Working after Update?
Methods to Fix Mac Error Code 1407
To fix the error code 1407, follow the below-given methods:
Method 1: Force Quit the Finder
If Finder is using the files, force quitting the Finder will help you fix the error 1407. Follow these steps:
Simultaneously press the Option + Command + Esc keys to open the Force Quit window.
Select Finder from the available options and then click on Force Quit, followed by Relaunch.
Lastly, try to delete or move your file.
Method 2: Unlock the File
You can try unlocking the file that you aren’t able to delete or move to an external storage drive. Follow the below-given steps for doing so:
Select the file you want to delete or move. Then, go to File menu and select Get Info.
Make sure to unmark the locked checkbox to unlock the file.
Follow the below-given steps to unlock the file using Terminal:
Go to Applications, followed by Utilities and Terminal to launch the Terminal option.
Type sudo chflags – R nouchg P# in the Terminal window and then click on Return.
Here, you have to replace P# with the path of the file or folder you want to unlock.
When prompted, enter the password. It will unlock the locked file or folder.
Method 3: Use Disk Utility
You can try repairing your storage drive using the Disk Utility to fix the error code 1407. For doing so, follow the below-given steps:
Start or restart your Mac that throws the error code 1407.
Then, press and hold the Command + R keys until Apple logo appears. This boots your Mac into macOS Recovery Mode.
Further, select Disk Utility from the macOS Utilities window and then click on Continue to launch Disk Utility.
Then, select the startup disk from the sidebar and then click on First Aid.
Click on Run to begin the Mac startup disk repair process and wait until the repair process completes.
Method 4: Reinstall macOS
Try to reinstall macOS if the Disk Utility repair method fails. Here’re the steps to reinstall macOS:
Note: Make sure to back up your startup disk using Time Machine or save your files to an external hard drive before reinstalling macOS as it erases your Mac storage drive.
Start or restart your Mac.
Then press and hold the Command + R keys and release them when the Apple logo appears.
Mac boots into macOS Recovery Mode.
Select Reinstall macOS from the macOS Utilities window and then click Continue.
When prompted, erase the Mac storage drive and follow the on-screen instructions.
Once you have reinstalled macOS, restore the backed-up files to your Mac storage drive.
Also Read: How to Recover Data after macOS update?
Use Free Mac File Recovery Software
If you end up losing your crucial data while resolving the error 1407, use a Mac data recovery software, such as Stellar Data Recovery for Mac to recover your lost or deleted data. It is a DIY software that effectively recovers data after emptying Trash, crashed Mac, drive corruption, and macOS upgrade. It allows recovery of deleted documents, photos, and audio files with ease. The software helps regain data lost due to any logical data loss situation and is 100% accurate and efficient in recovering data. The software is compatible with macOS Ventura 13.0 and lower versions.
Also Read: Top 10 Data Recovery Software for Mac [2022]
Note: Stellar also provide free Mac data recovery software. It offers free scan, free preview, and up to 1 GB of free data recovery to help you determine its effectiveness. However, to recover unlimited data, you can upgrade to the Standard, Professional, Premium, or Technician edition of the software. Also, all the editions of Stellar Data Recovery for Mac software come with a 30-day money-back guarantee.
Summing It Up
Following the methods mentioned in this blog, you would surely be able to fix the Apple Mac error code 1407. If you experience any unexpected data loss while resolving the error code, then choose a Mac data recovery software to recover lost data on your macOS Ventura 13.0 or earlier versions.
В этом практическом совете мы расскажем вам, как исправить ошибку -1407 на вашем Mac. Ошибка возникает, когда файлы больше не могут быть перемещены из Finder в корзину.
Исправить ошибку Mac -1407: восстановить права доступа к корзине
Прежде чем вы попробуете один из следующих методов решения, часто достаточно перезагрузить ваш Mac. Ошибка обычно исчезает таким образом.
Однако возможно, что права доступа к корзине больше не верны.
В таком случае, найдите «утилиту жесткого диска» в Finder и откройте ее.
Отметьте там свой том жесткого диска и нажмите кнопку «Проверить права доступа к тому».
В случае возникновения ошибки вы можете нажать «Восстановить права доступа к тому».
Второй способ решения: удалить неисправные файлы из корзины
В вашей корзине могут быть файлы, которые следует удалить или больше не распознавать как находящиеся там, даже если они все еще там.
Тогда воспользуйтесь бесплатным инструментом «Оникс». Программа может быть использована для обнаружения и удаления неисправных файлов.