
Windows 7 Enterprise Windows 7 Home Basic Windows 7 Home Premium Windows 7 Professional Windows 7 Starter Windows 7 Ultimate More…Less
INTRODUCTION
This article describes how to work around various issues that occur when you try to back up or to restore files or folders by using Windows Backup and Restore. When this Windows Backup and Restore issue occurs, you receive the following errors:
-
0x80070001
-
0x81000037
-
0x80070003
Additionally, you may be unable to browse to the files and folders that you want to restore in the File Restore Wizard.
For detailed information, see the “Symptoms,” “Cause,” “Workaround,” and “More information” sections of this article.
Symptoms
Issues that occur when you try to back up files
Issue 1
You receive the following error code when you try to back up files or folders by using Windows Backup and Restore:
0x80070001 (Invalid Function)This issue occurs when you try to back up a specific library or when you accept the default settings in Windows Backup and Restore.
Click here to view the resolution for this issue.
Issue 2
You receive an error message that resembles the following when you try to back up files or folders by using Windows Backup and Restore:
0x81000037: Windows Backup failed while trying to read from the shadow copy on one of the volumes being backed up
This issue occurs when you try to back up a specific library or when you accept the default settings in Windows Backup and Restore.
Click here to view the resolution for this issue.
Issues that occur when you try to restore files
Issue 3
You cannot use the Browse for files or the Browse for folders functionality to browse to the files and folders that you want to restore in the File Restore Wizard.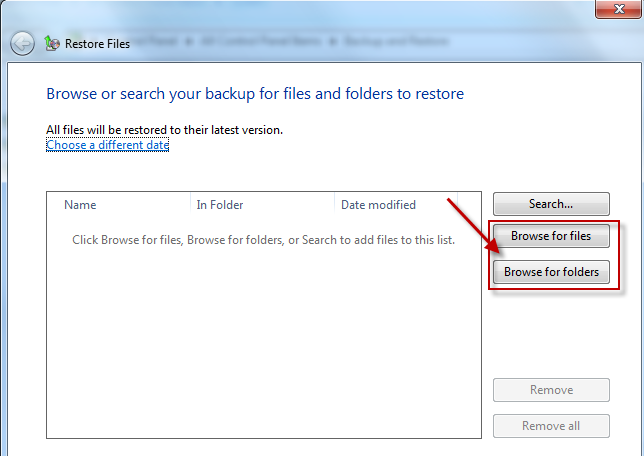
Click here to view the resolution for this issue.
Issue 4
You receive the following error code when you try to restore files or folders in a library by using Windows Backup and Restore:
0x80070003
Click here to view the resolution for this issue.
Cause
These issues occur because the folders or libraries that you are trying to back up or restore include a reparse point.
Reparse points resemble Windows shortcuts or to Unix symbolic links. A reparse point may be used to point to a file that is temporarily relocated on a different drive. For example, a reparse point would allow a folder such as C:DVD to point to Drive E, the actual DVD drive.
Cause of issues that occur when you try to back up files
Issue 1
This issue occurs if the reparse point points to a volume that uses the FAT file system.
Click here to view the resolution for this issue.
Issue 2
This issue occurs if the reparse point is a mounted volume that contains compressed files (for example, multimedia files, .zip files, and so on).
Click here to view the resolution for this issue.
Cause of issues that occur when you try to restore files
Issue 3
This issue occurs if the reparse point points to a mount point or a directory junction to the root of another volume.
Click here to view the resolution for this issue.
Issue 4
This issue occurs if the reparse point is a mount point or junction point to the root of another volume and if one of the following conditions is true:
-
The reparse point directory is deleted and you try to restore files or folders to their original location.
-
You click to select the Restore the files to their original subfolders check box in the File Restore Wizard and you try to restore files or folders to an alternative location.
Click here to view the resolution for this issue.
Workaround
Work around issues that occur when you try to back up files
Issue 1 and Issue 2
To work around these issues, remove the reparse point from the library, and then run the backup wizard again. To back up content for this reparse point (in this case, the FAT volume or the mounted volume), select the absolute path of this location in the Windows Backup configuration user interface.
To locate reparse point folder or its subfolder, follow these steps:
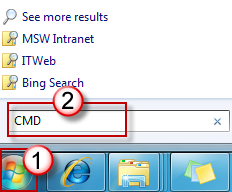
-
Click Start button, type CMD in the Search program and files box and then press Enter.

-
In the Command Prompt window, type DIR /AL /S and then press Enter. The list of JUNCTION (one type of reparse point) list is displayed.
Note You see several entries that say «junction» and the location that the entries point to (“junction point” is another name for “reparse point”). When a program tries to write to a directory that is really a reparse point, those files are sent (completely blindly to that program) to the other directory instead.

To delete mounted volume reparse point, follow these steps:
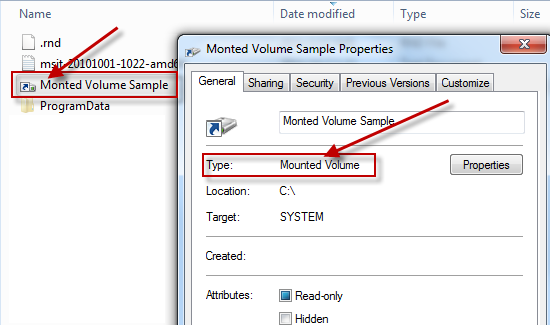
-
Locate the reparse point you found, right click the reparse point icon and click Properties.
-
In the General tab, confirm the folder Type is Mounted Volume and then delete this folder.
Work around issues that occur when you try to restore files
Issue 3
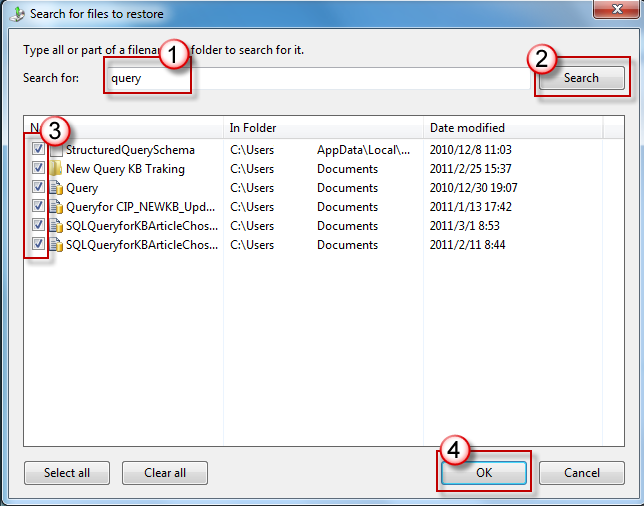
To work around this problemissue, use the Search functionality in the File Restore Wizard to locate the files. To do this, follow these steps:
-
Click Search.
-
Enter the keywords in the Search for box, and then click Search.
-
Click to select the files that you want to restore from the list, and then click OK.
Issue 4
To work around this issue, re-create the missing directory. To do this, follow these steps:
-
If the reparse point is deleted, you receive the following example error message:
-
Follow the path that is pointed out in the error and create the corresponding folder. In this example, you create the folder MyFolder under Drive C.
-
Try the restore operation again.
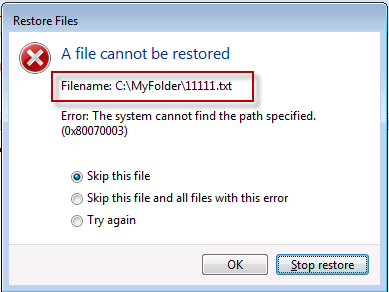
Additionally, click to clear the Restore the files to their original subfolders check box when you run the File Restore Wizard.
More Information
By design, Windows Backup does not traverse reparse points on a computer. However, if a reparse point is directly added to a Windows 7 Library, or if any of the child nodes of a reparse point is directly added to a Windows 7 Library, Windows Backup traverses these locations. This could cause several issues during the backup process.
Note If the reparse point is added to a folder that is already part of a Windows 7 Library, Windows Backup skips the reparse point, and no problem occurs.
For more information about reparse points, visit the following Microsoft Web sites:
Need more help?
Want more options?
Explore subscription benefits, browse training courses, learn how to secure your device, and more.
Communities help you ask and answer questions, give feedback, and hear from experts with rich knowledge.
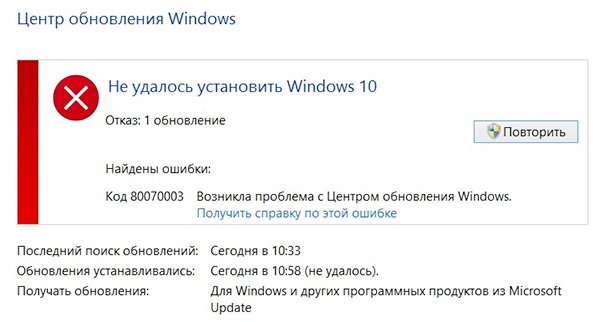
Некоторые пользователи при обновлении операционной системы Windows 10 сталкиваются с такой неприятностью, как ошибка с кодом 0x80070003. Она может быть вызвана разными причинами. В данной статье рассмотрим несколько наиболее простых и действенных способов ее устранения.
В Windows 10 имеются встроенные инструменты для устранения различных неполадок, в том числе и ошибок в работе «Центра обновления». Чтобы воспользоваться таким средством, нам потребует открыть «Параметры».
- Кликнем правой клавишей мыши на кнопку «Пуск» в панели задач и выберем в списке команд в ее контекстном меню пункт «Параметры».
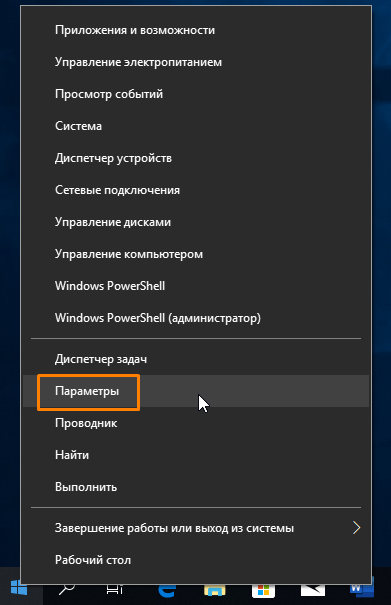
Запускаем «Параметры»
- В открывшемся окне находим раздел «Обновление и безопасность».
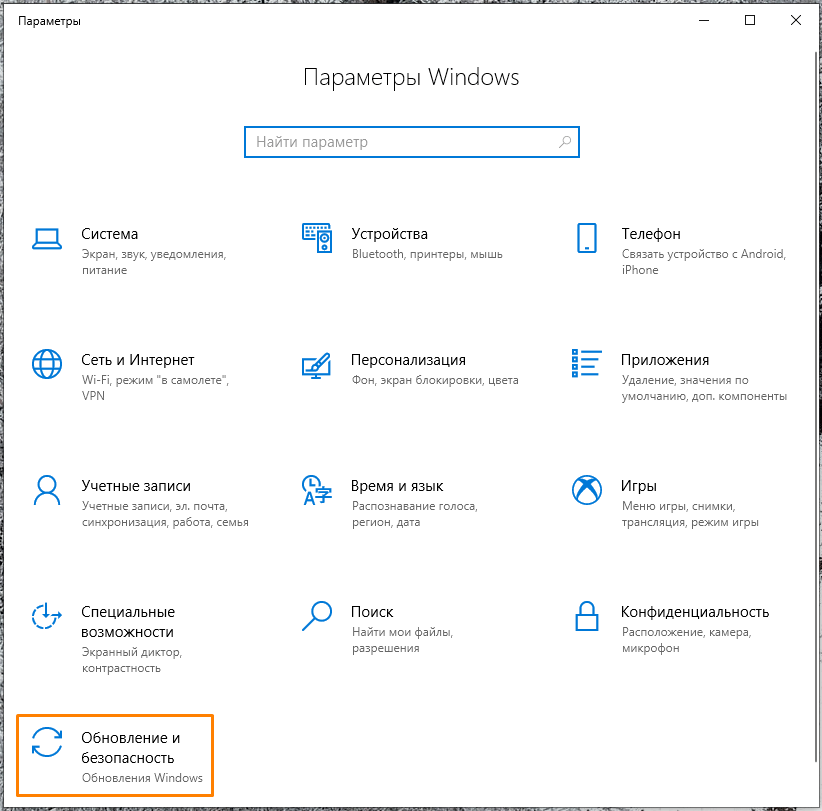
Открываем раздел «Обновление и безопасность»
- Далее в левой части окна выбираем категорию настроек «Устранение неполадок», а затем справа в секции «Запустить диагностику и устранить неполадку» кликаем на пункт «Центр обновления» и нажимаем кнопку «Запустить средство устранения неполадок».
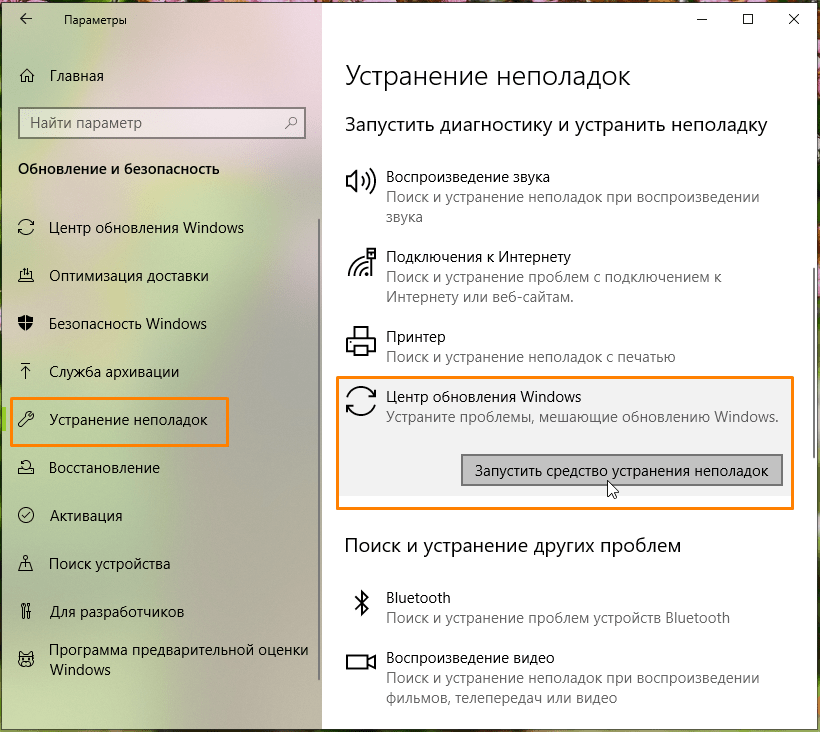
Запускаем «Средство устранения неполадок Центра обновления»
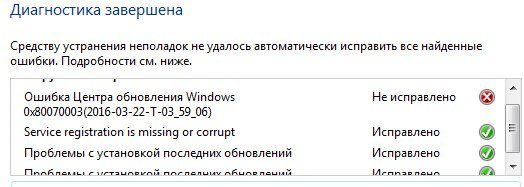
- Начнется проверка. При обнаружении проблем приложение предложит исправить их автоматически. Если модуль устранения неполадок не выявил проблему, перейдите к следующему разделу нашей инструкции.
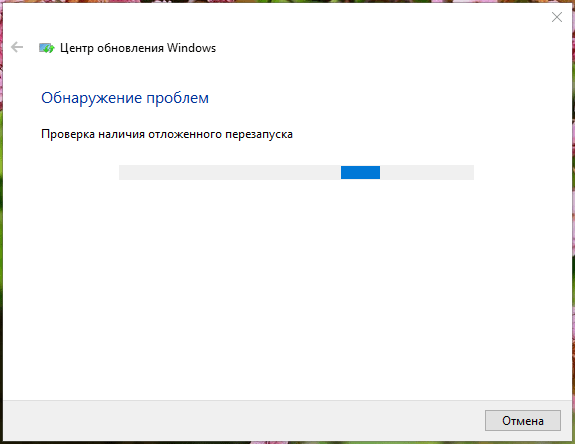
Процесс обнаружения проблем
Проверяем службы, связанные с «Центром обновления Windows»
Если какая-либо из служб, связанных с работой «Центра обновления» не запущена, это также может вызвать рассматриваемую нами ошибку 0x80070003. Следует убедиться, что тип запуска этих служб настроен верно. Сделать это можно в «Диспетчере служб».
- Нажмите на кнопку «Пуск» правой кнопкой мыши и выберите команду «Выполнить».
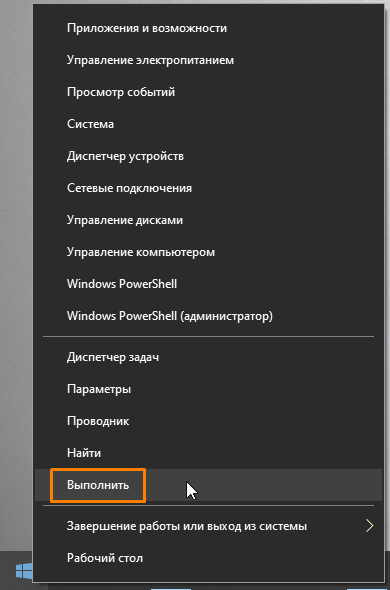
Выбираем команду «Выполнить»
- Затем в открывшемся окне введите команду services.msc и нажмите кнопку «ОК».

Запускаем «Диспетчер служб»
- В открывшемся окне «Службы» нам необходимо найти и проверить настройки запуска следующих четырех служб:
- для службы «Центр обновления» выбираем тип запуска «Вручную»;
- для службы «Фоновая интеллектуальная служба передачи (BITS)» указываем типа запуска «Вручную»;
- для таких служб, как «Службы криптографии» и «Рабочая станция», задаем вариант запуска «Автоматически».
- Для изменения типа запуска дважды кликаем на службу, чтобы открыть окно ее свойств и на вкладке «Общие» выбираем нужный тип запуска в раскрывающемся списке. Если служба не запущена в данный момент, нажимаем кнопку «Запустить», а затем «ОК» для подтверждения сделанных настроек и закрытия окна.
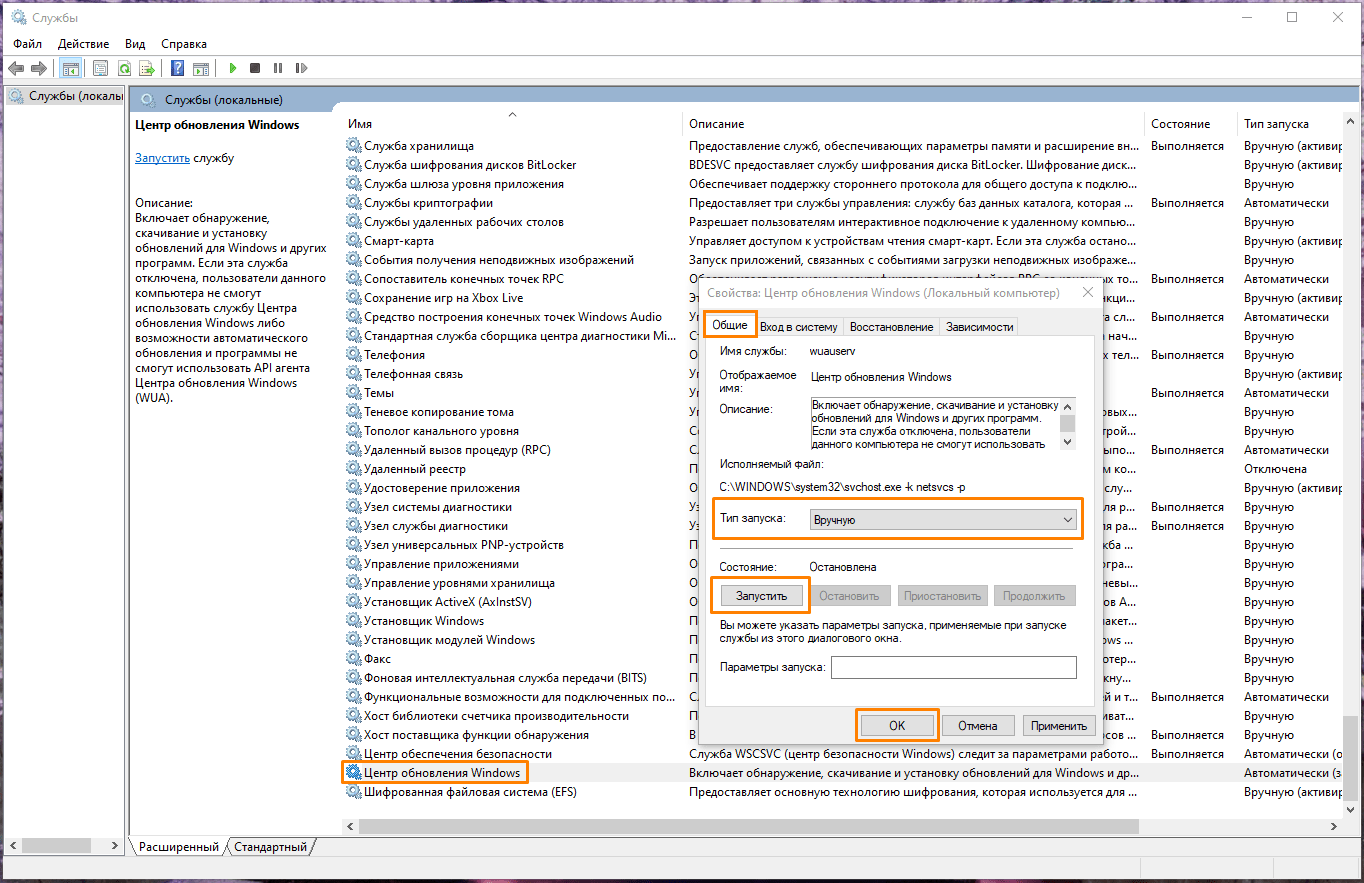
Выбираем нужный тип запуска
Проверяем системные файлы на ошибки
Причиной ошибки с кодом 0x80070003 может стать повреждение системных файлов ОС. К счастью, в Виндовс 10 имеется встроенное средство для их проверки и восстановления — утилита «System File Checker» (SFC). Для ее выполнения воспользуемся «Командной строкой», запущенной с правами администратора.
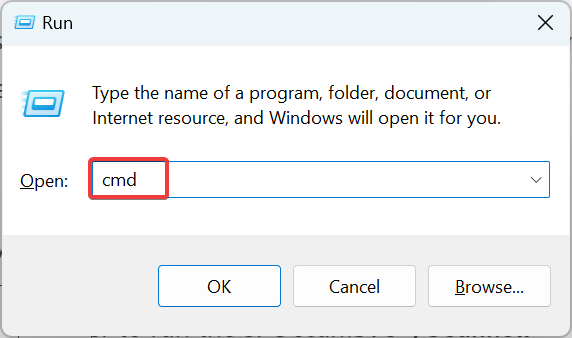
- Кликнем на значок лупы или установим курсор в строку системного поиска в панели задач и напечатаем cmd. Когда приложение «Командная строка» будет найдено, выберем в списке действий «Запуск от имени администратора».
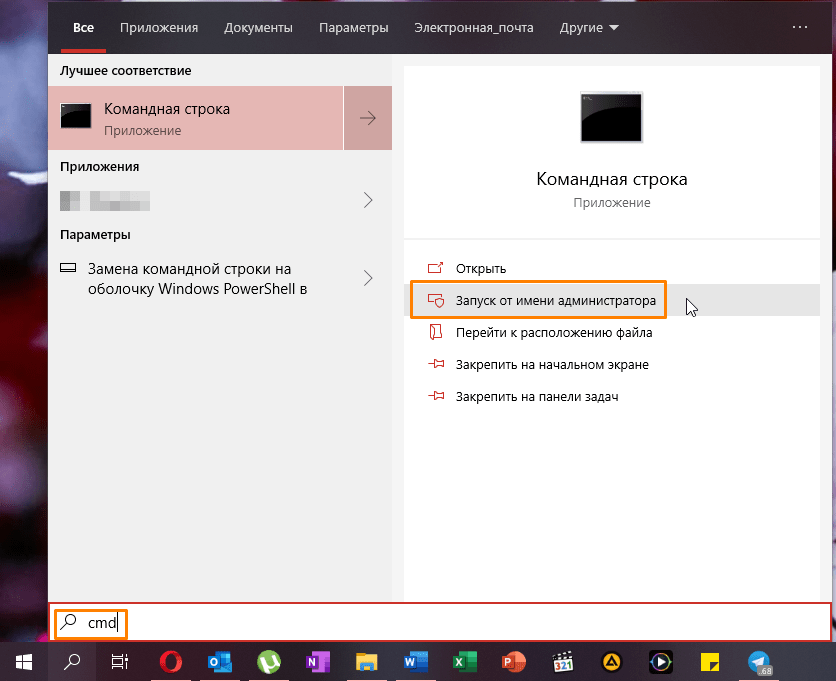
Запускаем «Командую строку» с помощью системного поиска
- Вводим команду sfc /scannow и нажимаем клавишу «Enter» для начала проверки. Если будут найдены поврежденные файлы, утилита «SFC» исправит их автоматически.
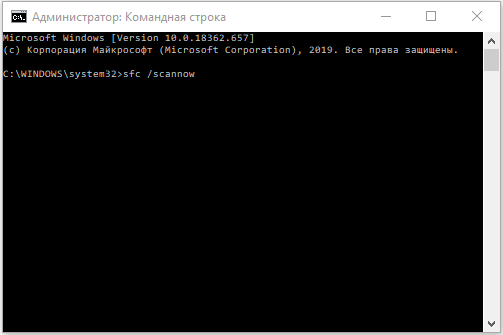
Осталось нажать «Enter» для запуска проверки
Факторов, способных вызвать ошибку с кодом 0x80070003 при обновлении Windows 10, и, соответственно, способов ее устранения, гораздо больше, чем можно рассмотреть в рамках одной статьи. Однако надеемся, что наши советы помогут вам справиться с этой неполадкой.
![]() Загрузка …
Загрузка …
Post Views: 5 941
Fix Windows Update errors with our tested solutions
by Ivan Jenic
Passionate about all elements related to Windows and combined with his innate curiosity, Ivan has delved deep into understanding this operating system, with a specialization in drivers and… read more
Updated on January 18, 2023
Reviewed by
Alex Serban

After moving away from the corporate work-style, Alex has found rewards in a lifestyle of constant analysis, team coordination and pestering his colleagues. Holding an MCSA Windows Server… read more
- The 0x80070003 update error usually arises due to issues with OS itself and can be fixed in no time.
- Restarting associated services, for instance, Windows Update, can help here.
- Other fixes include modifying the Registry and manually downloading the update, as described below.
XINSTALL BY CLICKING THE DOWNLOAD FILE
This software will repair common computer errors, protect you from file loss, malware, hardware failure and optimize your PC for maximum performance. Fix PC issues and remove viruses now in 3 easy steps:
- Download Restoro PC Repair Tool that comes with Patented Technologies (patent available here).
- Click Start Scan to find Windows issues that could be causing PC problems.
- Click Repair All to fix issues affecting your computer’s security and performance
- Restoro has been downloaded by 0 readers this month.
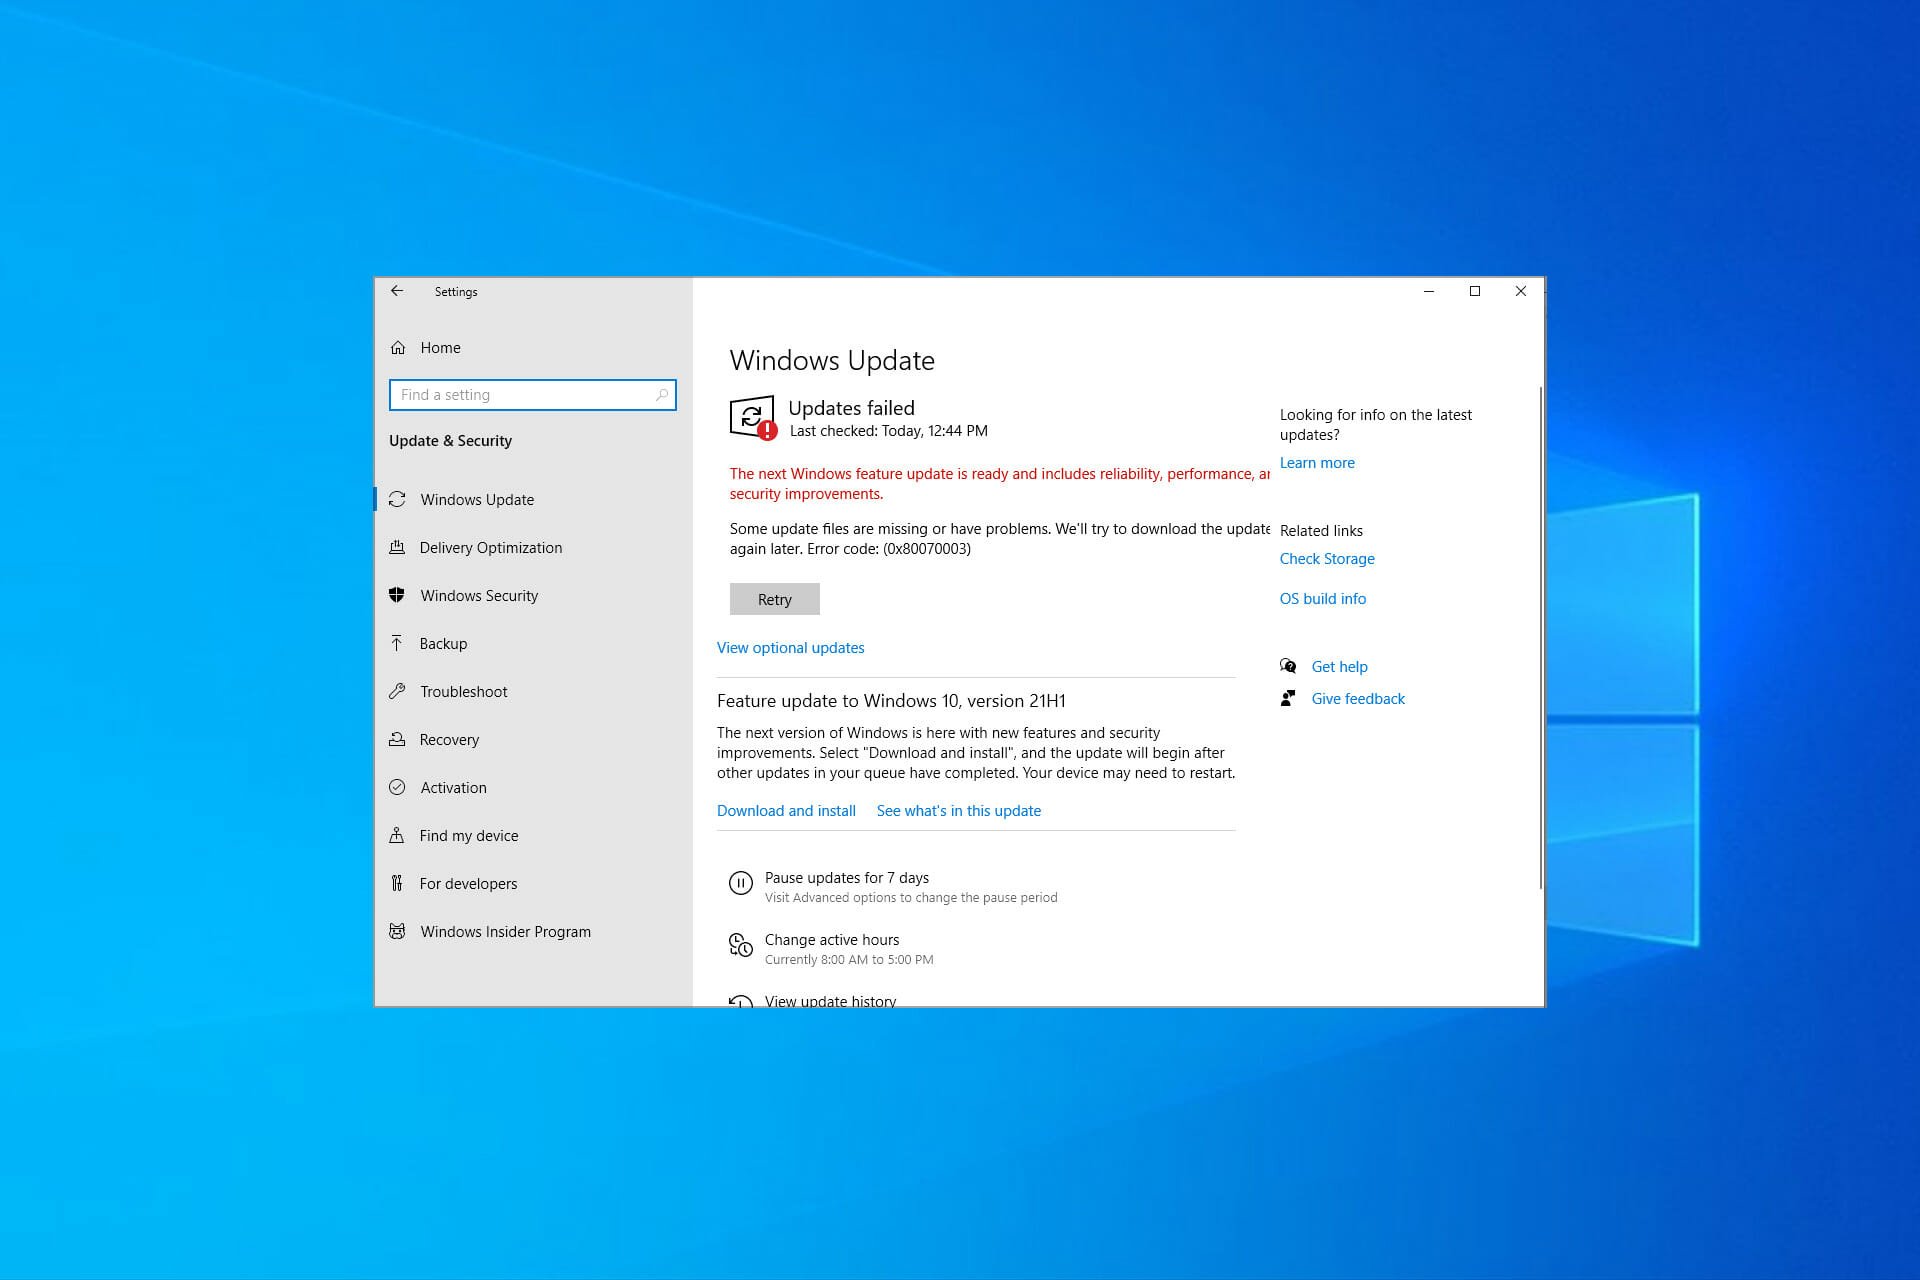
Have you tried updating your device only to get an error message on each attempt? You might have noticed that in some cases, the Windows Update process stops at around 50% and gives you the error code 0x80070003.
You are not the only one. The complete error message reads Some update files are missing or have problems. We’ll try to download the update again later. Error code: (0x80070003) with a Retry button underneath, which, too, doesn’t work in most cases.
What is error code 0x8007003?
Like any other Windows Update error, 0x80070003 prevents you from downloading the latest version of the OS. Here are some of the reasons why you might encounter the error:
- Issues with the related services – There are several critical services that need to be running for the update process to go through, in the absence of which, you are likely to get the error.
- Corrupt system files – In some cases, the error arises due to corrupt system files, which can easily be fixed by running the DISM tool and SFC scan.
- Misconfigured Registry – Oftentimes, all it takes is making some minor changes to the Registry to get the update process up and running.
- Problems with the Windows Update components – WU components play a critical role in the update process, and any issues here can trigger errors.
Here are other variations of the error:
- We couldn’t install this update but you can try again (0x80070003) – Here, you can try restarting the computer and verifying that the critical services are all up and running.
- Windows failed to install the following update with error 0x80070003 – A variation of the update error, and the solutions here should help fix things.
- Error code 0x80070003 Visual Studio / IIS (Cannot read configuration file) – Check whether the folder name matches the path for the virtual directory.
- Error 0x80070003 the system cannot find the path specified – In this case, users get the 0x80070003 Backup error.
- 0x80070003 error code Windows install in Windows 7/10/11 – Error encountered while installing Windows.
- 0x80070003 SCCM – Seen in Configuration Manager during the SCCM content transfer.
- Failure error code 0x80070003 – Modify the registry as we have shown below in order to fix this failure error.
- Status_wait_3 0x8007003 – Manually download each Windows update that you want to install in order to avoid this issue.
Without further ado, let’s just jump right in!
How do I fix error code 0x80070003?
- What is error code 0x8007003?
- How do I fix error code 0x80070003?
- 1. Modify the Registry
- 2. Run the Windows Update troubleshooter
- 3. Run the DISM and SFC scan
- 4. Restart or stop the Windows Update Service
- 5. Reset the Windows Update Components
- 6. Manually download each update
- 7. Perform an in-place upgrade
- How to fix update error 0x80070003 on Windows 11?
- 1. Run a quick SFC scan
Before we head to the full-fledged solutions, here are a few things you can try:
- Restart the computer.
- Disable any third-party antivirus or firewall installed on the computer since these could be blocking the update.
In case the two don’t work, try the solutions listed next.
1. Modify the Registry
Windows updates can run into trouble due to corrupted registry files, so you may need to change your Registry settings. Apply the provided steps below without changing other files.
1. Press Windows + R to open Run, type regedit in the text field, and hit Enter.
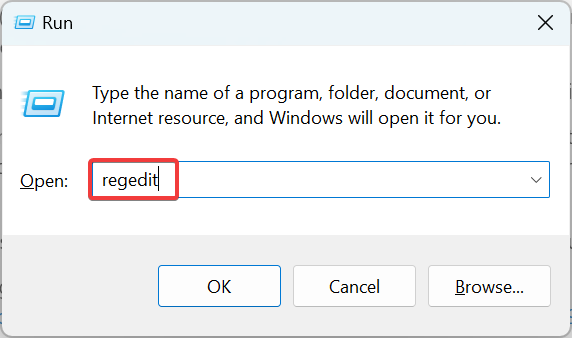
2. Click Yes in the UAC prompt.
3. Paste the following path in the address bar and hit Enter:HKEY_LOCAL_MACHINESYSTEMCurrentControlSetServicesWIMMount
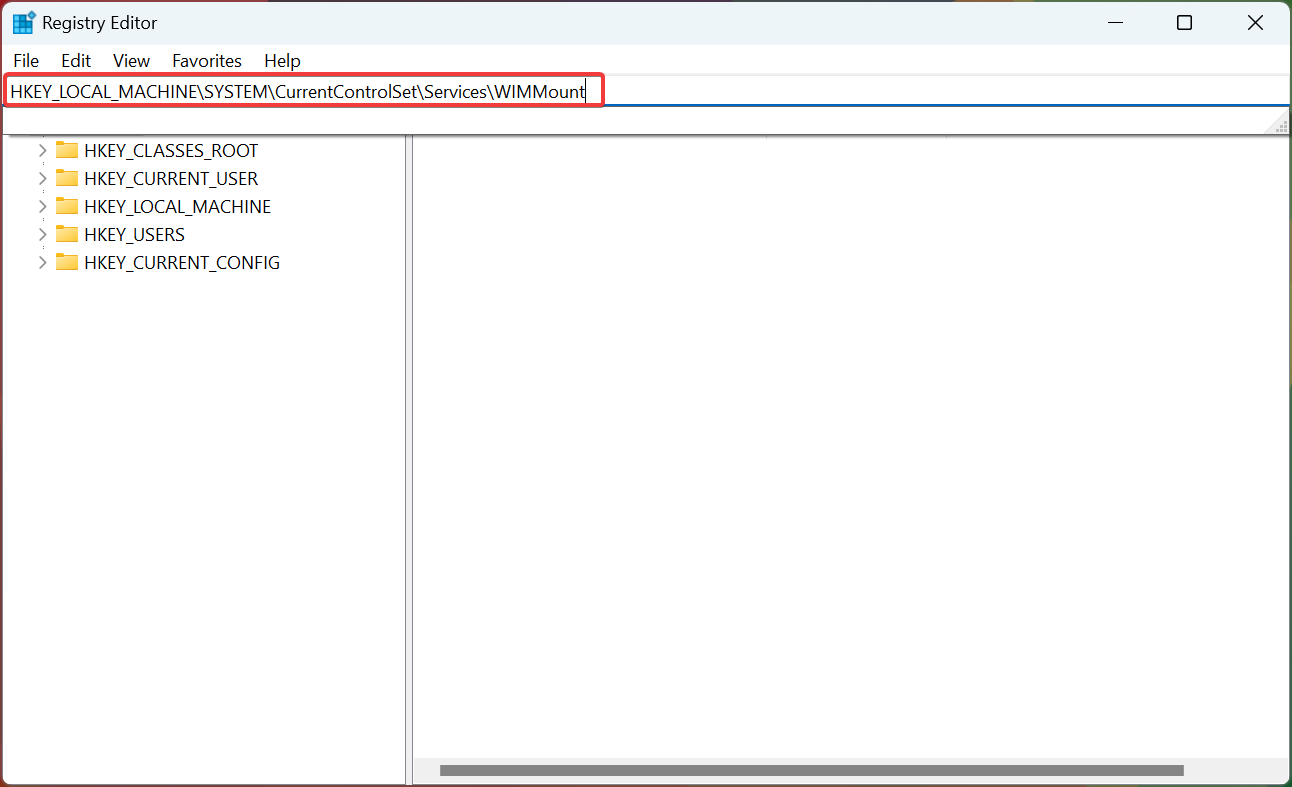
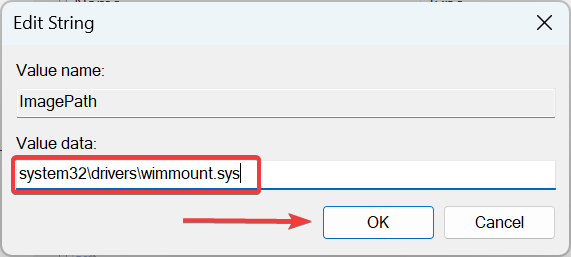
4. Now, double-click on the ImagePath entry on the right.
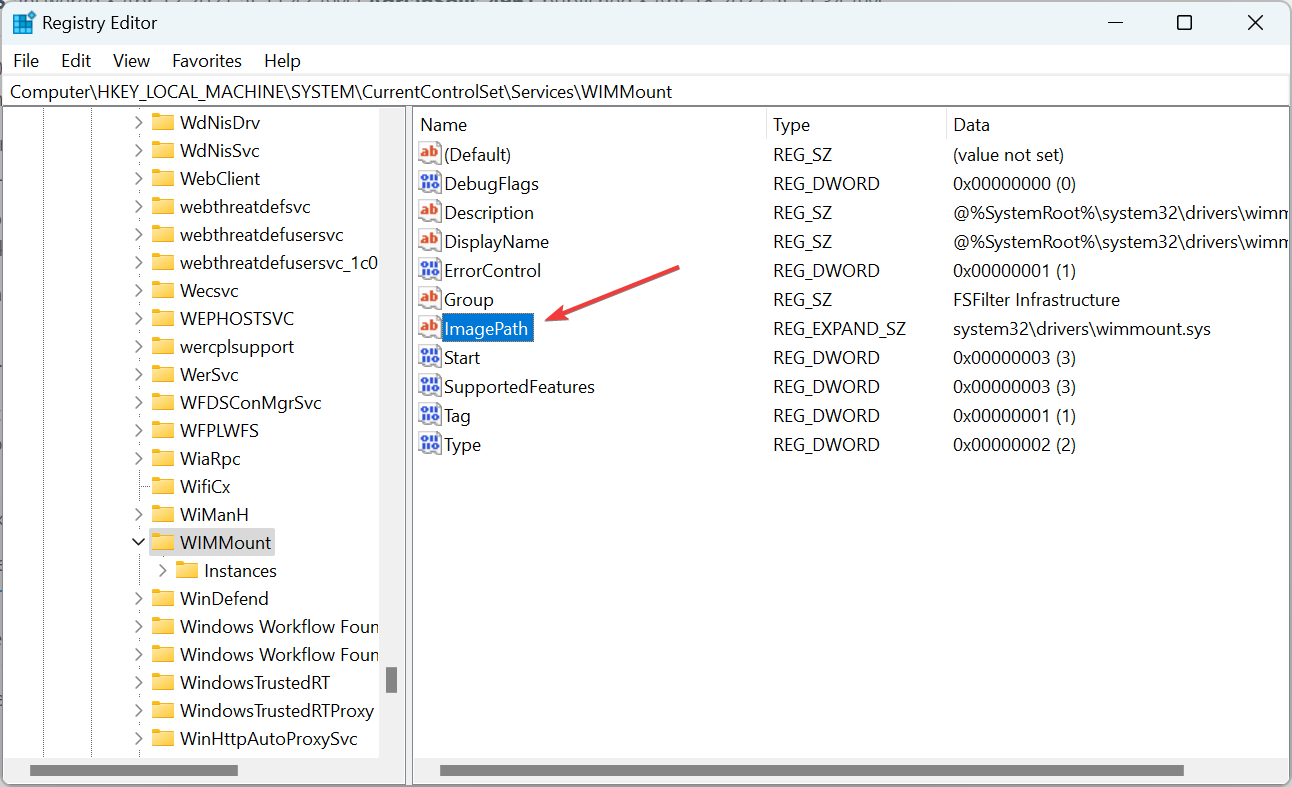
5. Make sure the Value data here has system32driverswimmount.sys listed under it. If it doesn’t, make the changes and click on OK.
Some PC issues are hard to tackle, especially when it comes to corrupted repositories or missing Windows files. If you are having troubles fixing an error, your system may be partially broken.
We recommend installing Restoro, a tool that will scan your machine and identify what the fault is.
Click here to download and start repairing.
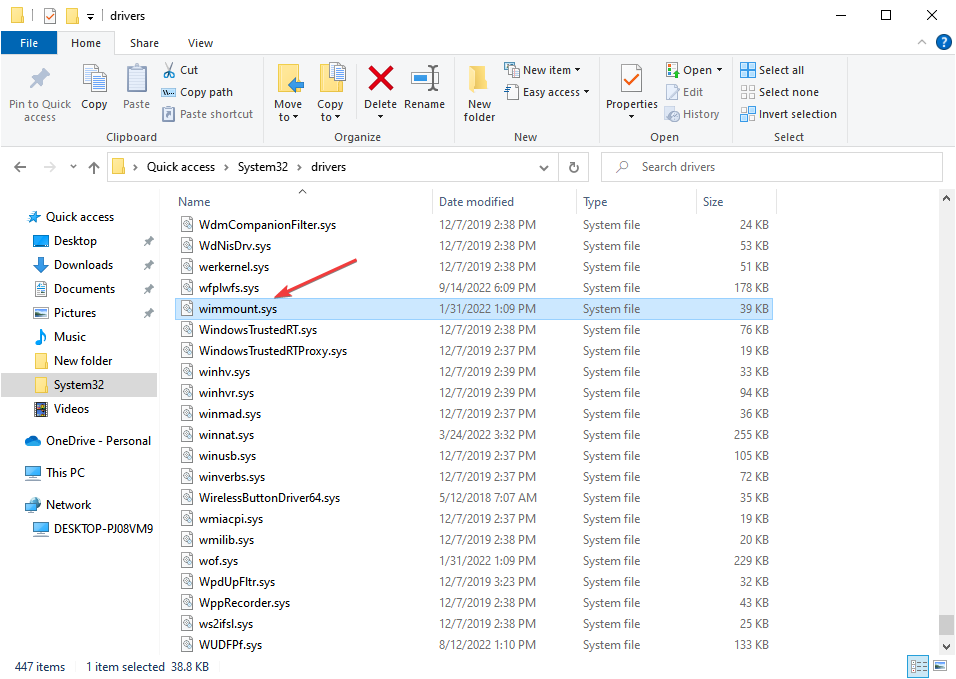
6. Now, press Windows + E to open File Explorer, paste the following path in the address bar, and hit Enter:C:WindowsSystem32drivers
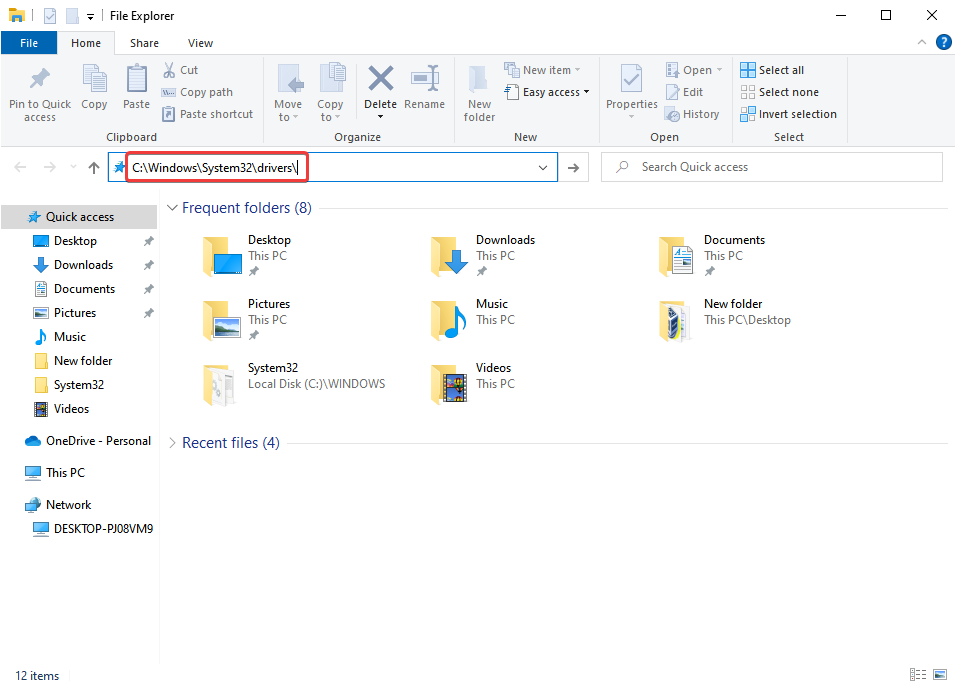
7. Verify you have the wimmount.sys file here.
8. Finally, restart the computer.
Once done, check if you can now download Windows Updates without encountering the 0x80070003 error.
2. Run the Windows Update troubleshooter
- Download Windows Update Troubleshooter.
- Once the file is downloaded, run it.
- Select one of the available options and click on Next.

- Wait for the process to finish.
- If the issue is still there, repeat the process, but select a different troubleshooter.

If you want to fix update errors and other issues with ease, Restoro is a great tool that you might want to consider.
3. Run the DISM and SFC scan
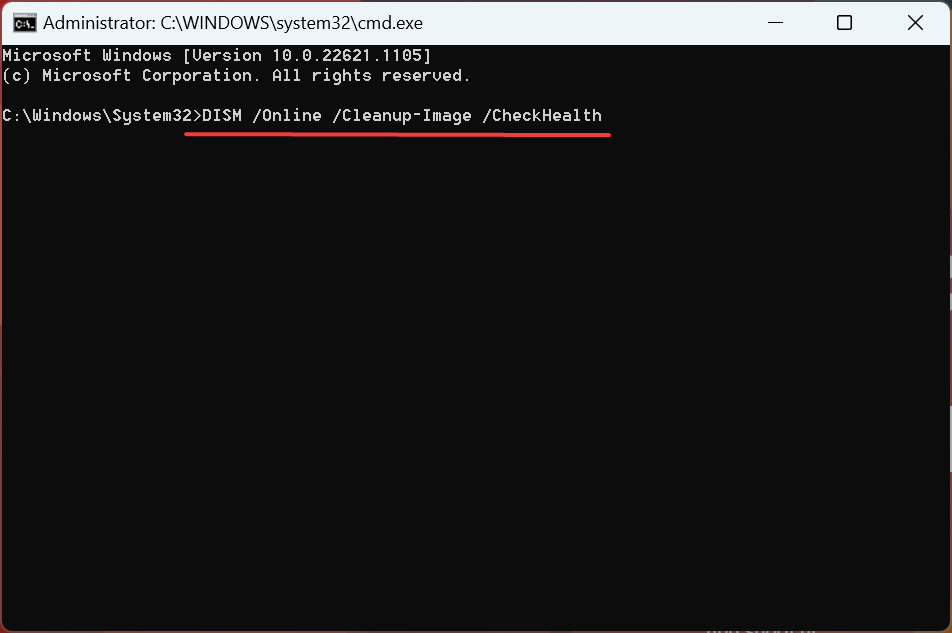
- Press Windows + R to open Run, type cmd, and hit Ctrl + Shift + Enter.

- Click Yes in the UAC prompt.
- Now, paste the following three commands one at a time and hit Enter after each:
DISM /Online /Cleanup-Image /CheckHealthDISM /Online /Cleanup-Image /ScanHealthDISM /Online /Cleanup-Image /RestoreHealth
- Next, execute the following command to run the SFC scan:
sfc /scannow - Once done, check if you are now able to install the updates.
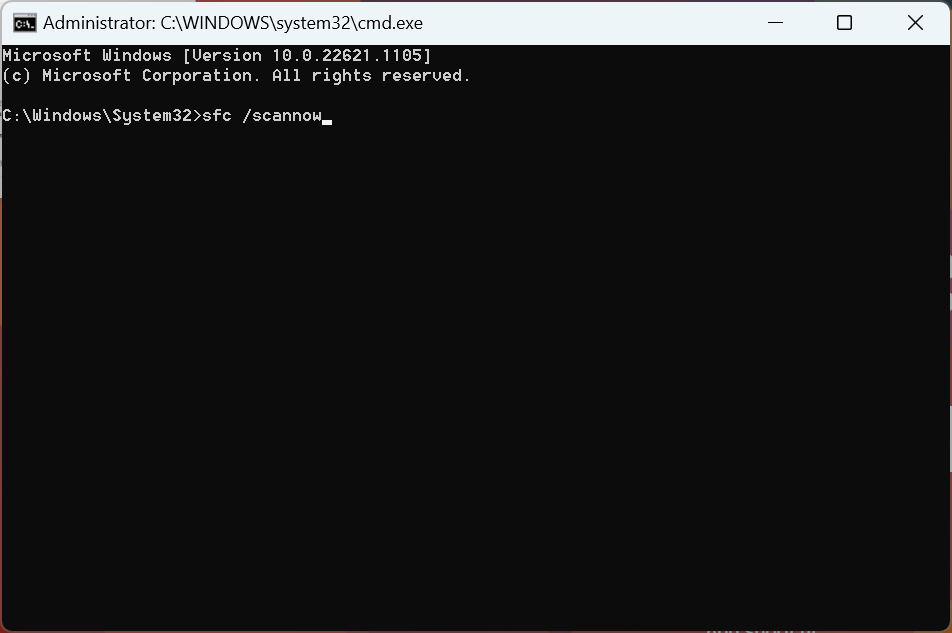
Corrupt system files are a likely reason you are getting the 0x80070003 update error in Windows, and the SFC (System File Checker) scan and DISM (Deployment Image Servicing and Management) tool should do the trick in this case.
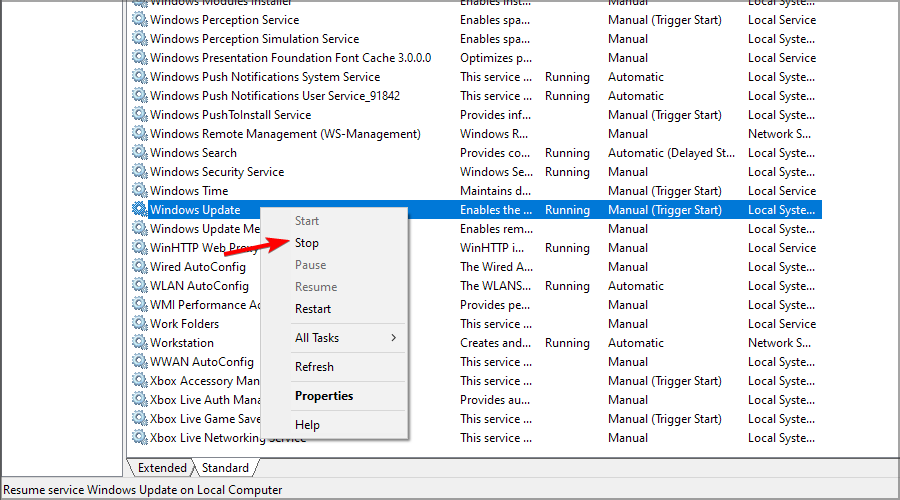
4. Restart or stop the Windows Update Service
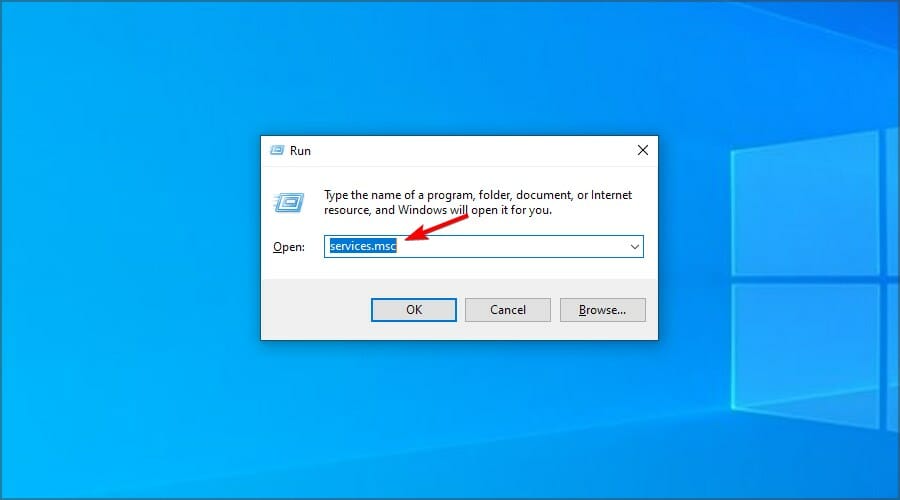
- Press Windows + R to open Run, type services.msc, and then hit Enter.
- Now, right-click on the Windows Update service, and select the Stop button.
- Reboot your PC.
- Return to the Windows Update service, right-click on it, and select Start.

This solution usually works, but if you’re having issues with services, check out what to do when the Windows Update service isn’t running.
- Windows Update is not working in Windows 10/11
- We couldn’t complete the Updates/Undoing changes
- 5+ best Windows update repair tools for Windows 10/11
- How to use the Windows Update troubleshooter in Windows 10 & 11
- Update error 0x800f0922 on Windows 10/11 [Install Failed]
5. Reset the Windows Update Components
In case the previous methods didn’t work, it could be corrupt Windows Update components to blame. Here, the simplest solution is to reset the Windows Update Components.
You can do that by running a batch file or manually executing the commands. The process is usually quick and highly effective at eliminating the 0x80070003 error with the KB5007186 update.
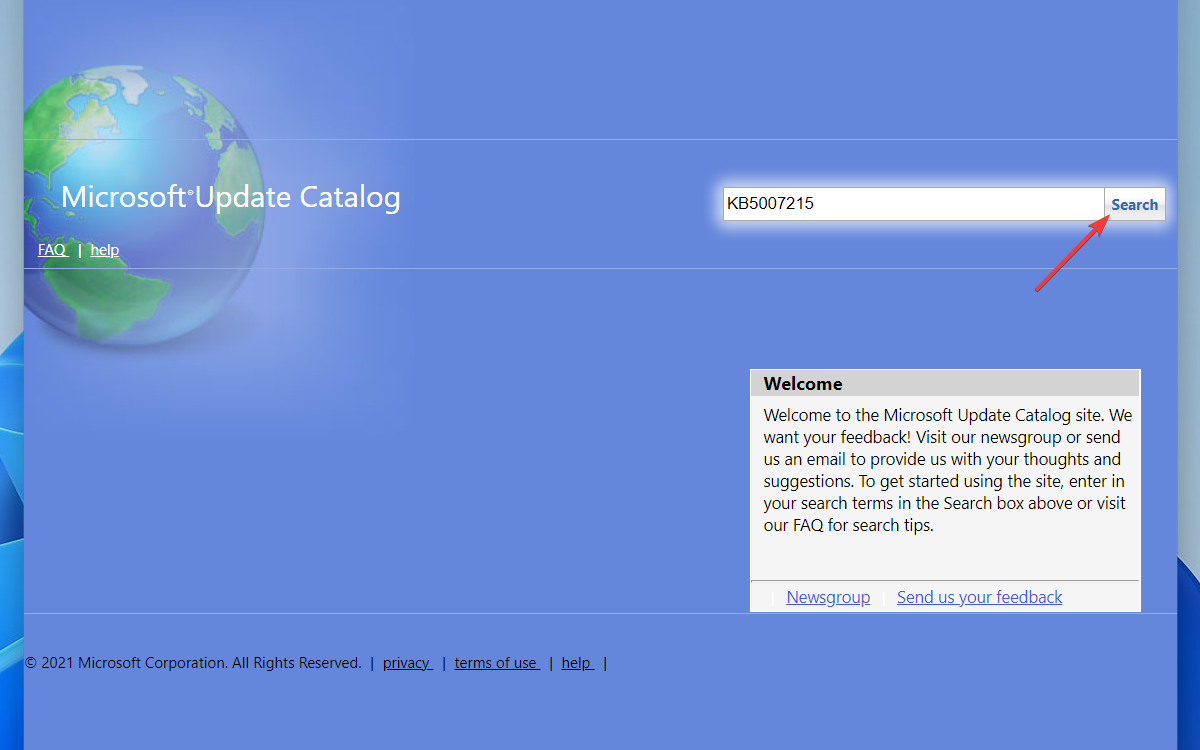
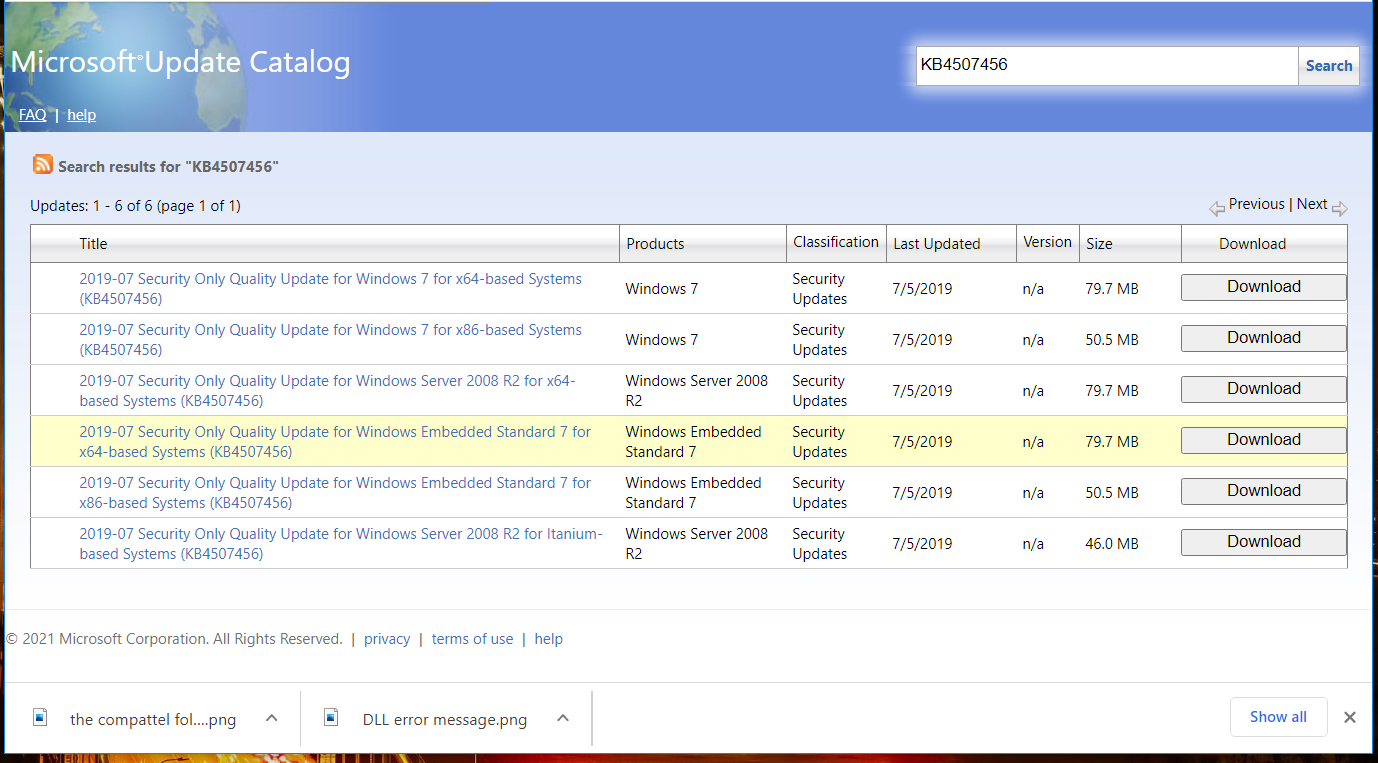
6. Manually download each update
- Visit the Microsoft Update Catalog website.
- Enter the KB number of the update you want to download.

- Now locate the update that matches your PC architecture and download it.

- Once the update is downloaded, run it and follow the instructions on the screen to install it.
7. Perform an in-place upgrade
- Visit the official Windows 10 download page and click on the Download Now button.

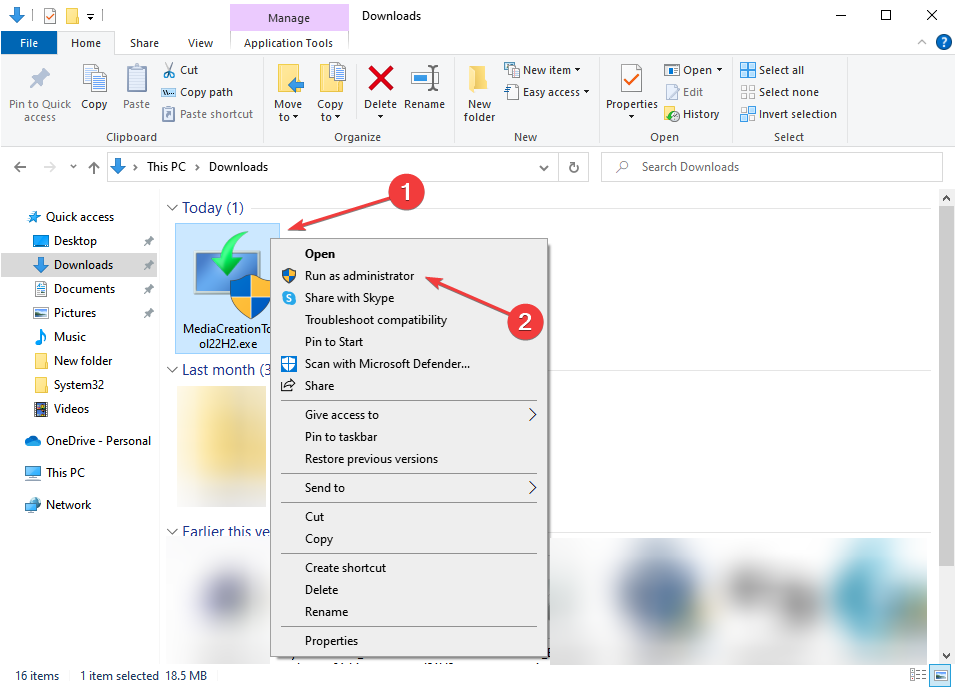
- After the tool is downloaded, right-click on it and select Run as administrator.

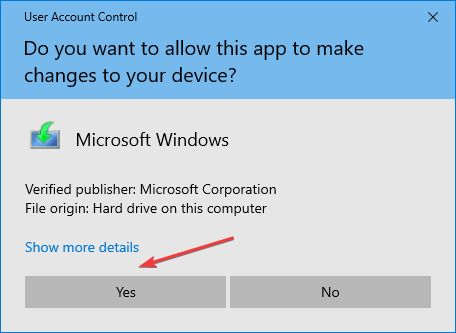
- Click Yes in the UAC prompt.

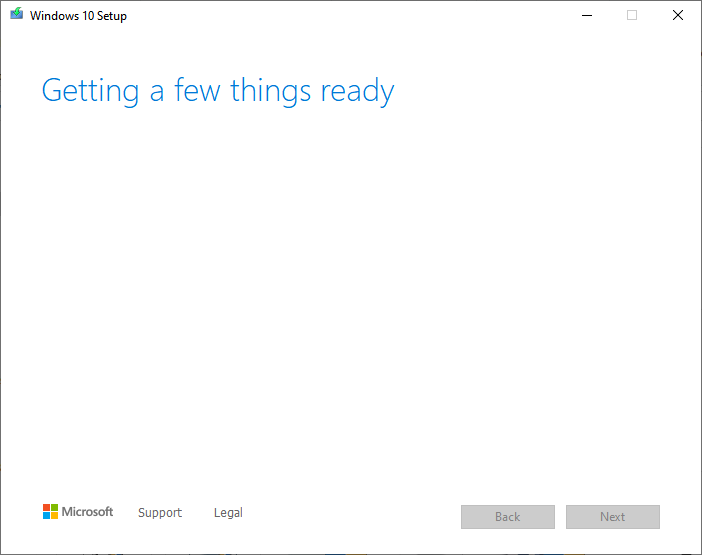
- Wait for the tool to get things ready.

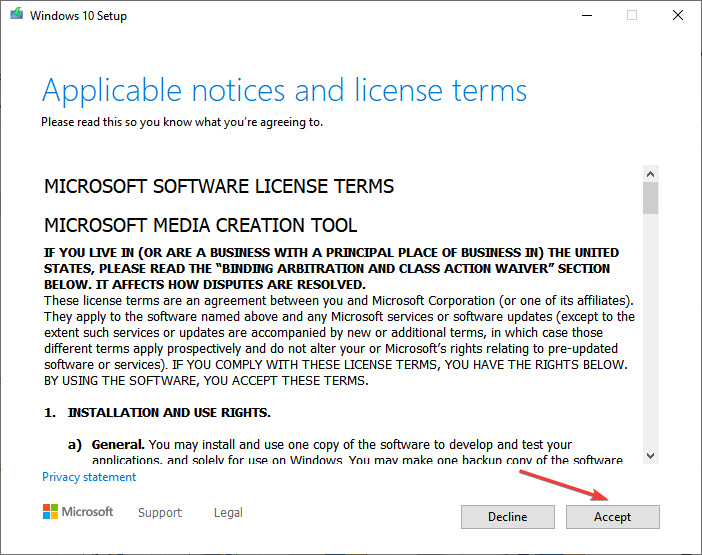
- Click on Accept to agree to the Microsoft Software License Terms.
- Choose Upgrade this PC now and click Next.
- Wait for the update to download. This can take a while.
- When you reach the Choose what to keep screen, select Keep everything and then proceed with the in-place upgrade.
- Now follow the instructions to complete the process.
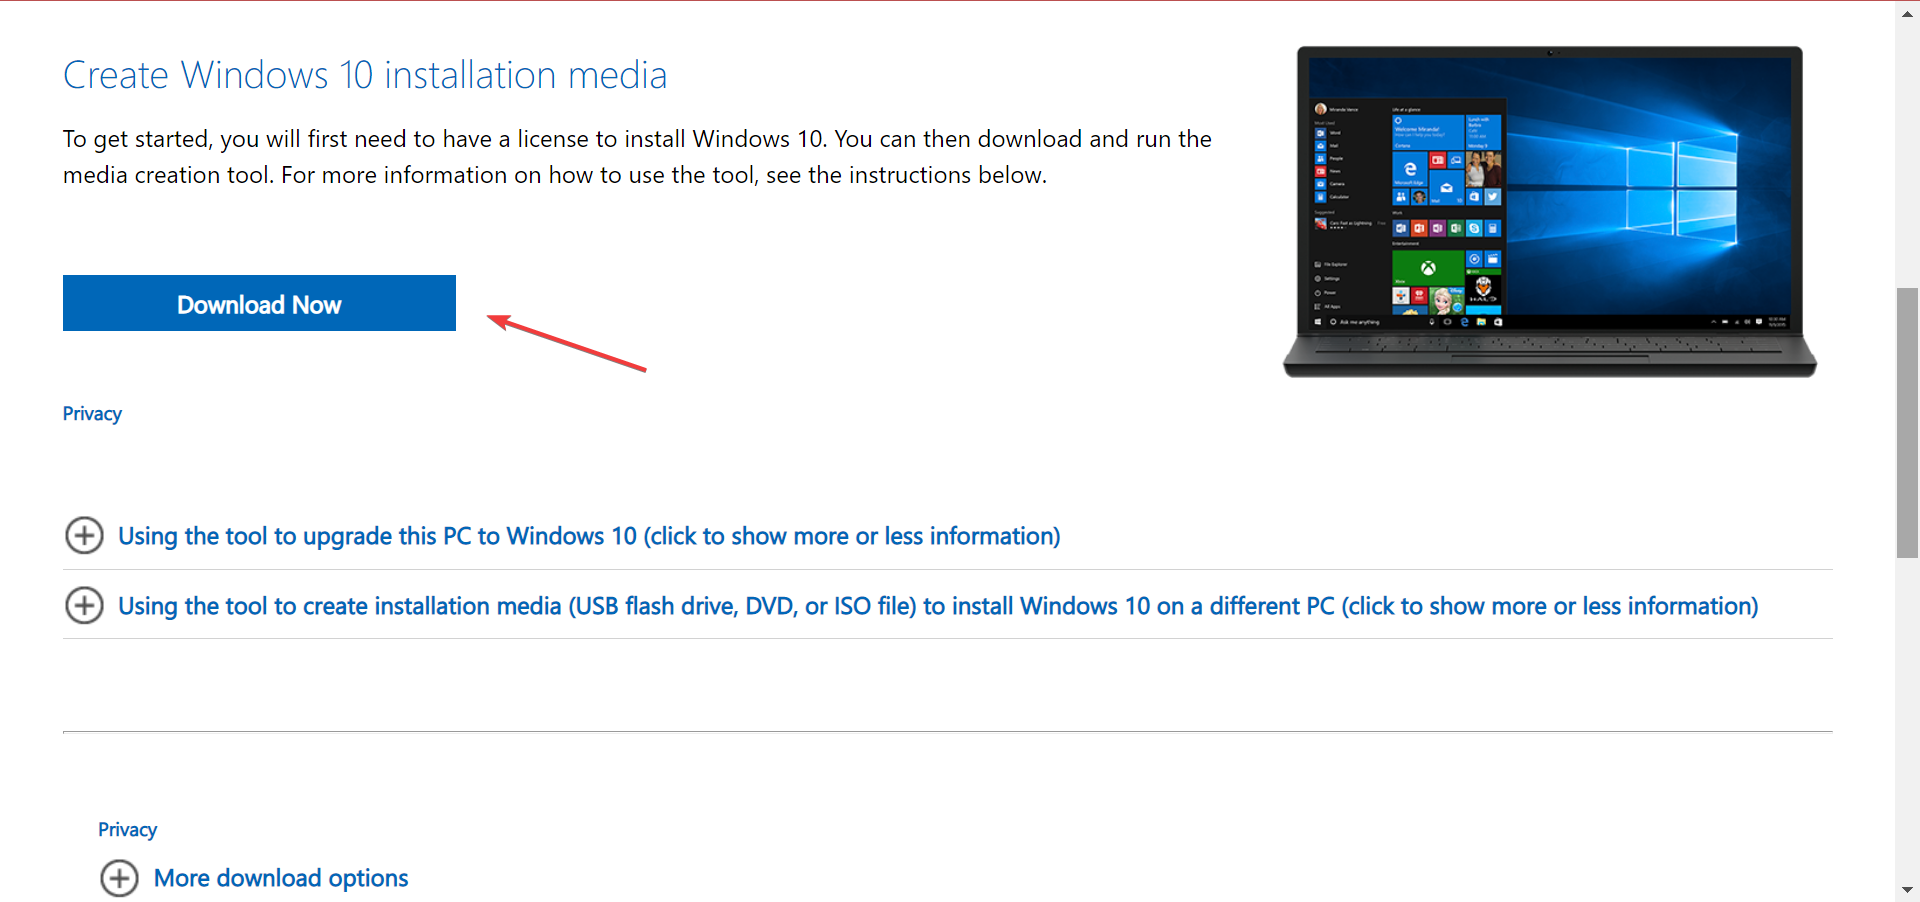
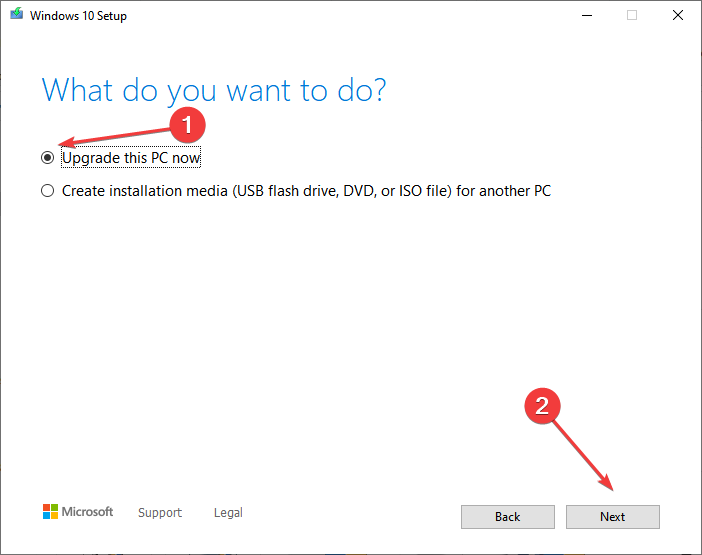

This is by far the most effective method to fix the 0x80070003 error. And remember, the installed applications and stored files won’t be affected during the process.
How to fix update error 0x80070003 on Windows 11?
1. Run a quick SFC scan
- Right-click the Start button and select Windows Terminal (Admin).

- Now run the following command:
sfc /scannow - Wait for it to finish. The process can take 10 minutes or more.
- After it’s finished, check if the problem is still there.


If you have followed the steps above carefully, the error code 0x80070003 should be fixed by the time you reach this part.
In case the problem persists, you have no option but to reinstall Windows 10, and remember, you will lose the applications and files stored on the computer.
Also, you may use a reliable Windows Update repair tool and fix all such errors automatically and in no time.
Should you run into any issues along the way, let us know in the comments below.
![]()
Главная Windows Как исправить ошибку 80070003 или 80070002 при установке обновлений Windows

В этом руководстве описано решение проблемы, при которой установка обновлений Windows (Windows 10, 8.x, 7 или Vista) завершается ошибкой с кодом 80070003 или 80070002 («Возникла проблема с Центром обновления Windows»). Обычно эти ошибки возникают, когда на компьютере неверно настроены параметры даты и времени или когда повреждена временная папка Windows Update. Для устранения этих ошибок вы можете воспользоваться приведенным ниже решением.
Способ 1: проверьте настройки даты и времени
Обязательно убедитесь в правильности даты и времени на вашем компьютере.
Для этого:
- нажмите на дата и время в правом нижнем углу;
- в открывшемся окне нажмите на ссылку «Изменение настроек даты и времени»;

- нажмите «Изменить дату и время» и установите правильную дату/время/год;

- теперь нажмите «Изменить часовой пояс» и выберите тот, в котором находитесь вы;
- перезагрузите компьютер и попробуйте обновить компьютер. Если проблема осталась, попробуйте следующий способ.
Способ 2: удаление установочных файлов Windows Update
Первое, что вам нужно сделать, это остановить работу службы Windows Update.
Для этого:
- одновременно нажмите клавиши
 и R на клавиатуре, чтобы открыть окно «Выполнить»;
 - в текстовом поле окна «Выполнить» введите команду services.msc и нажмите Enter;

- в открывшемся окне «Службы» найдите службу «Центр обновления Windows» и остановите ее;

- откройте «Мой компьютер» (или «Этот компьютер», если у вас Windows 8 или 10) и перейдите в папку C:Windows;
- найдите папку SoftwareDistribution, щелкните на ней правой кнопкой мыши, выберите «Переименовать», переименуйте ее в SoftwareDistributionOLD и нажмите Enter;

- если на экране появится предупреждение контроля учетных записей пользователей, нажмите «Да»;
- вернитесь в окно «Службы», запустите «Центр обновления Windows» и попробуйте обновить систему.
Способ 3: воспользуйтесь Microsoft Fix it Tool

Скачайте официальный инструмент диагностики Windows Update и запустите его. Инструмент проведет диагностику системы, а затем попытается исправить найденные ошибки. Когда процесс будет завершен, вернитесь в «Центр обновления Windows» и попробуйте установить обновления.
Отличного Вам дня!
Читайте также. Все по теме
На чтение 4 мин Просмотров 2к.
В некоторые моменты в системе случаются критические ошибки, которые имеют самые разные причины появления. Кодов очень много, например, 0x80070003, возникающий в процессе запуска Центра обновлений Windows. Возможно, он появился при запуске приложения, на определенном шаге скачивания или при установке операционной системы. В редких случаях сообщение может выглядеть следующим образом: «системе не удается найти указанный путь».
 Причины проблемы могут быть самыми разнообразными, например, недостаточный сигнал сети, возникший конфликт с файлами и многими другими компонентами. В общем, необходимо разобраться, как убрать код ошибки 80070003.
Содержание
- Решение проблемы с ошибкой 0x80070003
- Как исправить ошибку 0x80070002?
- Использование редактора реестра
- Использование восстановления образа
- Избавляемся от ошибки при восстановлении
- Полезное видео
Решение проблемы с ошибкой 0x80070003
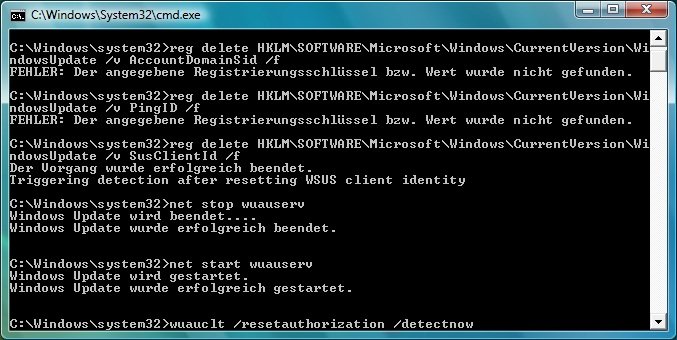
Когда проблема возникла при попытке скачать какой-то апдейт, что в этом случае делать? Откройте с повышенными привилегиями утилиту CMD (командная строка) и впишите команду, которая остановит службу, отвечающую за Центр обновлений:
- net stop wuauserv
Есть специальная папка, куда скачиваются файлы из Windows Update для ОС. Для начала нужно найти её. Она расположена по такому пути: C:WindowsSoftwareDistributionDownload. Дальше переименовываете ее в любое желаемое имя, например, Download.old. Проделать такое можно в ручном режиме.
 После проделанной выше процедуры снова в командной строке пишем команду для запуска Центра обновления:
- net start wuauserv
Поиск апдейтов начать сразу можно, если ввести уже другие команды:
- wuauclt /resetauthorization
- wuauclt /detectnow
Внимание! Помимо вышеуказанной неполадки, существует похожая, но с другим кодом — 0x80070002. Смысл тот же: при попытке скачать апдейт для ОС высвечивается код.
Также 0x80070002 появляется при восстановлении ОС.
Как исправить ошибку 0x80070002?
При появлении данной проблемы возможно использование тех же способов, описанных при исправлении кода 0x80070003. Если положительного результата нет, идём дальше.
Использование редактора реестра
В реестре находятся все настройки ОС. Чтобы открыть его, нужно нажать клавиши Win+R для входа в окошко «Выполнить». Теперь вводим следующее: regedit.
Далее алгоритм следующий:
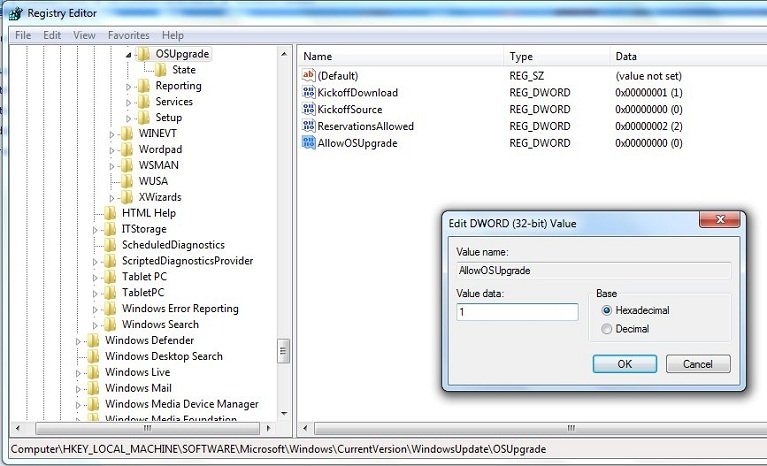
- Попав в окно, слева открываем такой раздел: HKEY_LOCAL_MACHINESOFTWAREMicrosoftWindowsCurrentVersionWindowsUpdateOSUpgrade.
- С правой стороны жмём правой кнопочкой мышки на любом месте и выбираем пункт «Создать» — «Параметр DWORD 32 бита». Его название должно быть следующим — AllowOSUpgrade.
- Два раза кликните по параметру мышкой и в качестве значения впишите единицу (1), а система счисления – шестнадцатеричная.
- Перезапускаем компьютер и пробуем воспользоваться инструментом. Такая практика возможна и на «семерке», и на поздних версиях ОС.
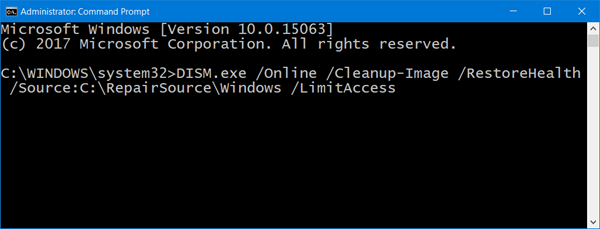
Использование восстановления образа
Это можно сделать на любой редакции операционной системы. Снова открываем командную строку с повышенными привилегиями и вписываем фразу:
- DISM.exe /Online /Cleanup-image /Restorehealth
В итоге мы, возможно, восстановим поврежденные данные, которые относятся к центру обновления.
Если вышеуказанная инструкция не помогла, тогда поступим немного другим способом:
- В командной строке пишем: DISM.exe /Online /Cleanup-Image /RestoreHealth /Source:C:RepairSourceWindows /LimitAccess.
- За место C:RepairSourceWindows /LimitAccess указываем путь к тому накопителю, на котором находится образ операционной системы, например, это оптический накопитель или флешка с ОС.
- После выполнения предыдущей команды ведите инструкцию для проверки накопителя: sfc /scannow.
Избавляемся от ошибки при восстановлении
Если проблема появилась при восстановлении, попробуем воспользоваться нижеописанными способами:
- Загрузиться с помощью безопасного режима и осуществить проверку системного раздела на ошибки, например, используя команду sfc /scannow.
- Используя восстановление системы, находим последние точки восстановления. Конечно, если такие существуют, тогда можно вернуться к тому состоянию, когда ОС была работоспособна.
Последним вариантом предлагается к использованию диагностических средств для Windows 7. Загрузить можно тут: https://support.microsoft.com/ru-ru/help/10164/fix-windows-update-errors. Утилита проверяет наличие проблем в системе и автоматически исправляет их.
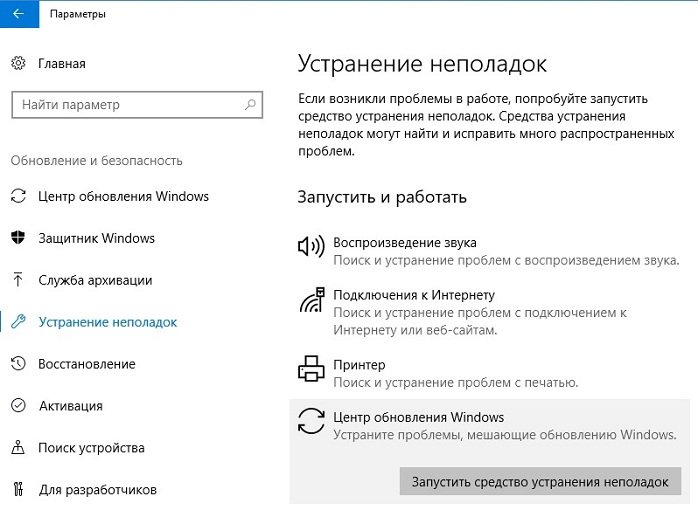
При установленной Windows 10, используя комбинацию клавиш клавиатуры Win+I, зайдите в параметры системы и сделайте следующее:
- Переходим в пункт «Центр обновления».
- Слева перейдите в подраздел «Устранение неполадок».
- Найдите в правой части окошка строку «Центр обновления», нажав по которой появится кнопочка «Запустить средство устранения неполадок». Также жмём по ней.
- Проблема начнет решаться в автоматическом режиме.
 Другие возможные варианты:
- Удалить недавно установленные программы.
- Отсоедините все периферийные компоненты, подключенные к USB и другим портам.
- Проверьте соединение с интернетом, попробуйте подключиться к другой сети, по возможности.
- Сделать восстановление системы без удаления данных (если восстановление исправно).
Таким образом, используя вышеуказанные методы есть возможность избавиться от ошибки с кодом 0x80070003, при этом мы убили сразу двух зайцев, разобрав схожую ошибку 0x80070002.
Полезное видео
Наглядное исправление данной неисправности подробно разобрано на этом видеоролике: