
(This was originally meant as a reply to the first comment to Krtek’s question, but I ran out of space there and to be honest it works as an answer just fine.)
Functions are essentially values, and thus a named function is actually a variable of that name. Variables, by their very definition, can change as a script is executed. Hell, someone might accidentally redefine one of those functions. Is that bad? To sum my thoughts up: depending on the script, parameters passed and/or actual implementations of those pre-defined functions you speak of (one might unset itself or others, for example), it is not possible to guarantee things work unless you are willing to narrow down some of your demands. Lua is too dynamic for what you are looking for. 
If you want a flawless test: create a dummy environment with all bells and whistles in place, and see if it crashes anywhere along the way (loading, executing, etc). This is basically a sort of unit test, and as such would be pretty heavy.
If you want a basic check to see if a script has a valid syntax: Krtek gave an answer for that already. I am quite sure (but not 100%) that the lua equivalent is to loadfile or loadstring, and the respective C equivalent is to try and lua_load() the code, each of which convert readable script to bytecode which you would already need to do before you could actually execute the code in your normal all-is-well usecase. (And if that contained function definitions, those would need to be executed later on for the code inside those to execute.)
However, these are the extent of your options with regards to pre-empting errors before they actually happen. Lua is a very dynamic language, and what is a great strength also makes for a weakness when you want to prove correctness. There are simply too many variables involved for a perfect solution.
Luacheck

Contents
- Overview
- Installation
- Basic usage
- Related projects
- Documentation
- Development
- Building and testing
- License
Overview
Luacheck is a static analyzer and a linter for Lua. Luacheck detects various issues such as usage of undefined global variables, unused variables and values, accessing uninitialized variables, unreachable code and more. Most aspects of checking are configurable: there are options for defining custom project-related globals, for selecting set of standard globals (version of Lua standard library), for filtering warnings by type and name of related variable, etc. The options can be used on the command line, put into a config or directly into checked files as Lua comments.
Luacheck supports checking Lua files using syntax of Lua 5.1, Lua 5.2, Lua 5.3 and LuaJIT. Luacheck itself is written in Lua and runs on all of mentioned Lua versions.
Installation
Using LuaRocks
From your command line run the following command (using sudo if necessary):
luarocks install luacheck
For parallel checking Luacheck additionally requires LuaLanes, which can be installed using LuaRocks as well (luarocks install lanes).
Windows binary download
For Windows there is single-file 64-bit binary distribution, bundling Lua 5.3.4, Luacheck, LuaFileSystem, and LuaLanes using LuaStatic:
download.
Basic usage
After Luacheck is installed, run luacheck program from the command line. Pass a list of files, rockspecs or directories (requires LuaFileSystem) to be checked:
luacheck src extra_file.lua another_file.lua
Checking src/good_code.lua               OK
Checking src/bad_code.lua                3 warnings

    src/bad_code.lua:3:23: unused variable length argument
    src/bad_code.lua:7:10: setting non-standard global variable embrace
    src/bad_code.lua:8:10: variable opt was previously defined as an argument on line 7

Checking src/python_code.lua             1 error

    src/python_code.lua:1:6: expected '=' near '__future__'

Checking extra_file.lua                  5 warnings

    extra_file.lua:3:18: unused argument baz
    extra_file.lua:4:8: unused loop variable i
    extra_file.lua:13:7: accessing uninitialized variable a
    extra_file.lua:14:1: value assigned to variable x is unused
    extra_file.lua:21:7: variable z is never accessed

Checking another_file.lua                2 warnings

    another_file.lua:2:7: unused variable height
    another_file.lua:3:7: accessing undefined variable heigth

Total: 10 warnings / 1 error in 5 files
For more info, see documentation.
Related projects
Editor support
There are a few plugins which allow using Luacheck directly inside an editor, showing warnings inline:
- For Vim, Syntastic contains luacheck checker;
- For Sublime Text 3 there is SublimeLinter-luacheck which requires SublimeLinter;
- For Atom there is linter-luacheck which requires AtomLinter;
- For Emacs, Flycheck contains luacheck checker;
- For Brackets, there is linter.luacheck extension;
- For Visual Studio code there is vscode-luacheck extension. vscode-lua extension also includes Luacheck support.
If you are a plugin developer, see recommended way of using Luacheck in a plugin.
Other projects
- Luacheck bindings for Node.js;
- Luacheck plugin for Gulp.
Documentation
Documentation is available online. If Luacheck has been installed using LuaRocks, it can be browsed offline using luarocks doc luacheck command.
Documentation can be built using Sphinx: sphinx-build docsrc doc, the files will be found inside doc/.
Development
Luacheck is currently in development. The latest released version is 0.23.0. The interface of the luacheck module may change between minor releases. The command line interface is fairly stable.
Use the Luacheck issue tracker on GitHub to submit bugs, suggestions and questions. Any pull requests are welcome, too.
Building and testing
After the Luacheck repo is cloned and changes are made, run luarocks make (using sudo if necessary) from its root directory to install dev version of Luacheck. To run Luacheck using sources in current directory without installing it, run lua -e 'package.path="./src/?.lua;./src/?/init.lua;"..package.path' bin/luacheck.lua .... To test Luacheck, ensure that you have busted and luautf8 installed and run busted.
License
The MIT License (MIT)

Copyright (c) 2014 - 2018 Peter Melnichenko

Permission is hereby granted, free of charge, to any person obtaining a copy
of this software and associated documentation files (the "Software"), to deal
in the Software without restriction, including without limitation the rights
to use, copy, modify, merge, publish, distribute, sublicense, and/or sell
copies of the Software, and to permit persons to whom the Software is
furnished to do so, subject to the following conditions:

The above copyright notice and this permission notice shall be included in all
copies or substantial portions of the Software.

THE SOFTWARE IS PROVIDED "AS IS", WITHOUT WARRANTY OF ANY KIND, EXPRESS OR
IMPLIED, INCLUDING BUT NOT LIMITED TO THE WARRANTIES OF MERCHANTABILITY,
FITNESS FOR A PARTICULAR PURPOSE AND NONINFRINGEMENT. IN NO EVENT SHALL THE
AUTHORS OR COPYRIGHT HOLDERS BE LIABLE FOR ANY CLAIM, DAMAGES OR OTHER
LIABILITY, WHETHER IN AN ACTION OF CONTRACT, TORT OR OTHERWISE, ARISING FROM,
OUT OF OR IN CONNECTION WITH THE SOFTWARE OR THE USE OR OTHER DEALINGS IN THE
SOFTWARE.
Во время скриптинга вы часто будете встречать проблемы, незаметные с первого взгляда. Эта страница покажет вам некоторые базовые стратегии локализирования ошибок.
Консоль отладки
MTA предоставляет встроенную консоль отладки, которая показывает отладочные сообщения от функций и скриптов MTA. Ее можно открыть, введя в консоли debugscript x, где x — уровень отладки:
- 1: только ошибки
- 2: ошибки и предупреждения
- 3: ошибки, предупреждения и информационные сообщения
Таким образом, при вводе debugscript 3 видны все сообщения, так что либо этот, либо уровень 2 рекомендованы в большинстве случаев. debugscript следует иметь включенным на протяжении практически всего времени, когда тестируете свои скрипты, это поможет в обнаружении опечаток и других мелких ошибок, позволяя с легкостью их поправить.
Пример
В этом отрывке две ошибки:
if (getPlayerName(player) == "Fedor")
    outputChatbox("Hello Fedor")
end
Когда скрипт, в котором присутствует данный отрывок кода попробует загрузиться, debugscript выведет что-то типа этого:
- INFO: Loading script failed: C:<server path>modsdeathmatchresourcesmyResourcescript.lua:15: ‘then’ expected near ´outputChatbox’
Это значит, что скрипт не может быть обработан в силу синтаксической ошибки. Показывается путь ко скрипту, чтобы можно было также увидеть, частью какого ресурса он является (‘myResource’ в данном случае), и, конечно, имя самого скрипта. После имени файла показан номер строки и что в ней, собственно, не так. Теперь все с легкостью можно исправить, мы просто забыли оператор ‘then’:
if (getPlayerName(player) == "Fedor") then
    outputChatbox("Hello Fedor")
end
Сейчас скрипт нормально загрузится и не выведет никаких ошибок, но только пока не выполнится для игрока с ником ‘Fedor’. В этом случае, debugscript выведет:
- ERROR: C:<server path>modsdeathmatchresourcesdscript.lua:15: attempt to call global ‘outputChatbox’ (a nil value)
То есть, что вызванной функции не существует, что и не удивительно, так как ее правильное название — outputChatBox (с заглавной B):
if (getPlayerName(player) == "Fedor") then
    outputChatBox("Hello Fedor")
end
Это, конечно, лишь пример, есть еще море других сообщений и сценариев, но вам теперь должна быть понятна сама суть.
Ведение отладочного лога на сервере и клиенте
Сервер
Перейдите в: (корневая папка MTA)>server>mods>deathmatch
Там есть два практически одинаковых файла:
- local.conf — содержит настройки сервера, доступного по нажатию на пункт «host game» главного меню MTA. Это быстрый и простой путь ненадолго запустить сервер извнутри клиента. При выключении клиента выключится и сервер.
- mtaserver.conf — используется при выполнении запуска «MTA Server.exe» из (корневая папка MTA)>server. Это способ запустить сервер независимо от клиента на продолжительное время.
В зависимости от выбранного вами способа, вам захочется отредактировать один из этих файлов. Настройки, интересные нам:
<!-- Задает имя и путь лог-файла debugscript. Если оставить пустым, такой файл создан не будет. -->
    <scriptdebuglogfile>logs/scripts.log</scriptdebuglogfile>

    <!-- Задает уровень лог-файла debugscript. Допустимые значения: 0, 1, 2, 3. Если не установить, по умолчанию будет 0. -->
    <scriptdebugloglevel>0</scriptdebugloglevel>
Убедитесь, что указали имя лога. Также укажите уровень ошибок, которые будут записываться. При указании 0 ничего не будет записываться. Другие уровни были объяснены в начале данной статьи. При смене уровня записи на 3, все ошибки серверных скриптов будут записаны в (корневая папка MTA)>server>mods>deathmatch>logs>scripts.log
Клиент
Перейдите в: (корневая папка MTA)>server>clientscript.log
В этот файл ведется запись ошибок всех клиентских скриптов. Запись включена по умолчанию, вмешательств не требуется.
Стратегии отладки
Есть несколько стратегий, помогающих в поиске ошибок, мы говорим об отличных от непосредственного просмотра кода, конечно же. Большинство из них включает в себя вывод отладочных сообщений с варьирующейся от ситуации к ситуации информацией.
Полезные функции
Для начала, некоторые функции, которые могут оказаться удобными при отладке.
- outputDebugString или outputChatBox для вывода информации любого вида
- tostring() обращает переменную в строковую, например, когда она является бинарной (двоичной)
- getElementType для выполнения проверки элемента MTA на получение его типа
Добавляйте отладочные сообщения, чтобы проверять когда, как часто и вообще, выполняется ли участок кода
Типичный пример проверки на выполнение участка с if. Чтобы его сделать, просто добавьте любое сообщение, которое вы потом будете в состоянии понять, внутрь участка с if.
if (variable1 == variable2) then
    outputDebugString("вошел в if")
    -- что-нибудь делаем
end
Другое применение — проверка переменной на предмет ее изменения. Для начала найдите все случаи, где переменная редактируется, и добавьте сообщения прямо рядом с ней.
Добавляйте отладочные сообщения для проверки значения переменной
Скажем, вы создали маркер, но он не появляется на той позиции, на которой вы этого хотели бы. Первое, что вы захотите сделать — проверить, была ли выполнена функция createMarker. Но одновременно с этим вы также можете проверить и значения, используемые при выполнении функции createMarker, всего за один запуск.
outputChatBox("posX - "..x.." posY - "..y.." posZ - "..z)
createMarker(x,y,z)
Это выведет в консоль отладки все три переменные, используемые в качестве коодинат для маркера. Подразумевая, что у вас они считываются из map-файла, теперь вы сможете сравнить выведенное в консоль с желаемыми значениями. tostring() гарантирует, что значения переменных смогут быть выведены вместе строкой, даже если они, например, двоичные.
Пример
Представьте, что где-то вы создали колшейп (collision shape) и хотите производить какое-либо действие над игроком, простоявшим в нем 10 секунд.
function colShapeHit(player)
    -- устанавливаем таймер на вывод сообщения (можно также вызвать другую функцию)
    -- сохраняем id таймера в таблице, используя игрока как индекс
    colshapeTimer[player] = setTimer(outputChatBox,10000,1,"Игрок задержался в колшейпе на 10 секунд!")
end
addEventHandler("onColShapeHit",getRootElement(),colShapeHit)

function colShapeLeave(player)
    -- убираем таймер при покидании игроком колшейпа
    killTimer(colshapeTimer[player])
end
addEventHandler("onColShapeLeave",getRootElement(),colShapeLeave)
При попадании игрока в колшейп, в консоль отладки выводится следующее сообщение:
- ERROR: ..[path]: attempt to index global ‘colshapeTimer’ (a nil value)
Что значит, что вы пытались проиндексировать несуществующую таблицу. В образце выше это сделано, так как id таймера сохраняется в таблице. Нам нужно добавить проверку на то, существует ли таблица, а если нет — создать ее.
function colShapeHit(player)
    if (colshapeTimer == nil) then
        colshapeTimer = {}
    end
    -- устанавливаем таймер на вывод сообщения (можно также вызвать другую функцию)
    -- сохраняем id таймера в таблице, используя игрока как индекс
    colshapeTimer[player] = setTimer(outputChatBox,10000,1,"Игрок задержался в колшейпе на 10 секунд!")
end
addEventHandler("onColShapeHit",getRootElement(),colShapeHit)

function colShapeLeave(player)
    -- убираем таймер при покидании игроком колшейпа
    killTimer(colshapeTimer[player])
end
addEventHandler("onColShapeLeave",getRootElement(),colShapeLeave)
Но мы все же получаем предупреждение, когда игрок попадает в колшейп, ждет сообщения и снова его покидает:
- WARNING: [..]: Bad argument @ ‘killTimer’ Line: ..
За исключением этого сообщения (о нем поговорим позже) все, похоже, работает правильно. Игрок попадает в колшейп, таймер стартует, если он остается, появляется сообщение, если он уходит, таймер убирается.
Более незаметная ошибка
Но, в силу некоторых обстоятельств, сообщение выводится дважды, если вы остаетесь в колшейпе на транспортном средстве. Если так получается, значит какой-то код выполняется дважды, мы добавим отладочные сообщения для проверки.
function colShapeHit(player)
    if (colshapeTimer == nil) then
        colshapeTimer = {}
    end
    -- добавляем отладочное сообщение
    outputDebugString("colShapeHit")
    -- устанавливаем таймер на вывод сообщения (можно также вызвать другую функцию)
    -- сохраняем id таймера в таблице, используя игрока как индекс
    colshapeTimer[player] = setTimer(outputChatBox,10000,1,"Игрок задержался в колшейпе на 10 секунд!")
end
addEventHandler("onColShapeHit",getRootElement(),colShapeHit)

function colShapeLeave(player)
    -- добавляем отладочное сообщение
    outputDebugString("colShapeLeave")
    -- убираем таймер при покидании игроком колшейпа
    killTimer(colshapeTimer[player])
end
addEventHandler("onColShapeLeave",getRootElement(),colShapeLeave)
Теперь мы точно видим, что обе функции, прикрепленные к обработчикам, выполняются дважды, если мы в ТС, или один раз, если мы вне ТС. Такое может получаться, если транспортное средство тоже вызывает срабатывание колшейпа. Чтобы подтвердить или опровергнуть эту теорию, проверим переменную player, которая должна содержать элемент типа player.
function colShapeHit(player)
    if (colshapeTimer == nil) then
        colshapeTimer = {}
    end
    -- добавляем отладочное сообщение, с типом элемента
    outputDebugString("colShapeHit "..getElementType(player))
    -- устанавливаем таймер на вывод сообщения (можно также вызвать другую функцию)
    -- сохраняем id таймера в таблице, используя игрока как индекс
    colshapeTimer[player] = setTimer(outputChatBox,10000,1,"Игрок задержался в колшейпе на 10 секунд!")
end
addEventHandler("onColShapeHit",getRootElement(),colShapeHit)

function colShapeLeave(player)
    -- добавляем отладочное сообщение, с типом элемента
    outputDebugString("colShapeLeave "..getElementType(player))
    -- убираем таймер при покидании игроком колшейпа
    killTimer(colshapeTimer[player])
end
addEventHandler("onColShapeLeave",getRootElement(),colShapeLeave)
Отладочные сообщения говорят, что одна из переменных player — действительно игрок, а другая — элемент типа vehicle, т.е. ТС. Так как мы хотим, чтобы срабатывание происходило при попадании в колшейп именно игрока, добавляем if, который предотвратит выполнение функции, если в него попал не игрок (не элемент типа player).
function colShapeHit(player)
    if (colshapeTimer == nil) then
        colshapeTimer = {}
    end
    -- добавляем проверку на тип элемента
    if (getElementType(player) ~= "player") then return end
    -- добавляем отладочное сообщение, с типом элемента
    outputDebugString("colShapeHit "..getElementType(player))
    -- устанавливаем таймер на вывод сообщения (можно также вызвать другую функцию)
    -- сохраняем id таймера в таблице, используя игрока как индекс
    colshapeTimer[player] = setTimer(outputChatBox,10000,1,"Игрок задержался в колшейпе на 10 секунд!")
end
addEventHandler("onColShapeHit",getRootElement(),colShapeHit)

function colShapeLeave(player)
    -- добавляем проверку на тип элемента
    if (getElementType(player) ~= "player") then return end
    -- добавляем отладочное сообщение, с типом элемента
    outputDebugString("colShapeLeave "..getElementType(player))
    -- убираем таймер при покидании игроком колшейпа
    killTimer(colshapeTimer[player])
end
addEventHandler("onColShapeLeave",getRootElement(),colShapeLeave)
Теперь скрипт должен работать как задумано, но все еще будет выводить предупреждение, о котором было сказано ранее. Это происходит, так как таймер, который мы пытаемся убрать при покидании игроком колшейпа, не будет более существовать по прошествии 10 секунд (уже истек). Есть множество способов избавиться от этого предупреждения (вы же знаете, что таймер может более не существовать, и вы хотите его убрать, только если он еще существует). Одним из способов является проверка на то, существует ли упоминаемый в таблице таймер на самом деле. Чтобы ее сделать, нам понадобится isTimer, которой мы и воспользуемся при убирании таймера:
if (isTimer(colshapeTimer[player])) then
    killTimer(colshapeTimer[player])
end
Итак, полностью рабочий код таков:
function colShapeHit(player)
    if (colshapeTimer == nil) then
        colshapeTimer = {}
    end
    -- добавляем проверку на тип элемента
    if (getElementType(player) ~= "player") then return end
    -- добавляем отладочное сообщение, с типом элемента
    outputDebugString("colShapeHit "..getElementType(player))
    -- устанавливаем таймер на вывод сообщения (можно также вызвать другую функцию)
    -- сохраняем id таймера в таблице, используя игрока как индекс
    colshapeTimer[player] = setTimer(outputChatBox,10000,1,"Игрок задержался в колшейпе на 10 секунд!")
end
addEventHandler("onColShapeHit",getRootElement(),colShapeHit)

function colShapeLeave(player)
    -- добавляем проверку на тип элемента
    if (getElementType(player) ~= "player") then return end
    -- добавляем отладочное сообщение, с типом элемента
    outputDebugString("colShapeLeave "..getElementType(player))
    -- убираем таймер при покидании игроком колшейпа
    if (isTimer(colshapeTimer[player])) then
        killTimer(colshapeTimer[player])
    end
end
addEventHandler("onColShapeLeave",getRootElement(),colShapeLeave)
Отладка проблем с производительностью
Если ваш сервер использует намного больше ресурсов, чем ему следовало бы, или вы просто хотите убедиться, что ваши скрипты эффективны, вы можете узнать правду, воспользовавшись отличным инструментом, который поставляется вместе с сервером MTA SA — performancebrowser. Удостоверьтесь, что он запущен, введя «start performancebrowser», а если у вас его нет, возьмите из комплекта стандартных ресурсов, поставляемых с сервером. Данный инструмент предоставляет потрясающее количество информации, полезной для отладки проблем с производительностью. Утечки памяти, утечки элементов и интенсивно использующие процессор скрипты легко найти через performancebrowser. Например, при использовании опции -d в Lua timing, вы можете увидеть, какие функции сильно загружают процессор.
Для доступа к performancebrowser вам понадобится перейти по адресу: http://здесьIPсервера:здесьHTTPпортсервера/performancebrowser/ в своем интернет-браузере. Заметьте, что в конце требуется символ / (слэш). То есть, например: http://127.0.0.1:22005/performancebrowser/ Затем вам понадобится войти со внутриигрового администраторского аккаунта или любого другого аккаунта, имеющего доступ к «general.HTTP». Большинство нужной вам информации находится в разделах Lua timing и Lua memory, там смотрите на те показатели, которые значительно превышают другие.
Примеры скриптов, которые могут вызывать провалы производительности
Добавление данных в таблицу без последующего удаления. Хотя пройдут месяцы/годы, пока это реально вызовет какие-либо проблемы.
local someData = {}

function storeData()
    someData[source] = true
    -- Здесь не учитывается выход игрока, что вызовет утечку памяти
    -- Используя вкладку Lua timing, вы можете обнаружить использование RAM каждым из ресурсов.
end
addEventHandler("onPlayerJoin", root, storeData)
Утечка элементов возможна при использовании по какой-либо причине множества временных колшейпов и последующем их неустранении. Через некоторое время это повлечет за собой проблемы с пропускной способностью, расходом процессора и памяти сервера.
function useTemporaryCol()
    local col = createColCircle(здесь какой-нибудь код)
    if (нормальные для этого условия) then
        destroyElement(col)
    end
    -- Но иногда этого не происходит, так что даже по окончании скрипта зона коллизии остается, что впоследствии
    -- может вылиться в сотни, а то и тысячи бесполезных зон коллизии.
    -- Вкладка Lua timing позволит вам увидеть количество элементов, созданных каждым скриптом.
end
Большой расход процессора чреват тем, что выливается в просадку FPS сервера до порога, когда тот становится неиграбельным. Менее чем за 24 часа это может превратить даже самый популярный сервер в пустующий. Количество «refs» в Lua timing обнаруживает данный тип скопления, удивительно, но вкладка Lua timing в данном случае не помогла, когда Lua memory — напротив.
addEventHandler("onPlayerJoin", root, function()
    -- Код для заходов
    addEventHandler("onPlayerQuit", root, function()
        -- Код для того, когда выходят
        -- Видите проблему? Он привязан к корню (root), к которому обработчик добавляется снова, снова и снова
    end)
end)
Функция интенсивно использует процессор, потому что то, что она выполняет, занимает много времени. Это просто функция, которой для завершения требуется много времени. Без performancebrowser вы бы и не догадывались, в чем причина, но с performancebrowser вы можете увидеть, что ресурс сильно загружает процессор во вкладке Lua timing. Если вы затем введете: -d в редактируемое поле options, он даже скажет название файла и первую строку функции, которая так сильно загружает процессор.
function someDodgyCode()
    for i=1, 100000 do
        -- какой-нибудь код
    end
end
 en
en
Introduction
In this chapter, you will learn how to use a tool called LuaCheck to automatically scan your mod for any mistakes. This tool can be used in combination with your editor to provide alerts to any mistakes.
- Installing LuaCheck
- Windows
- Linux
- Running LuaCheck
- Configuring LuaCheck
- Troubleshooting
- Using with editor
Installing LuaCheck
Windows
Simply download luacheck.exe from the Github Releases page.
Linux
First, you’ll need to install LuaRocks:
sudo apt install luarocks
You can then install LuaCheck globally:
sudo luarocks install luacheck
Check that it’s installed with the following command:
Running LuaCheck
The first time you run LuaCheck, it will probably pick up a lot of false errors. This is because it still needs to be configured.
On Windows, open powershell or bash in the root folder of your project and run pathtoluacheck.exe .
On Linux, run luacheck . whilst in the root folder of your project.
Configuring LuaCheck
Create a file called .luacheckrc in the root of your project. This could be the root of your game, modpack, or mod.
Put the following contents in it:
unused_args = false
allow_defined_top = true

globals = {
    "minetest",
}

read_globals = {
    string = {fields = {"split"}},
    table = {fields = {"copy", "getn"}},

    -- Builtin
    "vector", "ItemStack",
    "dump", "DIR_DELIM", "VoxelArea", "Settings",

    -- MTG
    "default", "sfinv", "creative",
}
Next, you’ll need to test that it works by running LuaCheck. You should get a lot fewer errors this time. Starting at the first error you get, modify the code to remove the issue, or modify the configuration if the code is correct. See the list below.
Troubleshooting
- accessing undefined variable foobar — If
foobaris meant to be a global, add it toread_globals. Otherwise, add any missinglocals to the mod. - setting non-standard global variable foobar — If
foobaris meant to be a global, add it toglobals. Remove fromread_globalsif present. Otherwise, add any missinglocals to the mod. - mutating read-only global variable ‘foobar’ — Move
foobarfromread_globalstoglobals, or stop writing to foobar.
Using with editor
It is highly recommended that you find and install a plugin for your editor of choice to show you errors without running a command. Most editors will likely have a plugin available.
- VSCode — Ctrl+P, then paste:
ext install dwenegar.vscode-luacheck - Sublime — Install using package-control: SublimeLinter, SublimeLinter-luacheck.

Definition of Lua assert Function
Lua assert is the function to use in the error handling of the Lua programming language. This is the function helping to handle the runtime error of the Lua source code to avoid complications between compile-time errors and run-time errors. This keyword helps to return the true value or condition of the source code otherwise displays the error message of assert. This is the function that declares the error message of the condition when values of the Lua assert argument is failed. It works on Boolean condition error handling conditions in the Lua source code. It returns the final statements if the given value is true otherwise asserts, declaring the error message in the output screen.
Syntax:
The syntax is below.
assert ( value or condition statement, [ message of the error])Example: assert(type(firstvariable) = “string”, “the value of argument a is not string”)
Or
assert ( value or condition statement, [ message of the error]);Example: assert(type(firstvariable) = “string”, “the value of argument a is not string”);
Description:
The Lua has compile-time errors and run-time errors to handle the complicated errors. The Lua assert handles the run time error and declares the assertion error. The “assert” keyword is useful for showing the Boolean condition of the declaration statement. The “value or condition statement” is used for declaring the value of the argument or Boolean condition which is true. The “message of the error” is used for declaring the error message when the Boolean condition is failed. The semicolon symbol does not need at the last of the assert function, but we can use Lua’s assert syntax with or without the semicolon symbol.
How does the assert function work in Lua?
Step 1: Lua programming IDE Environmental Setup.
The Lua text editor, Lua compiler, and Lua interpreter install in your computer as per the operating system and software version.
Or
If you do not have software then you can use Lua Online IDEs for coding and start Lua programming.
Step 2: Create the Lua File.
The Lua file creates with the .lua extension and writes a source code.
File name: Luacomment.lua
Step 3: Use Lua assert in the source code.
Initialize the Lua variable with a value.
local _vaiable1 = 10;The syntax is used as per the user’s requirement.
Assert (_variable1 == 12, "the variable is not greater than 12 ")Print the variable value.
Print ( -variable1 )- If the Boolean condition is true, then the variable value is the display.
- If the Boolean value is failed, then an error message is displayed.
Examples
Let us discuss examples.
Example #1
The basic Lua asserts with condition examples and output.
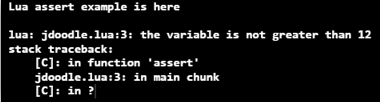
Part 1: if the condition is Boolean then Lua assert work in the source code.
print("Lua assert example is here")
local _variable1 = 10
assert( _variable1 == 12, "the variable is not greater than 12 ")
print( _variable1 )
Output:
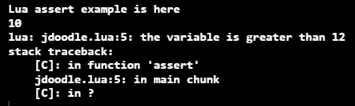
Part 2: if condition applies, then it works in the source code.
print("Lua assert example is here")
local _variable1 = 10
assert( _variable1 <= 12, "the variable is not greater than 12 ")
print( _variable1 )
assert( _variable1 >= 13, "the variable is greater than 12 ")
print( _variable1 )
Output:
Description:
The part1 and part 2 are shows the outputs of the different conditions using Lua assert. The given variable is equal to require value the output is the given value otherwise, assert declare error message. If a given variable is fulfilled the “less than” or “greater than condition, then the initial value declares in the display window.” If a given variable does not fulfill the condition, then the assert error message displayed in the output window.
Example #2
the basic Lua assert with two variable examples and output.
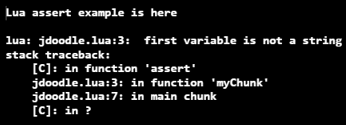
Part 1: if Lua assert applies on the first variable, then the output is below.
print("Lua assert example is here")
function myChunk(_str1, _str2)
assert(type( _str1 ) == "string", " first variable is not a string ")
assert(type( _str2 ) == "string ", "second variable is not a string ")
return _str1,_str2
end
print(myChunk(6, "my variable"))
Output:
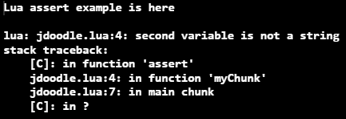
Part 2: if Lua assert applies on the second variable, then the output is below.
print("Lua assert example is here")
function myChunk(_str1, _str2)
assert(type( _str1 ) == "string", " first variable is not a string ")
assert(type( _str2 ) == "string ", "second variable is not a string ")
return _str1,_str2
end
print(myChunk( "my variable", 8))
Output:

Part 3: if Lua assert applies on both variables then the output is below.
print("Lua assert example is here")
function myChunk(_str1, _str2)
assert(type( _str1 ) == "string", " first variable is not a string ")
assert(type( _str2 ) == "string ", "second variable is not a string ")
return _str1,_str2
end
print(myChunk( "lua variable", "my variable"))
Output:
Description:
You can see the difference between the three example condition and their output. If one variable failed in the condition, then the respective Assert message is declared in the output window. If both variables failed in the condition, then the first Assert error message is declared in the output window.
Example #3
the basic Lua asserts with file handling examples and output.
Part 1: open input/output file with Lua assert example, and output is below.
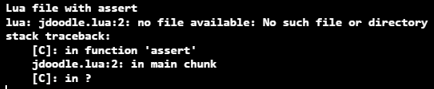
print("Lua file with assert")
file = assert(io.open("no file available", "r+"))
print(file())
Output:
Part 2: open input/output file without Lua assert example, and output is below.
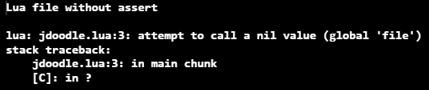
print("Lua file without assert")
file = io.open("no file available", "r+")
print(file())
Output:
Description:
If the Lua file is trying to open in the source code but the file is not available, then shows the difference between with or without Lua assert. If the file is not available, then it gives an understandable error message includes the file name. If the file is not available and we do not apply to assert then the output window shows a complicating error message.
Conclusion
It helps to avoid complicated errors in the lengthy source code. It is useful to avoid runtime errors and declared an understandable error message. It makes a web application readable, systematic, and neat.
Recommended Articles
We hope that this EDUCBA information on “Lua assert” was beneficial to you. You can view EDUCBA’s recommended articles for more information.
- Assertions in Selenium
- Java Assertion
- Assert in C#
- Assert in Python