
| title | description | ms.date | ms.topic | f1_keywords | dev_langs | helpviewer_keywords | ms.assetid | author | ms.author | manager | ms.technology | ms.workload | |||||||||||||||||||||
|---|---|---|---|---|---|---|---|---|---|---|---|---|---|---|---|---|---|---|---|---|---|---|---|---|---|---|---|---|---|---|---|---|---|
|
Manage exceptions with the debugger | Microsoft Docs |
Learn how to specify which exceptions the debugger breaks on, at which point you want the debugger to break, and how breaks are handled. |
01/23/2023 |
how-to |
|
|
|
43a77fa8-37d0-4c98-a334-0134dbca4ece |
mikejo5000 |
mikejo |
jmartens |
vs-ide-debug |
multiple |
Manage exceptions with the debugger in Visual Studio
[!INCLUDE Visual Studio]
An exception is an indication of an error state that occurs while a program is being executed. You can tell the debugger which exceptions or sets of exceptions to break on, and at which point you want the debugger to break (that is, pause in the debugger). When the debugger breaks, it shows you where the exception was thrown. You can also add or delete exceptions. With a solution open in Visual Studio, use Debug > Windows > Exception Settings to open the Exception Settings window.
Provide handlers that respond to the most important exceptions. If you need to know how to add handlers for exceptions, see Fix bugs by writing better C# code. Also, learn how to configure the debugger to always break execution for some exceptions.
When an exception occurs, the debugger writes an exception message to the Output window. It may break execution in the following cases when:
- An exception is thrown that isn’t handled.
- The debugger is configured to break execution before any handler is invoked.
- You have set Just My Code, and the debugger is configured to break on any exception that isn’t handled in user code.
[!NOTE]
ASP.NET has a top-level exception handler that shows error pages in a browser. It doesn’t break execution unless Just My Code is turned on. For an example, see Tell the debugger to continue on user-unhandled exceptions below.
[!NOTE]
In a Visual Basic application, the debugger manages all errors as exceptions, even if you use On Error-style error handlers.
Tell the debugger to break when an exception is thrown
The debugger can break execution at the point where an exception is thrown, so you may examine the exception before a handler is invoked.
In the Exception Settings window (Debug > Windows > Exception Settings), expand the node for a category of exceptions, such as Common Language Runtime Exceptions. Then select the check box for a specific exception within that category, such as System.AccessViolationException. You can also select an entire category of exceptions.
::: moniker range=»<=vs-2019″

::: moniker-end
::: moniker range=»>=vs-2022″

::: moniker-end
[!TIP]
You can find specific exceptions by using the Search window in the Exception Settings toolbar, or use search to filter for specific namespaces (such as System.IO).
If you select an exception in the Exception Settings window, debugger execution will break wherever the exception is thrown, no matter whether it’s handled. Now the exception is called a first chance exception. For example, here are a couple of scenarios:
-
In the following C# console application, the Main method throws an AccessViolationException inside a
try/catchblock.static void Main(string[] args) { try { throw new AccessViolationException(); Console.WriteLine("here"); } catch (Exception e) { Console.WriteLine("caught exception"); } Console.WriteLine("goodbye"); }
If you have AccessViolationException checked in Exception Settings, execution will break on the
throwline when you run this code in the debugger. You can then continue execution. The console should display both lines:but it doesn’t display the
hereline. -
A C# console application references a class library with a class that has two methods. One method throws an exception and handles it, while a second method throws the same exception but doesn’t handle it.
public class Class1
{
    public void ThrowHandledException()
    {
        try
        {
            throw new AccessViolationException();
        }
        catch (AccessViolationException ave)
        {
            Console.WriteLine("caught exception" + ave.Message);
        }
    }

    public void ThrowUnhandledException()
    {
        throw new AccessViolationException();
    }
}
Here’s the Main() method of the console application:
static void Main(string[] args)
{
    Class1 class1 = new Class1();
    class1.ThrowHandledException();
    class1.ThrowUnhandledException();
}
If you have AccessViolationException checked in Exception Settings, execution will break on the
throwline in both ThrowHandledException() and ThrowUnhandledException() when you run this code in the debugger.
To restore the exception settings to the defaults, choose the Restore the list to the default settings button:
::: moniker range=»<=vs-2019″

::: moniker-end
::: moniker range=»>=vs-2022″

::: moniker-end
Tell the debugger to continue on user-unhandled exceptions
If you are debugging .NET or JavaScript code with Just My Code, you can tell the debugger to prevent breaking on exceptions that aren’t handled in user code but are handled elsewhere.
-
In the Exception Settings window, open the shortcut menu by right-clicking a column label, and then select Show Columns > Additional Actions. (If you’ve turned off Just My Code, you won’t see this command.) A third column named Additional Actions appears.
::: moniker range=»<=vs-2019″

::: moniker-end
::: moniker range=»>=vs-2022″
::: moniker-end
For an exception that shows Continue when unhandled in user code in this column, the debugger continues if that exception isn’t handled in user code but is handled externally.
-
To change this setting for a particular exception, select the exception, right-click to show the shortcut menu, and select Continue When Unhandled in User Code. You may also change the setting for an entire category of exceptions, such as the entire Common Language Runtime exceptions).
::: moniker range=»<=vs-2019″
::: moniker-end
::: moniker range=»>=vs-2022″
::: moniker-end


For example, ASP.NET web applications handle exceptions by converting them to an HTTP 500 status code (Exception handling in ASP.NET Web API), which may not help you determine the source of the exception. In the example below, the user code makes a call to String.Format() that throws a xref:System.FormatException. Execution breaks as follows:

Add and delete exceptions
You can add and delete exceptions. To delete an exception type from a category, select the exception, and choose the Delete the selected exception from the list button (the minus sign) on the Exception Settings toolbar. Or you may right-click the exception and select Delete from the shortcut menu. Deleting an exception has the same effect as having the exception unchecked, which is that the debugger won’t break when it’s thrown.
To add an exception:
-
In the Exception Settings window, select one of the exception categories (for example, Common Language Runtime).
-
Choose the Add an exception to the selected category button (the plus sign).
::: moniker range=»<=vs-2019″
::: moniker-end
::: moniker range=»>=vs-2022″
::: moniker-end
-
Type the name of the exception (for example, System.UriTemplateMatchException).
::: moniker range=»<=vs-2019″
::: moniker-end
::: moniker range=»>=vs-2022″
::: moniker-end
The exception is added to the list (in alphabetical order) and automatically checked.


To add an exception to the GPU Memory Access Exceptions, JavaScript Runtime Exceptions, or Win32 Exceptions categories, include the error code and the description.
[!TIP]
Check your spelling! The Exception Settings window doesn’t check for the existence of an added exception. So if you type Sytem.UriTemplateMatchException, you’ll get an entry for that exception (and not for System.UriTemplateMatchException).
Exception settings are persisted in the solution’s .suo file, so they apply to a particular solution. You can’t reuse specific exception settings across solutions. Now only added exceptions are persisted; deleted exceptions aren’t. You may add an exception, close and reopen the solution, and the exception will still be there. But if you delete an exception and close/reopen the solution, the exception will reappear.
The Exception Settings window supports generic exception types in C# but not in Visual Basic. To break on exceptions like MyNamespace.GenericException<T>, you must add the exception as MyNamespace.GenericException`1. That is, if you’ve created an exception like this code:
public class GenericException<T> : Exception
{
    public GenericException() : base("This is a generic exception.")
    {
    }
}
You can add the exception to Exception Settings using the previous procedure:
::: moniker range=»<=vs-2019″

::: moniker-end
::: moniker range=»>=vs-2022″

::: moniker-end
Add conditions to an exception
Use the Exception Settings window to set conditions on exceptions. Currently supported conditions include the module name(s) to include or exclude for the exception. By setting module names as conditions, you can choose to break for the exception only on certain code modules. You may also choose to avoid breaking on particular modules.
[!NOTE]
Adding conditions to an exception is supported starting in [!includevs_dev15].
To add conditional exceptions:
-
Choose the Edit conditions button in the Exception Settings window, or right-click the exception and choose Edit Conditions.
-
To add extra required conditions to the exception, select Add Condition for each new condition. Additional condition lines appear.
-
For each condition line, type the name of the module, and change the comparison operator list to Equals or Not Equals. You may specify wildcards (*) in the name to specify more than one module.
-
If you need to delete a condition, choose the X at the end of the condition line.


See also
- Continue execution after an exception
- How to: Examine system code after an exception
- How to: Use native run-time checks
- First look at the debugger
One of the most important concepts in modern programming is Exceptions. They were introduced in the 60’s with LISP and eventually made their way to practically all modern programming languages.
The simple concept is this: When some kind of error occurs during runtime, the execution will terminate and an Exception will be thrown. This will cause the stack to unwind until an appropriate Exception Handler is found. It’s a brilliant concept really. Here’s an example:
public void Foo()
{
    var item = _warehouse.GetItem(-1);
}
class Warehouse
{
    Item[] _items = new Item[100];
    public Item GetItem(int itemIndex)
    {
        return _items[itemIndex];
    }
}
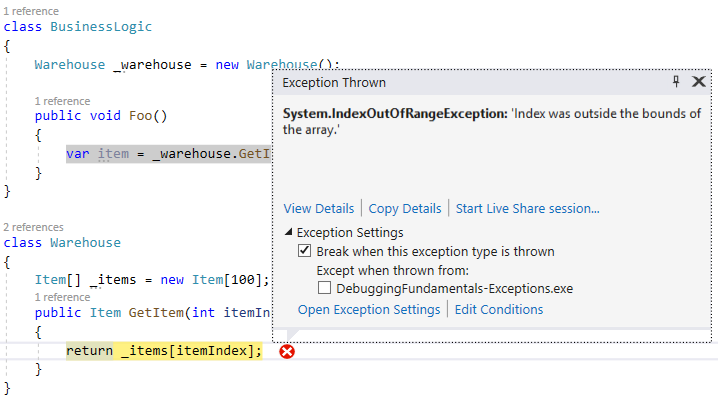
When Foo() is called, it invokes GetItem(-1). This tries to access item -1 in an array. Since -1 is an illegal index, the runtime tells us there’s an error by throwing an exception. In this case, it’s an IndexOutOfRangeException. Here’s how it looks like during debugging:
Handling Exceptions
In the above case, the exception is not handled and will crash the process. But we can handle exceptions and it’s actually standard practice in .NET. It’s done by using the try-catch clause as follows:
try
{
    ...
}
catch (Exception ex)
{
    ...
}
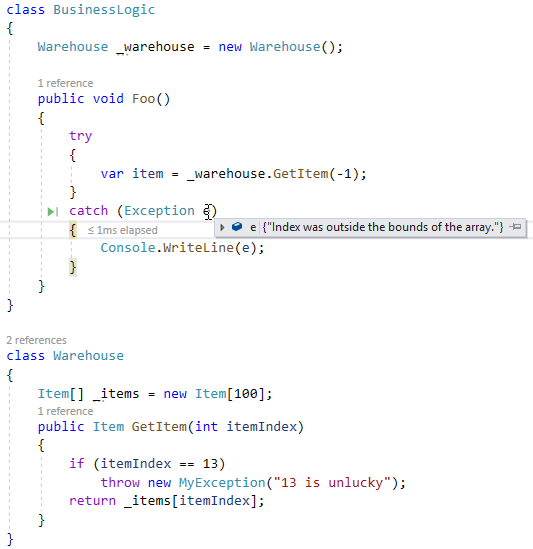
If an exception is thrown within the try statement, the execution will naturally continue to the catch statement. This includes exceptions thrown in inner methods called from the try statement. Caught exceptions are called First Chance Exceptions or Handled Exceptions.
When an exception is thrown, the stack unwinds until a handler is found. That means the runtime looks for a catch statement in the current method first. If not found, it looks for catch in the calling method and goes on all the way up to the “root” method. If not found, it’s considered an Unhandled Exception or Second Chance Exception.
What happens when an Exception is Thrown?
When a Second Chance Exception is thrown, it usually terminates the entire process, depending on some rules:
- When an exception is thrown in the Main thread (In a Console Application or a Desktop Application), from a thread created with
new Thread()or from a thread-pool thread created withThreadPool.QueueUserWorkItem, it will crash the process. - In older .NET 1.0 and 1.1 applications this behavior is different. An unhandled exception in a thread-pool thread will not crash the process. You can configure the application to the older behavior (that is, not to terminate) with some code in configuration file (not recommended).
- When an exception is thrown from a Task created with
Task.Run()orTask.Factory.StartNewit will not crash the process. In this case the exception is handled, just not in user code. - In ASP.NET, an unhandled exception in a thread within a request context will not crash the process. In this case the exception is handled, just not in user code.
When a First Chance Exception is thrown, the execution will not terminate. It will instead continue to the relevant catch clause.
Debugging Exceptions in Visual Studio
When an exception is thrown while debugging, Visual Studio might or might not break at this point to show you the exception details. This depends on your settings in the Exception Settings Window available from Debug | Windows | Exceptions Setting.
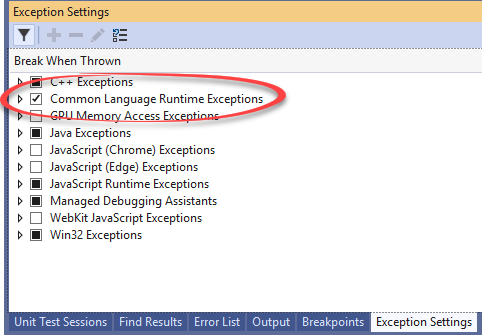
In .NET, we care only about Common Language Runtime Exceptions (CLR Exceptions). Here are the rules of behavior:
- Visual Studio always breaks on second-chance exceptions, even when the CLR Exceptions checkbox is unchecked.
- When the CLR Exceptions checkbox is unchecked, VS will break only on second-chance exceptions.
- When the CLR Exceptions checkbox is checked, VS will break on all first-chance exceptions.
- You can expand the CLR Exceptions checkbox to select which first-chance exceptions VS should break on:
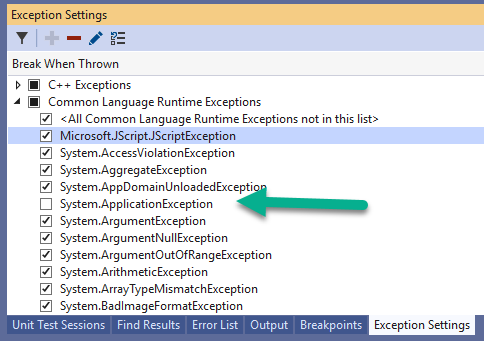
In the above case, VS will not break on System.ApplicationException.
- When an exception occurs, a popup with the exception details appears. It has some of the same options as the exception settings window:
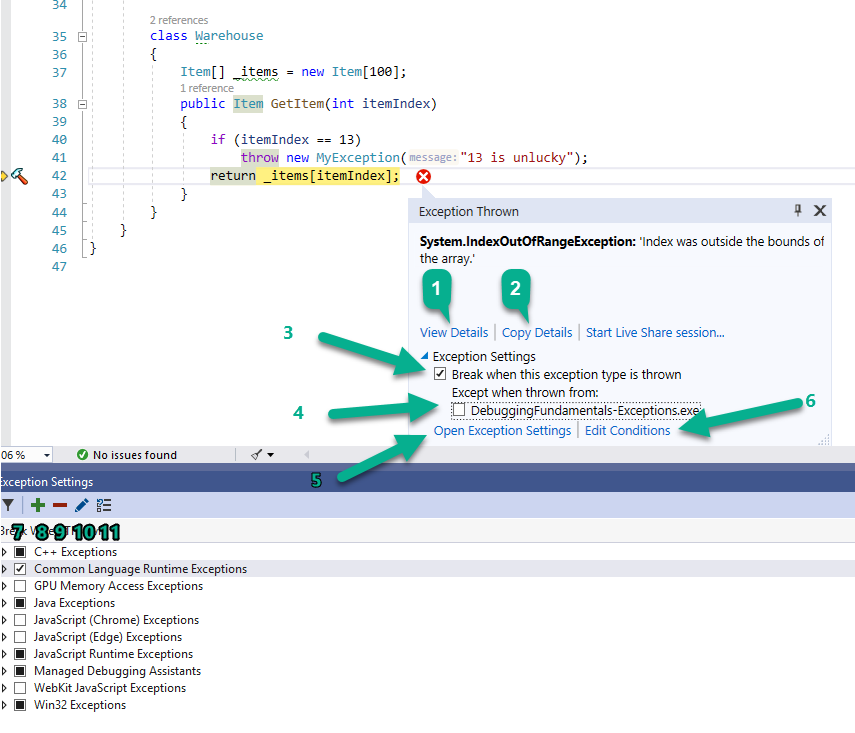
Let’s go over those options:
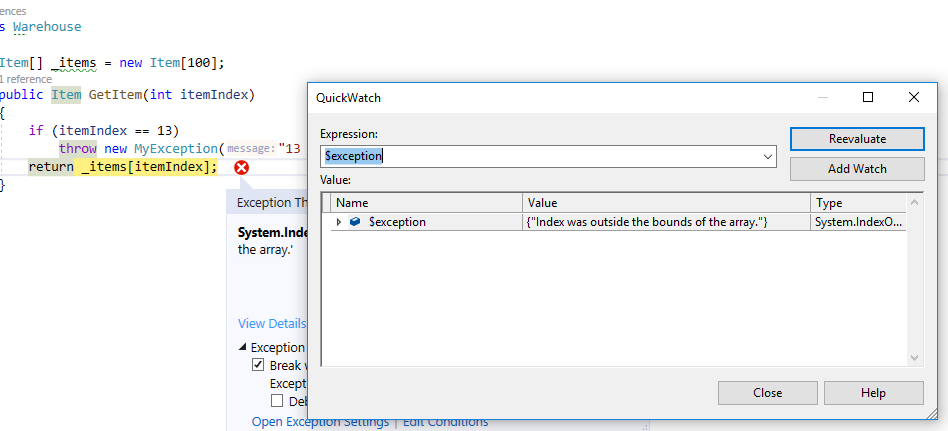
- View Details will open a QuickWatch window with the exception object that was thrown.
- Copy Details copies to clipboard the Exception Type, Message, and Call stack.
- By un-checking “Break when this exception type is thrown” VS will not stop next time on this type of exception (unless it’s a second-chance exception).
- You can add a condition to not break on this type of exception in the current assembly. This can later be edited in the Edit Conditions window available from (6) and (10).
- Opens the exceptions settings window, which is already open in the screenshot.
- Opens the Edit Conditions window.
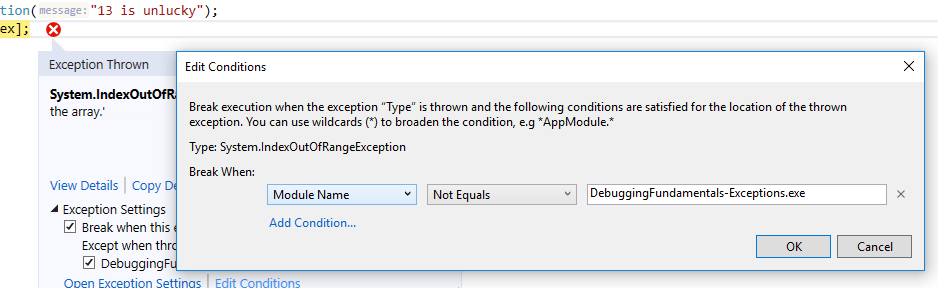
You can add conditions according to Module Name (assembly name).
- Show only enabled exceptions and expand them.
- Add a custom exception to the exceptions list. Useful when you create your own exception classes.
- Delete the selected exception from the list.
- Opens the Edit Conditions window (same as 6).
- Restore the list to default settings.
TIP: The exception settings window is one of the most important debugging windows. You should always be aware whether you are currently breaking on exceptions or not. If you’re experiencing a strange behavior or bug, it’s very likely exceptions are thrown and you’re just not aware of this because your CLR exceptions checkbox is off.
Enable Just my Code
One of the lesser known features in Visual Studio debugging is to Enable or Disable Just My Code. This is actually a very important functionality in some scenarios. You can toggle this options in VS debugging options from Debug | Options.
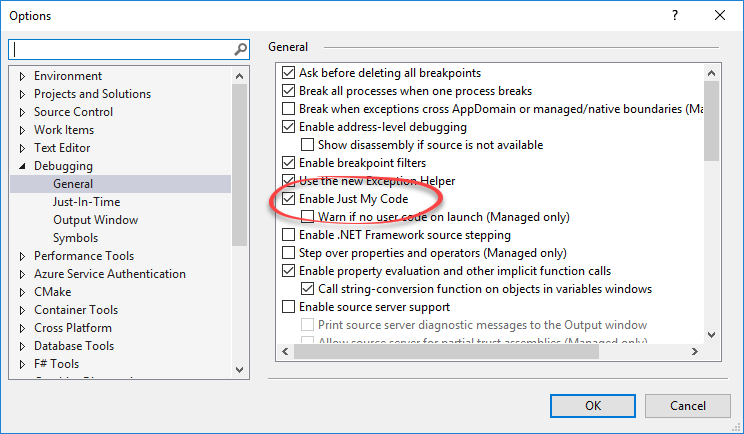
The default value is ON. That is, Just My Code is Enabled. When enabled, Visual Studio will break only on exceptions in your own code. In reality, there are a whole lot of exception being thrown in the process that we aren’t aware of. Those are exceptions in the .NET framework itself and in 3rd party libraries. We usually don’t want to be notified on those exceptions. In fact, turning this on can make your debugging experience terrible since VS will stop every second on irrelevant exceptions.
There are times that we do want to stop on those exceptions. Here are some of those:
- When something strange is going on. For example, a request to your server returns 500 for no apparent reason.
- When you’re calling 3rd party library code and it returns unexpected results.
- When you’re calling 3rd party library code and it throws an exception. By turning off Enable Just My Code you will see more details (the full call stack).
Here’s a simple example with Just My Code Enabled:
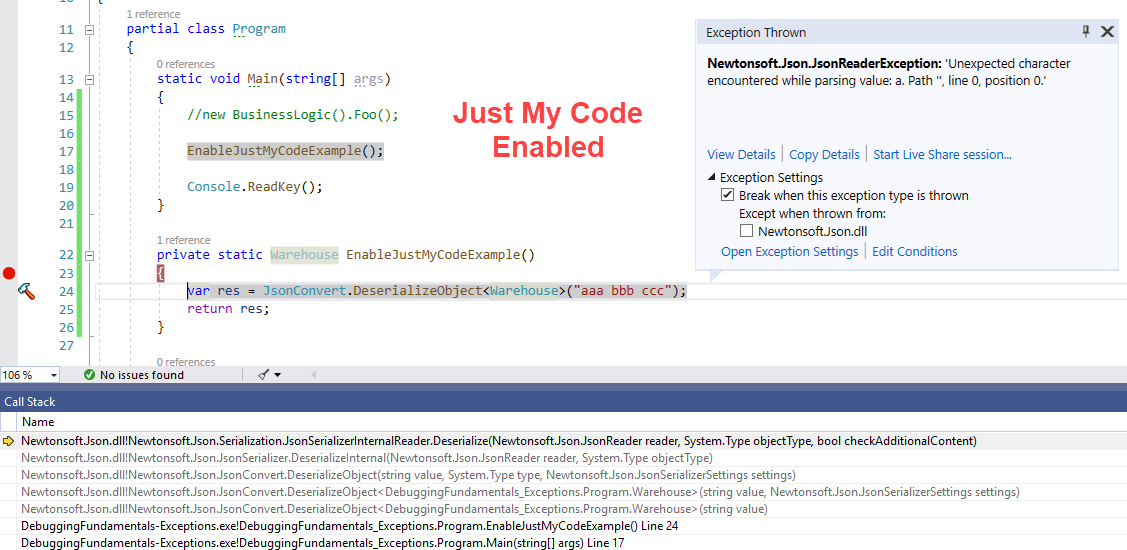
Now when disabling Just My Code:
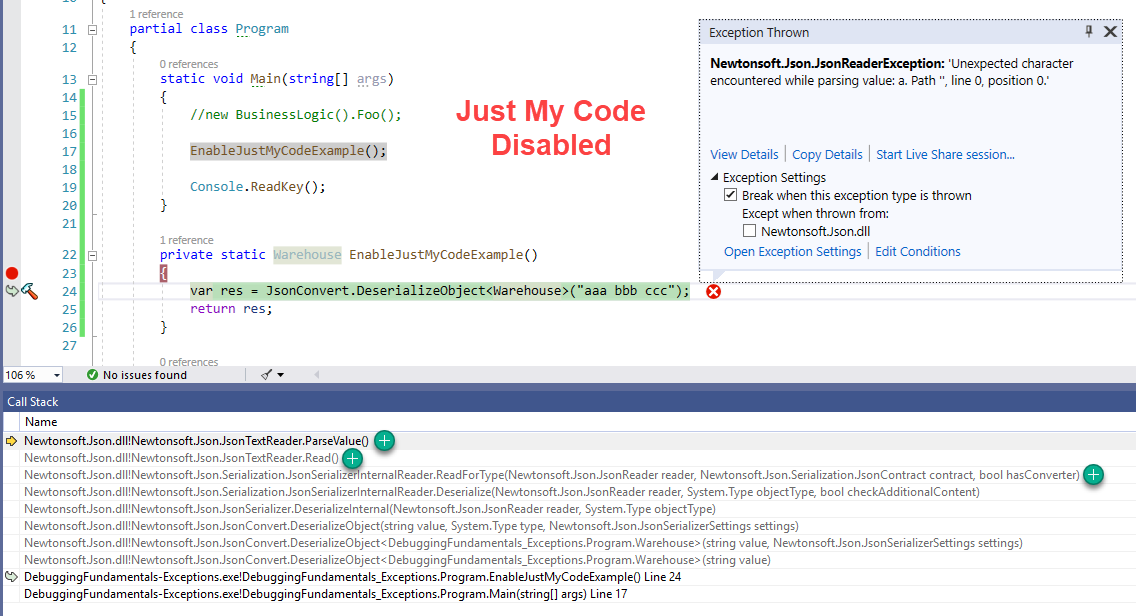
As you can see, when Just My Code is disabled, there’s more to the call stack. In this simple example it might not seem very useful, but this feature can be a lifesaver. The full call stack can give you hints to the problem. In addition, if you’re planning to debug the 3rd party code with a tool like dnSpy, you’ll have a better idea on where to place the breakpoint.
This feature is especially useful for strange unexplained behavior like failed requests for no reason.
Unwind to This Frame
When an exception happens, the debugger’s current location is somewhat special. It’s not on any particular statement, rather it shows the last statement executed before an exception was thrown. In this state, it’s possible to sort of “Go back in time” to a method (aka Frame) in the current call stack before the exception was thrown. This is done from the context menu of the Call Stack window:
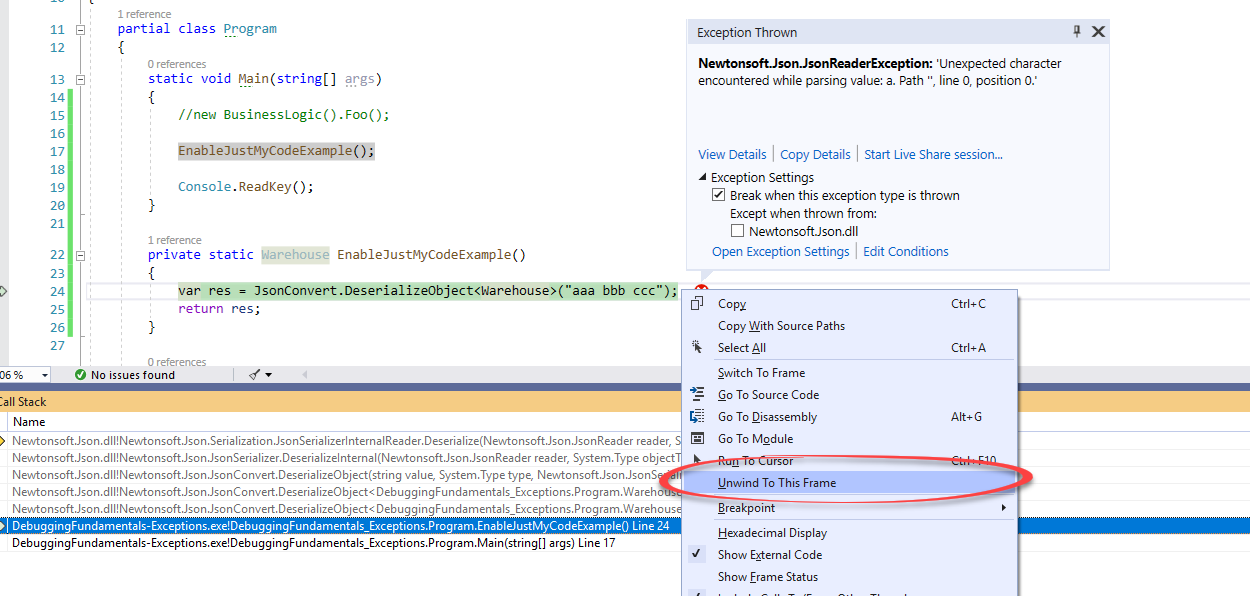
After clicking Unwind To This Frame, the exception will disappear and it would seem you are debugging the last statement up to the exception.
This feature is available only when Just My Code is Enabled. You’ll be able to unwind to more frames for unhandled exceptions.
This is useful in several cases:
- For whatever reason, you might want to repeat the scenario. For that, you can unwind to frame and hit Continue (F5). The exception will usually be thrown again.
- You can use Visual Studio’s Edit and Continue feature to edit some code and continue execution. This can save you the trouble of stop debugging, making a change, and running again. You can even Unwind to Frame, then move the debugger’s location (Set next statement (Ctrl+Shift+F10)) to a previous location in code. Then do some editing and see if it solves the problem.
IntelliTrace (Visual Studio Enterprise)
If you’re lucky enough to have a VS Enterprise license, then you can use the all-powerful IntelliTrace.
IntelliTrace allows you to record execution history. That is, you’ll be able to view and “Travel” back in time to recorded Events. What are Events? Well, exceptions, for example, are recorded events. Debugger events like breaking on breakpoints are also events.
Here’s how the Diagnostics tool window looks like when I stopped on a breakpoint after an exception was thrown:
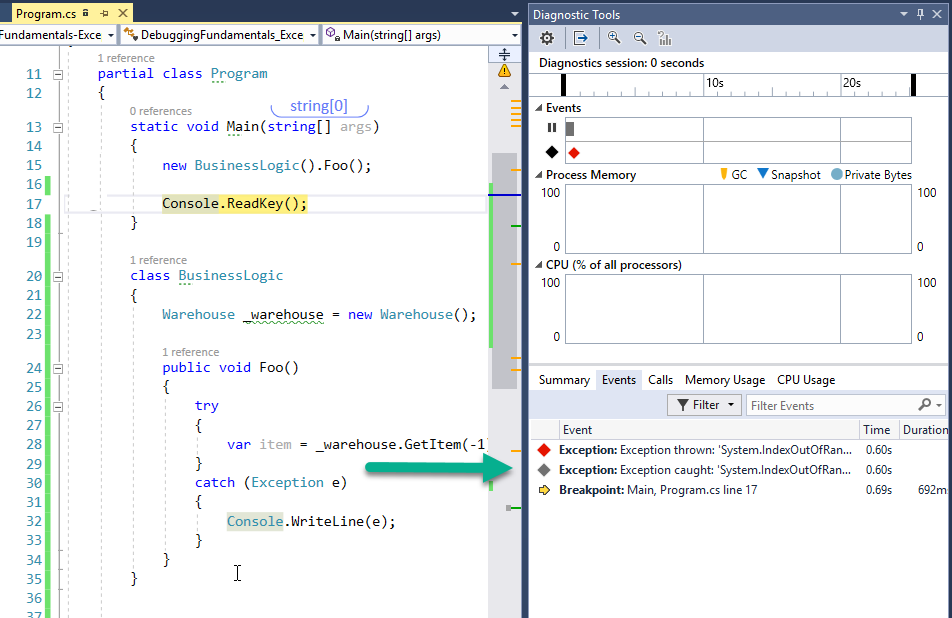
Now you can actually click on the exception event to enter a special Historical debug mode. Here’s how it looks like:
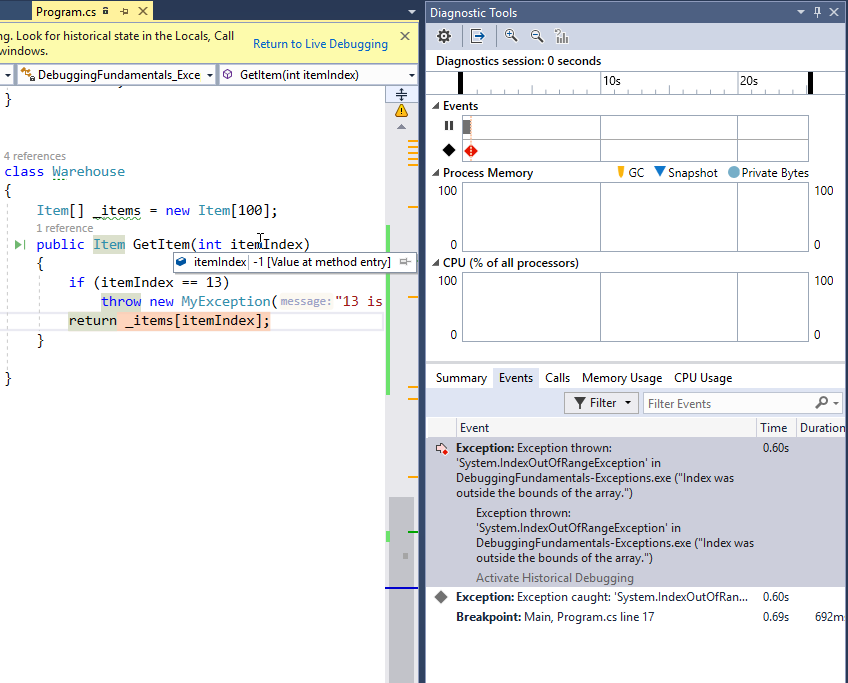
You can now debug as if Visual Studio stopped when that exception was thrown. You can see the call stack and depending on configuration, you can even see the local variables.
There are 2 main modes to configure IntelliTrace, available from Debug | Options | IntelliTrace (you’ll see this only in Enterprise version):

The first mode will record events, but not the call information. So when in this mode, you won’t see local variables like the itemIndex parameter in the picture. The second mode will record call information as well but has more impact on performance.
Когда я установил VS13 и впервые откомпилировал код с ошибками, появилось окошко, в котором мне предложили игнорировать ошибки и запускать последню удачную конфигурацию.
Подскажите, как это отключить? Чтобы проект не компилировался, если есть ошибки.
Если есть такая тема, перенаправьте, пожалуйста, не нашел.
задан 12 мая 2015 в 17:05
![]()
Amazing UserAmazing User
7411 золотой знак10 серебряных знаков28 бронзовых знаков
Код не скомпилировался. Студия предложила вам запустить результат предыдущей — успешной — компиляции, а не просто «проигнорировать ошибки и запустить что получилось».
Это можно отключить в меню Tools/Options секция Project and Solutions/Build and Run. Опция называется On run, when build or deployment errors occur... — поменяйте Prompt на Do not launch.
В русской студии — страница Проекты и решения/Построение и запуск, опция При выполнении, когда возникают ошибки построения или развертывания (MSDN)
ответ дан 12 мая 2015 в 17:10
1
It’s always fun when Visual Studio (ie @drunkvs) can’t recite the alphabet backwards: The code below builds just fine when running through the compiler, but Visual Studio displays Intellisense errors in the Error Window and in the code with underlined squiggles:
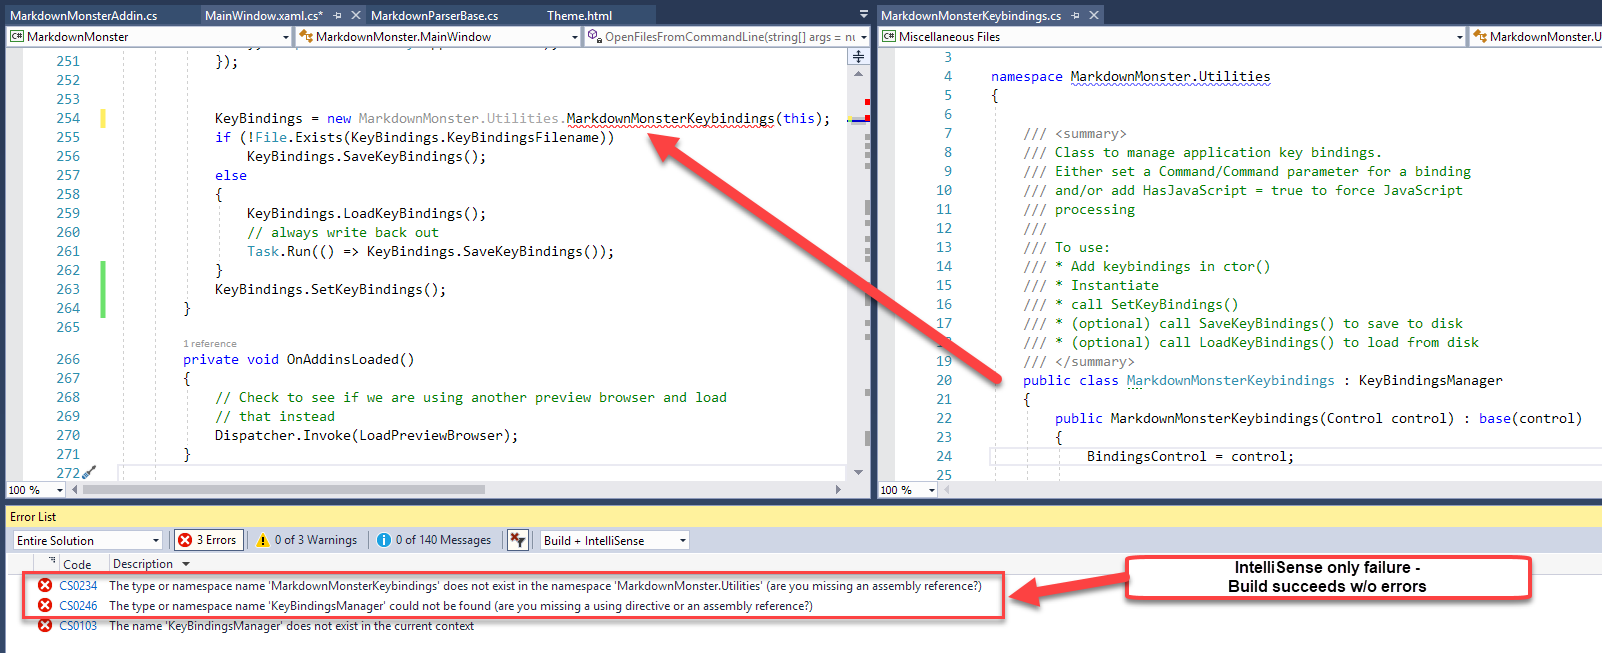
The actual build of the code succeeds, but Intellisense is flagging several classes as missing even though they clearly exist and clearly compile properly.
IntelliSense is High!
So IntelliSense sometimes goes off the rails and if you see errors in your project that don’t make sense, first check to see if the errors are related to Intellisense.
Notice the drop down in the error list that lets you see Build + Intellisense which, in the case above produces 3 errors, but no errors if I just show Build Only:
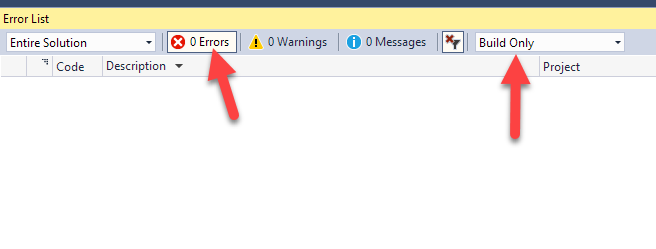
Note the Intellisense error drop down is a new feature so you may not see it in older versions of Visual Studio. Not sure when it arrived but it was in one of the late VS 2015.x updates.
Clearing up Intellisense
There’s usually a simple solution when IntelliSense decides to sleep one off:
Delete the .vs folder
The .vs folder holds solution related temp data including the .suo file that caches intellisense and some debug data. That folder also holds Web site configuration data for Web projects and a few other things. It’s safe to delete this folder — Visual Studio recreates it when it’s missing.
Older versions of Visual Studio (prior to VS 2015) didn’t have a separate folder and dumped that same information into files in the solution’s root folder.
In these older versions you can fix Intellisense issues by deleting the Solution’s .suo file. Deleting the .vs folder in newer version nukes the .suo file which is responsible for cached IntelliSense and also some cached Debug data. When VS acts up and reports whacky errors that seem wrong, the burning down the .suo file is a nice quick thing to try first.
To do this:
- Shut down VS
- Nuke the
.vsfolder or the.suofile - Restart VS
The .suo file contains cached IntelliSense data and once that file is off, no amount of recompilation or clearing the project is going to help. Nuke the .suo file. or in VS 2015 or later the .vs folder and get back to sanity.
Compiler Errors?
I haven’t run into this problem very frequently but when it does happen it’s usually quite vexing resulting (for me at least) in a flurry of deleting output folders.
I have a standard set of steps I tend to go through when I get compiler errors that are wrong. Well, usually it’s me who’s wrong, not the compiler but on occasion I get to be right and the compiler is really wrong.
If you have errors that show under the Build Only dropdown, then the issue isn’t Intellisense.
This has gotten a lot better, but for a while invalid compiler errors were a big problem with the .NET SDK projects (.NET Core / .NET Standard) and in those cases the solution for me usually is (and still occasionally is):
- Delete the
objfolder completely - Delete the
binfolder completely
While Visual Studio’s Clean project feature is supposed to address this, Clean will only clean up files the project knows about. If you’ve removed or renamed assemblies there may still be left over files in project output folders and deleting them cleans out the project completely.
This often fixes odd left over file issues that can cause strange compilation behavior. I never really considered Intellisense failure previously because Visual Studio didn’t differentiate compiler and IntelliSense Errors (or more accruately I didn’t notice the dropdown). I’d see errors in the Error list, yet my project would compile successfully, which was even more confusing.
Back to the Straight And Narrow
It’s nice that Visual Studio now explicitly shows these errors separately as Build and Intellisense errors, so you can take the sepearate actions to clean up this mess. In the past when the errors weren’t separated it was even more confusing with compiles succeeding, but the error list showing errors.
Now as to the cause of any of these errors? @drunkvs has some cleaning up to do after the barf fest of the previous night…
Далеко не всегда удается писать код абсолютно без ошибок. Если ошибки компиляции нам помогает отловить компилятор, то с ошибками логики дело обстоит немного сложнее. Как узнать, почему какая-то переменная не изменяется или почему результат выполнения какого-то кода не такой, как вы ожидали? Все это сложно, если в вас нет мощного средства отладки программы, а в Visual Studio средства отладки достаточно мощные, чтобы найти любые ошибки.
Данный документ показывает примеры отладки программ на примере среды разработки Microsoft Visual C# Express Edition. Это базовая поставка среды разработки, которая доступна бесплатно. Уже в ней заложены мощные средства отладки приложений, так что в платных версиях вы сможете найти все то же самое.
Давайте создадим новое приложение, на примере которого и будем рассматривать отладку. Нам все равно, какого типа оно будет — консольное или с визуальным интерфейсом. Я решил выбрать WinForms приложение. На поверхность формы я поместил кнопку и по событию Click для кнопки написал следующий код:
 private void button1_Click(object sender, EventArgs e)
 {
   int x = 10;
   int y = 15;
   x = Double(x);
   x = x / (y - 15);
   MessageBox.Show(x.ToString());
 }
В этом коде в третьей строке происходит вызов метода Double. Это не какой-то стандартный метод, его нужно написать в коде формы:
 int Double(int x)
 {
   return x * 2;
 }
Полный исходный код формы будет выглядеть следующим образом:
using System;
using System.Collections.Generic;
using System.ComponentModel;
using System.Data;
using System.Drawing;
using System.Linq;
using System.Text;
using System.Windows.Forms;

namespace WindowsFormsApplication1
{
    public partial class Form1 : Form
    {
        // конструктор
        public Form1()
        {
            InitializeComponent();
        }

        // обработчик события Click для кнопки
        private void button1_Click(object sender, EventArgs e)
        {
            int x = 10;
            int y = 15;
            x = Double(x);
            x = x / (y - 15);
            MessageBox.Show(x.ToString());
        }

        // наш метод Double
        int Double(int x)
        {
            return x * 2;
        }
    }
}
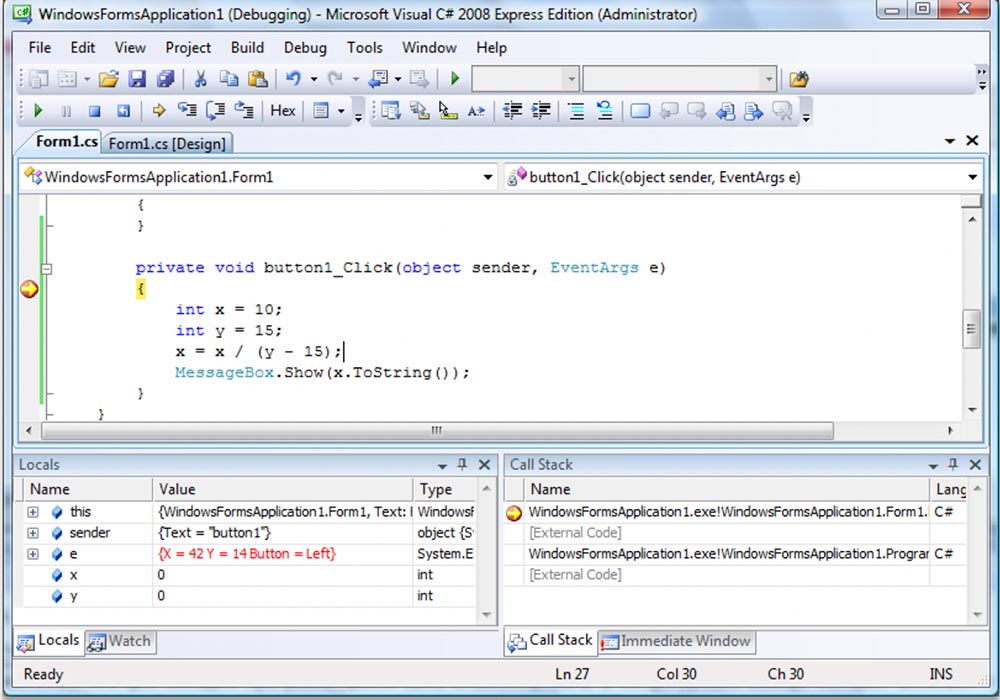
Если запустить программу из среды разработки и нажать на кнопку, то выполнение программы переключится на среду разработки и вы увидите сообщение об ошибке:
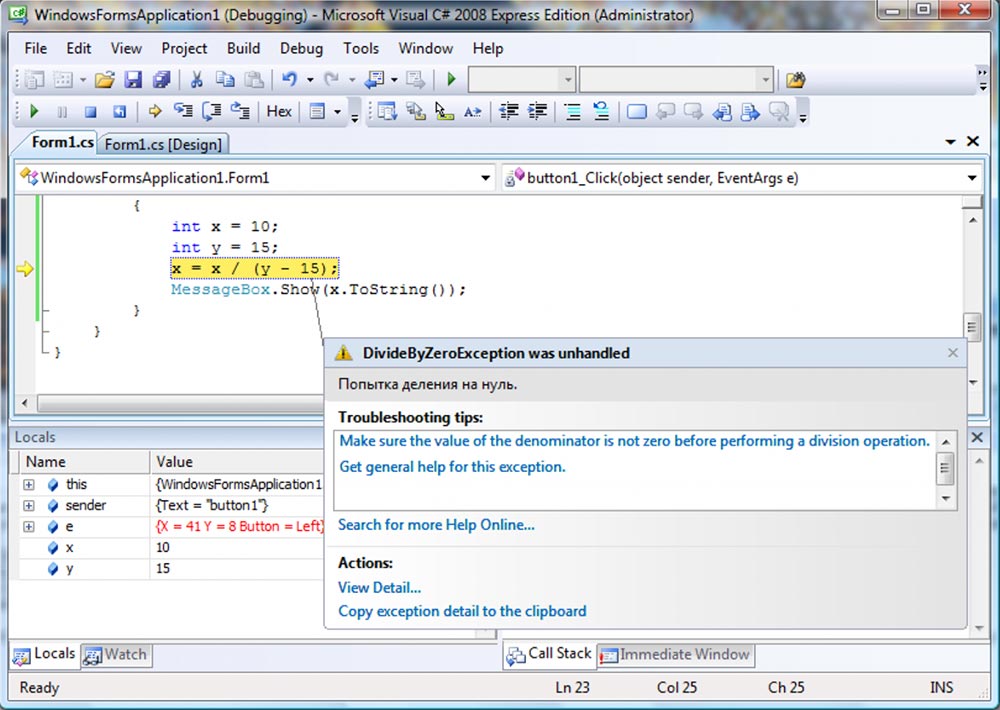
Произошла ошибка, и среда разработки взяла управление на себя, чтобы вы смогли просмотреть информацию об ошибке и попробовали определить ее источник. В редакторе кода желтым цветом выделена строка кода, в которой и произошла ошибка. От этой строки идет стрелка к всплывающему окну, в котором исключительная ситуация описана более подробно.
Название ошибки можно увидеть в заголовке всплывающего окна. Чуть ниже под заголовком находится описание ошибки. Нам повезло, потому что оно написано на русском и сразу понятно, что произошло деление на ноль:
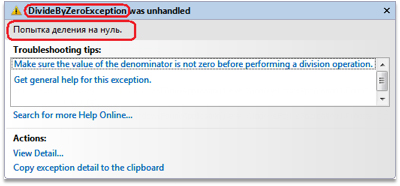
В списке Troubleshooting tips этого окна можно увидеть возможные подсказки, которые могут помочь вам найти возможное решение. В данном случае проблема проста и с ней можно разобраться без дополнительных советов, потому что в строке произошло деление на ноль и наша задача добавить перед выполнением кода проверку, которая предотвратит деление на 0. В данном случае, нужно проверить, чтобы переменная y не была равна 15:
 int x = 10;
 int y = 15;

 if (y == 15)
   MessageBox.Show("Переменная y не должна быть равна 15 ");

 x = x / (y - 15);
 MessageBox.Show(x.ToString());
Но определение ошибки далеко не всегда так легко определимо. Бывают случаи, когда нужно пройти программу пошагово, строчка за строчкой, в поисках уязвимого места, которое привело к проблеме. Давайте попробуем пройти программу пошагово. Проходить всю программу шаг за шагом проблематично, потому что очень многое происходить за кулисами, в том числе и обработка событий, а большой проект проходить шаг за шагом вообще подобно самоубийству. Поэтому чаще всего заранее определяется блок кода, который нужно проанализировать. В нашем случае этим блоком кода будет обработчик события Click для кнопки.
Конфигурация компиляции
Для того, чтобы отладка программы была доступна, программа должна быть еще запущена в режиме отладки и из среды разработки. Простое нажатие клавиши F5 как раз запускает программу в отладочном режиме. Чтобы запустить программу без возможности отладки, нужно нажать Ctrl+F5. Соответствующие пункты меню можно найти в меню Debug:
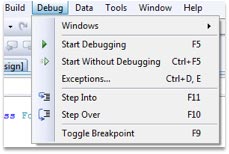
- Debug | Start Debugging запустить в режиме отладки
- Debug | Start Without Debugging запустить в режиме выполнения и без возможности отладки
Тут нужно заметить, что для отладки программа должна быть скомпилирована в конфигурации Debug, которая включает в исполняемый файл дополнительную информацию, необходимую при отладке программы. Конфигурацию можно выбрать на панели инструментов чуть правее кнопки запуска программы. На следующем снимке соответствующий выпадающий список окрашен красным цветом:

В версии Microsoft Visual C# Express Edition данный выпадающий список недоступен, а отладочная информация попадает в исполняемый файл. В версии Visual Studio Standard и более полных вариантах данный выпадающий список будет содержать конфигурации Debug и Release. Вы должны будете выбрать первый пункт. Вы можете создавать и свои конфигурации, но это уже тема отдельного разговора.
Точки останова
Итак, нам нужно отладить метод и мы сделаем это с самого начала. Для этого нужно поставить точку прерывания в нужном нам месте. Точка прерывания — это точка в коде программы, при достижении которой выполнение программы будет прервано и управление будет передано среде разработки.
Вы можете создавать точки останова в любом месте программы, но только там, где есть код и программа может прервать выполнение. Для создания точки перейдите на нужную строку и:
- — нажмите F9
- — выберите меню Debug | Toggle Breakpoint
- — дважды щелкните на полоске серого цвета, слева от строки текста в окне редактора кода
Напротив строки на полоске серого цвета слева от текста появиться красный кружок, символизирующий, что здесь стоит точка останова. Если еще раз попытаться поставить точку останова на этой же строке, то точка останова будет снята.
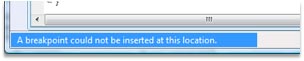
Если точку на текущей строке установить нельзя, то в строке состояния среды разработки появиться соответствующее сообщение:
Так как мы отлаживаем метод с самого начала, то поставьте курсор на строку с именем метода и нажмите F9. Теперь можно запускать программу. Кстати, запустить программу можно было и раньше, потому что точку останова можно ставить в любой момент, даже во время выполнения программы.
Запустите программу и нажмите на кнопку. После нажатия кнопки должен сработать метод button1_Click (у вас он может называться по-другому), на который я поставил обработчик события. Так как мы поставили точку останова, среда разработки перехватит на себя выполнение и выделит оператор, который можно выполнить следующим шагом желтым цветом (назовем эту точку курсором пошагового выполнения программы):
Обратите внимание, что выделена строка с символом открывающейся фигурной скобки. Это потому, что выполнение метода начинается именно с фигурной скобки, а не с имени, где мы поставили точку останова. Да, точка останова иногда может смещатся, но если вы поставите ее на конкретный оператор, который может быть выполнен, то точка останется там и никуда не поедет.
Внизу окна среды разработки появилось две панели:
- Locals — где в виде списка представлены все переменные, доступные в текущем методе. В этом списке переменные представлены в виде трех колонок:
- Name — название переменной
- Value — значение переменной
- Type — тип
- Call stack — стек вызовов. В этом окне перечислены методы, которые уже были вызваны ранее.
Пошаговое выполнение
Итак, наш курсор пошагового выполнения остановился на какой-то точке и теперь хотим начать тестирование кода. Посмотрим на панель, где появилась новая панелька отладки, там же мы и найдем необходимые команды (в скобках указаны горячие клавиши):

На этой панели можно найти следующие интересные кнопочки:
- Continue (F5) — продолжить выполнение программы.
- Stop debugging (Shift+F5) — остановить отладку. При этом остановится и выполнение программы. Даже больше — ваполнение программы прервется на той точке, на которой сейчас и находиться, т.е. оно не будет завершено корректно и ничего не сохранится, если вы в программе что-то делали.
- Restart (Ctrl+Shift+F5) — перезапустить программу. Выполнение программы будет прервано и запустится заново.
- Show Next Statement (Alt + Num *) — показать следующий оператор, т.е переместить курсор редактора кода в курсор пошагового выполнения. Курсор переместиться в начала оператора, который должен быть выполнен следующим. В редакторе кода он выделен желтым цветом.
- Step Into (F11) — выполнить очередной оператор. Если это метод, то перейти в начало этого метода, чтобы начать отладку. Например, если вы находитесь на строке: x = Double(x) то, курсор пошагового выполнения перейдет на начало метода Double и вы сможете отладить этот метод;
- Step Over (F10) — выполнить очередной оператор. Если это метод, то он будет полностью выполнен, т.е. курсор выполнения не будет входить внутрь метода.
- Step out (Shift + F11) — выйти из метода. Если вы отлаживаете метод и нажмете эту кнопку, то метод выполнится до конца и курсор пошагового выполнения выйдет из метода и остановится на следующей строке после вызова данного метода. Например, если вы отлаживаете метод Double, нашего примера и нажмете эту кнопку, то метод выполнится до конца, а выполнение остановится на строке «x = x / (y — 15);» метода button1_Click.
Попробуйте сейчас пошагово выполнить код метода, нажимая клавишу F10. Потому запустите снова приложение и попробуйте пошагово выполнить его, нажимая клавишу F11. Я могу много рассказывать и описывать тестирование, но пока вы сами не попробуете, вы не поймете смысл и мощь пошагового выполнения. Когда произойдет ошибка, попробуйте прервать работу отладки и приложения, нажав Shift+F5.
Просмотр значений
Выполните пошагово код так, чтобы курсор выполнения остановился на следующей строке:
x = x / (y - 15);
Нам нужно узнать, почему происходит ошибка. Так как ошибка в делении, то нужно просмотреть, на что происходит деление. В данном случае это скобка. Наведите мышкой на открывающуюся или закрывающуюся скобку и вы увидите всплывающую подсказку, в которой находится результат вычисления значения в скобках:
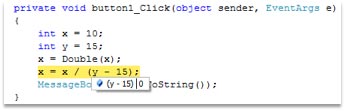
Результат находится после вертикальной черты и он равен нулю. Вы можете наводить мышкой на любую переменную, и отладчик покажет вам ее значение в виде всплывающей подсказки.
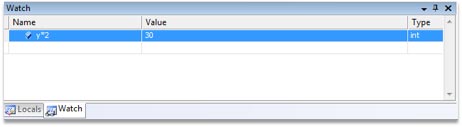
Посмотрите на панель Locals. По идее внизу у вас должны быть еще одна закладка Watch. Переключитесь на нее. Здесь находится список, в который вы можете вносить свои переменные и выражения, за значениями которых вы хотите наблюдать. Выделите первую пустую строку в списке (всегда одна пустая строка присутствует в списке) и в поле Name введите y*2 и нажмите Enter. В поле Value появится значение выражения. После каждого шага выполнения значение переменной будет пересчитано и отображено. Таким образом, вам не нужно после каждого шага наводить на переменную, чтобы узнать ее значение. Оно видно в окне Watch:
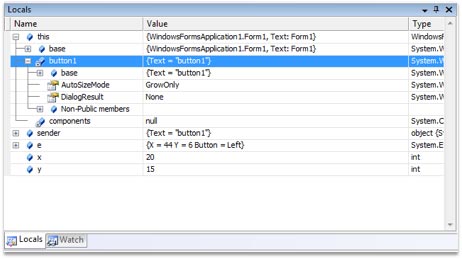
На закладке Locals видны переменные, которые актуальны для данного метода. Сюда включаются переменные, объявленные внутри метода и параметры метода, а так же переменная this.
Параметры представлены в виде дерева для объектных типов данных. Раскрывая дерево объекта this вы можете увидеть значения всех свойств и даже объектов на текущей форме, ведь this всегда указывает на текущий объект, которым является форма:
Заключение
Отладка — это мощное средство поиска любого вида ошибок. Я надеюсь, что этот документ поможет вам разобраться с этим процессом. Да, документ нельзя назвать основательным, но я постарался включить в него все основные нюансы, которые вам могут пригодиться в реальной работе.
Внимание!!! Если ты копируешь эту статью себе на сайт, то оставляй ссылку непосредственно на эту страницу. Спасибо за понимание