
Содержание
- Announcement
- My desperate situation with M8S (m8 v8_1 20150418) SOLVED. 🙂
- My desperate situation with M8S (m8 v8_1 20150418) SOLVED. 🙂
- Comment
- Comment
- Comment
- Comment
- Comment
- Comment
- Uboot partition boot download buffer data transfer error
Announcement
My desperate situation with M8S (m8 v8_1 20150418) SOLVED. 🙂
![]()
My desperate situation with M8S (m8 v8_1 20150418) SOLVED. 🙂
- Join Date: Jun 2012
- Posts: 9458
Welcome to Freaktab.com.
1.: What Version of Windows you are running?
2.: Did you install the Drivers with USB Burning Tool?
3.: You are sure you are using the Right USB Port?

![]()
Yes. On Windows 10 World cup drivers installed trough USB burning tool 2.0.4.3 setup and i used the usb port next the corner of the box not the port next the hdmi output. i used a toothpick to push recovery button and in same time plug the USB male-male cable to the PC and the power cable too but nothing appear. only blue led on front.
please find a video of my box inside:
https://goo.gl/photos/XMCUM2h4zGnwC19s7
I read somewhere we have to short some pins on nand or create a jumper on the board between USB port and HDMI. But with tons of m8s clones I don’t which.
- Join Date: Jun 2012
- Posts: 9458
The problem here is Windows 10, It’s working also on Windows 10 / 8.1 64 bit, but you’ll have to disable driver signature enforcement to install the Drivers.
Take a look here —> https://www.youtube.com/watch?v=gmw8. yer_detailpage
![]()
Even if there is no drivers installed it should react when I plug the USB cable in! No? I m going to try and tell you. Thx
Envoyé de mon Nexus 5 en utilisant Tapatalk
![]()
OK. Still no detection using F7 to install unsigned drivers. Only blue LED on front and still no video output and no recovery access. I shorted pins 29-30 and with power no led at all.
Envoyé de mon Nexus 5 en utilisant Tapatalk
![]()
Finally my box is back to life. Not far to go into the bin. 
i followed this procedure: i had to shorten 29-30pins of the nand then unshort when box detected by USB Burning tool in order to use this firmware m8s_ap6330_8g2g_150818_USB
My problem is SOLVED
»
NOTE: Shortening the pins is needed only if you have problems with device recognition (in Windows) and troubles with NAND flashing procedure. This trick will enable a special state to interact with NAND directly. Please, refer to your NAND datasheet to find the correct pin numbers for I/O0 and I/O1 pins. In my case it’s 29-30 pins (H27UCG8T2ETR). Please, be carefull! It’s on your own risk!
Flashing procedure:
1) Install the drivers and USB Burning tool first (refer to instruction in this thread).
2) Check the connection: hold the recovery button, then connect device to PC using USB-OTG slot.
If the device is visible in Windows — GOOD! If not — you should try a trick with a pins (see below).
To test the connection — run Amlogic USB Burning Tool as administrator, if everything is fine — you should see the device connected in this tool.
Disconnect the device.
3) Prepare the firmware in IMG file. Make sure it’s ok
4) Hold the recovery button on your device (I’ve used a wooden stick), then proceed to the next step:
5) (powering up)
a) Without shortening pins: Put USB cable into USB-OTG slot to power-up the device. You should see the new device dialog in Windows and connection in Amlogic USB Burning Tool. Goto step 6.
b) With shortening pins: Shorten the 29 and 30 pins (refer to your NAND datasheet) with a needle (or some thin metal) and hold it, then put USB cable into USB-OTG slot to power-up the device. When LED powers-up — stop shortening! A new device dialog will display, and you will see the device connected in Windows and Amlogic USB Burning Tool.
6) Now you can un-press the recovery button.
Check device connection in Amlogic USB Burning Tool.
Flash IMG file (refer to instruction in this thread).
After you will successfully flash the IMG file, press Stop button, then remove USB cable from USB-OTG port
Thats it! Your device now should boot fine!
In case of errors I suggest you to use Force Erase All option, and check the connection.
Using a good USB connection is very important!
There was a problem with my USB connection at the first time, so I had to change the cable to good and short one, and after that its worked fine.
So, you should try to change the cable first in case of this errors:
UBOOT/Partition boot/Download buffer/Data tranfer error
Romcode/Lead UBOOT/Download UBOOT/Data tranfer error
USB error occur when transfer buffer at Uboot Partition
NOTE: After you have flashed the image, you will be able to flash your regular firmware from zip (from recovery).
In case of fail, you can use Amlogic USB Burning Tool to start all over again
»
Source: http://mbox.co.za/forum/viewtopic.ph. t=182&start=20
![]()
Finally my box is back to life. Not far to go into the bin.
i followed this procedure: i had to shorten 29-30pins of the nand then unshort when box detected by USB Burning tool in order to use this firmware m8s_ap6330_8g2g_150818_USB
My problem is SOLVED
»
NOTE: Shortening the pins is needed only if you have problems with device recognition (in Windows) and troubles with NAND flashing procedure. This trick will enable a special state to interact with NAND directly. Please, refer to your NAND datasheet to find the correct pin numbers for I/O0 and I/O1 pins. In my case it’s 29-30 pins (H27UCG8T2ETR). Please, be carefull! It’s on your own risk!
Flashing procedure:
1) Install the drivers and USB Burning tool first (refer to instruction in this thread).
2) Check the connection: hold the recovery button, then connect device to PC using USB-OTG slot.
If the device is visible in Windows — GOOD! If not — you should try a trick with a pins (see below).
To test the connection — run Amlogic USB Burning Tool as administrator, if everything is fine — you should see the device connected in this tool.
Disconnect the device.
3) Prepare the firmware in IMG file. Make sure it’s ok
4) Hold the recovery button on your device (I’ve used a wooden stick), then proceed to the next step:
5) (powering up)
a) Without shortening pins: Put USB cable into USB-OTG slot to power-up the device. You should see the new device dialog in Windows and connection in Amlogic USB Burning Tool. Goto step 6.
b) With shortening pins: Shorten the 29 and 30 pins (refer to your NAND datasheet) with a needle (or some thin metal) and hold it, then put USB cable into USB-OTG slot to power-up the device. When LED powers-up — stop shortening! A new device dialog will display, and you will see the device connected in Windows and Amlogic USB Burning Tool.
6) Now you can un-press the recovery button.
Check device connection in Amlogic USB Burning Tool.
Flash IMG file (refer to instruction in this thread).
After you will successfully flash the IMG file, press Stop button, then remove USB cable from USB-OTG port
Thats it! Your device now should boot fine!
In case of errors I suggest you to use Force Erase All option, and check the connection.
Using a good USB connection is very important!
There was a problem with my USB connection at the first time, so I had to change the cable to good and short one, and after that its worked fine.
So, you should try to change the cable first in case of this errors:
UBOOT/Partition boot/Download buffer/Data tranfer error
Romcode/Lead UBOOT/Download UBOOT/Data tranfer error
USB error occur when transfer buffer at Uboot Partition
NOTE: After you have flashed the image, you will be able to flash your regular firmware from zip (from recovery).
In case of fail, you can use Amlogic USB Burning Tool to start all over again
»
Source: http://mbox.co.za/forum/viewtopic.ph. t=182&start=20
please, I needed that firmware, you’d be so kind to give me a link that works.
Thank you.
a greeting.
Источник
Вскрываете приставку и смотрите маркировку на плате рядом с процессором.
Пример
Старая ревизия с 2 Гб ОЗУ
Q5X2 V1.0 18482
Q5X2 V1.5 19023
Q5X2 V2.0 18375
Q5X2 V4.0 18472
Q5X2 V4.5 18525
Старая ревизия с 4 Гб ОЗУ
Q5X2 V3.0 18393
Q5X2 V3.0 18395
Q5X2 V5.0 18436 — Проблемная. Многие прошивки не работают.
Q5X2 V5.0 18483
Q5X2 V5.5 19015
Q5X2 V7.0 19133 — Проблемная. Многие прошивки не работают.
Новая ревизия с 4 Гб ОЗУ
Q5X2 LP3 19215
- Amlogic USB Burning Tool (Поддерживаемые версии от 2.1.6.8 до 2.2.4 ) — Прошивальщик для устройств на базе Amlogic
- ADB и все, что с помощью него можно сделать — Консольное приложение для работы с Android устройством
- Burn Card Maker — Программа для создания «прошивочной» флешки
- AFRD (актуально для стоковых и на их основе прошивок) — автофреймрейт для устройств на SOC Amlogic
- Google Chrome версия 57 с copy/paste (Не будет обновляться)
- SmartTubeNext — альтернативный youtube клиент без рекламы
- YouTube Bridge (STN) — дополнение для SmartTubeNext, позволяет запустить видео найденные с помощью голосового поиска
- Включение/Отключение USB
- Google Cast
- Пульт на смартфон для Android TV BOX (CetusPlay)
- Кастомное ядро от anpaza
- AFR на прошивках UGOOS
- Патч для отключения защиты на прошивках UGOOS
Необходимую запись добавить в файл /vendor/bin/preinstall.sh после последней строки через любой файловый менеджер или терминал
Отключение деинтерлейса (помогает с проблемами в приложении Wink):
Рабочая регулировка работы шумодава в Droid settings — Picture — DNR ( только для Android 9)
В файле по пути /vendor/etc/tvconfig/pq/pq_default.ini исправляем строку:
В теме нет куратора. По вопросам наполнения шапки обращайтесь к модераторам раздела через кнопку  под сообщениями, на которые необходимо добавить ссылки.
Сообщение отредактировал Cuphead — 13.01.23, 05:55


YouTube максимальная резолюция 1080p может потому что мой ТВ не поддерживает 4К. Тут тоже придётся покопаться в индефикация бокса и разрешение резолюцией файле build.prop.
Далее была установлена Aida 64. Которая показала система Android 8.1.0 Linux ядро 4.9. 76.
Устройство с Root доступом (Да) что очень сомнительно.
ЦП — 4 ядра 100-1908Мгц.
Память Ram 4 Гб для пользования доступно 3836MB.
Память ROM 24.01Гб ( вот тут странность было заказано 32Гб ).
Поддержка как и обещано Open GL ES 3.2 графическая карта Mali g31.
USB 2.0 — поддерживаемая скорость 480 Мбит/с.
USB 3.0 HCI Host Controller — поддерживаемая скорость 5000 Мбит/с.


Была установлена программа мониторинг ресурсов. Выведи на верхнюю часть экрана показания работы CPU, температурный режим а также оставшаяся Ram память.
Состояние простоя температурный режим 40-45 градусов. (Поначалу даже удивила меня столь хорошим охлаждением бокса). При установке программ и серфинге интернет температура не подымалась более 50 градусов.
Далее было установлено Ace Stream Media. Lol TV. Для контроля потоковое онлайн ТВ. IPTV Player с встроенными плейлистми. Программы и ресурсы отзывались с хорошей скоростью по WiFi 5.8Ггц соединения. Но тут началось нагревания бокса до 65 градусов в течение получаса просмотра 1 HD канал. 720dpi. Переключение на спортивный канал увеличила температурный режим до 70 градусов. И как мы видим по скриншотам таинственно стали исчезать мегабайты с Ram памяти. CPU — 4 процессоры молотили 98-100%.
Video HD Box установлен запустился но не было проверено. OGYouTube так же был установлен но не хватило времени проверить. Может быть во второй серии продолжим тестирование сей удивительного бокса .
P. S Удивило очень быстрая отзывчивость быстрая работа системы. По сравнению с процессором Amlogic s912 ощущение 20-30% прибавление скорости. Копирование штук 20 скриншотов прошло моментально на флешку USB 3.0.
Установка программ, ощущение ускоренного процесса. Подключение к аккаунту и скачивание с Play Market Aida64 довольно-таки большая программа, прошла быстро.
Пульт — программируется четыре (4) дополнительные кнопки под ТВ. Очень удобно лежит в руке отзывчивый.
Не понравилось неудобная управление мышь. Так как система более заточена под управления пульт.
Но это уже издержки системы Android 8.1.
CPU Throttling тест не прошёл по причине некорректной работы самой программы, при запуске программы запускалась то в ландшафтном режиме, то переворачивалась портретный режим невозможно было отследить и сделать скриншоты.
Нав-бар не присутствует не Нижний не верхний статус бар.
Скриншоты сейчас добавлю по мере возможности буду добавлять некоторые нюансы по тестированию.
Источник
Finally my box is back to life!!!! Not far to go into the bin…
i followed this procedure: i had to shorten 29-30pins of the nand then unshort when box detected by USB Burning tool in order to use this firmware m8s_ap6330_8g2g_150818_USB
My problem is SOLVED
«
NOTE: Shortening the pins is needed only if you have problems with device recognition (in Windows) and troubles with NAND flashing procedure. This trick will enable a special state to interact with NAND directly. Please, refer to your NAND datasheet to find the correct pin numbers for I/O0 and I/O1 pins. In my case it’s 29-30 pins (H27UCG8T2ETR). Please, be carefull! It’s on your own risk!
Flashing procedure:
1) Install the drivers and USB Burning tool first (refer to instruction in this thread).
2) Check the connection: hold the recovery button, then connect device to PC using USB-OTG slot.
If the device is visible in Windows — GOOD! If not — you should try a trick with a pins (see below).
To test the connection — run Amlogic USB Burning Tool as administrator, if everything is fine — you should see the device connected in this tool.
Disconnect the device.
3) Prepare the firmware in IMG file. Make sure it’s ok
4) Hold the recovery button on your device (I’ve used a wooden stick), then proceed to the next step:
5) (powering up)
a) Without shortening pins: Put USB cable into USB-OTG slot to power-up the device. You should see the new device dialog in Windows and connection in Amlogic USB Burning Tool. Goto step 6.
b) With shortening pins: Shorten the 29 and 30 pins (refer to your NAND datasheet) with a needle (or some thin metal) and hold it, then put USB cable into USB-OTG slot to power-up the device. When LED powers-up — stop shortening! A new device dialog will display, and you will see the device connected in Windows and Amlogic USB Burning Tool.
6) Now you can un-press the recovery button.
Check device connection in Amlogic USB Burning Tool.
Flash IMG file (refer to instruction in this thread).
After you will successfully flash the IMG file, press Stop button, then remove USB cable from USB-OTG port
Thats it! Your device now should boot fine!
In case of errors I suggest you to use Force Erase All option, and check the connection.
Using a good USB connection is very important!
There was a problem with my USB connection at the first time, so I had to change the cable to good and short one, and after that its worked fine.
So, you should try to change the cable first in case of this errors:
UBOOT/Partition boot/Download buffer/Data tranfer error
Romcode/Lead UBOOT/Download UBOOT/Data tranfer error
USB error occur when transfer buffer at Uboot Partition
NOTE: After you have flashed the image, you will be able to flash your regular firmware from zip (from recovery).
In case of fail, you can use Amlogic USB Burning Tool to start all over again
«
Source: http://mbox.co.za/forum/viewtopic.ph…t=182&start=20
Have had a U9-h for 2 years now. No problems till this summer. While streaming video (using apps, not Kodi) my screen would go black, but audio would carry on. Sometimes video would return back to normal; other times the screen would go blue. Had to turn it off and reboot to get going again.
Now the problem is getting worse. I get a black screen sometimes without doing anything (i.e. at the Launcher screen). Have tried a factory reset to no avail. Any suggestions to rectify the situation?
To make matters worse, I have an old MXQ Pro which functions fine (except that it is much slower than the U9-h.
Any suggestions you might have would be greatly appreciated.

Firmware is up to date. No updates per the OTA firmware check.

Any suggestions you might have would be greatly appreciated.
Try with another hdmi cable
Firmware is up to date. No updates per the OTA firmware check.
You have to flash the firmware via manual update with usb burning tool and not via OTA (automatic).
Tried the manual update. Got through to 38% complete and received the following error message:
[0x30403003] UBoot/Partition System/Download Buffer/Data Transfer Error
Now my PC will not even recognize the U9-h as an external device. Any suggestions?
Tried the manual update. Got through to 38% complete and received the following error message:
[0x30403003] UBoot/Partition System/Download Buffer/Data Transfer Error
Now my PC will not even recognize the U9-h as an external device. Any suggestions?
Did you try a Factory Reset before this?
Gave it one last try. Got much further this time, but stopped on the 1-yard line (i.e. 98%) and received this message:
[0x30401002]UBoot/Partition Bootloader/Identify/USB Control Setup Error. Suggestions?

Gave it one last try. Got much further this time, but stopped on the 1-yard line (i.e. 98%) and received this message:
[0x30401002]UBoot/Partition Bootloader/Identify/USB Control Setup Error. Suggestions?
Try it a third time .
Have tried numerous times with both the Android 6 and Android 7 versions. Both get me to the 98% mark with the error message as noted above. Also tried hooking the unit back up with my TV. No start up. As well, nothing happens when I hold the Power Button down for 6+ seconds to try to get to the Factory Reset screen. Is this the end?
Did you try a Factory Reset before this?
If you performed a Factory Reset, why did you then progress to burning the image?
nothing happens when I hold the Power Button down for 6+ seconds to try to get to the Factory Reset screen.
As your device has been partly flashed then Factory Reset will no longer be an option as it needs a fully flashed firmware to do this.
Have had a U9-h for 2 years now. No problems till this summer. While streaming video (using apps, not Kodi) my screen would go black, but audio would carry on. Sometimes video would return back to normal; other times the screen would go blue. Had to turn it off and reboot to get going again.
Now the problem is getting worse. I get a black screen sometimes without doing anything (i.e. at the Launcher screen). Have tried a factory reset to no avail. Any suggestions to rectify the situation?
To make matters worse, I have an old MXQ Pro which functions fine (except that it is much slower than the U9-h.
Any suggestions you might have would be greatly appreciated.
I have kind off the same problem but my minix reboot after +/_ 1 hour of streaming… I just wondering do you use a VPN app?
-
#1
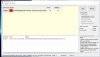
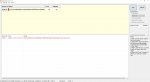
Hello all I was wondering if you could help with my H96 MAX X2 box, it started with it not fully booting up, was stuck on screen logo, reported it to the people I bought the box off (eBay) they told me to reset to factory settings using set setup menu, but it still would not start up, still stuck on the logo screen, they then sent me files and a video to reflash the box, the very first time I tried to flash it, it got to 29% (see picture 1) then got the error UBOOT/Partition system/Download buffer/Data transfer error,… I followed the video perfectly, the box was recognized when I plugged in the USB, then when it started to reflash it again it got to 3% and I heard the sound of the USB being disconnected, then it carried on to 9% (see picture 2) also a box pops up in the bottom right hand corner saying unrecognizable device, then I get and error saying “[HUB5-14][Err]—[0x30403003]UBOOT/Partition boot/Download buffer/Data tranfer error” and that happens every time now
I am using a Windows 7 32bit pc to try this on
Thanks in advance
Bazza08
P.S. nothing at all shows up when i plug the box into my tv, there is an orange light on the front of the box
-
#2
here are the pictures and Log
-

Picture 1.JPG
152.2 KB · Views: 408
-

Picture 2.JPG
117.1 KB · Views: 463
-
2019.06.27-12.txt
330.7 KB · Views: 223
![]()
-
#4
Hi Dave, thanks for your time, yes mate that is what they told me to do and the pictures i attached were the result of tring to flash the firmware, this is the video they sent me
-
#5
Try another usb port on your pc as the amlogic burning tool can be very temperamental at the best of times. If you have the correct drivers installed it will happen for you.
-
#6
Hi Sean thanks for your time, i will give it a try
Bazza08
-
#7
Try another usb port on your pc as the amlogic burning tool can be very temperamental at the best of times. If you have the correct drivers installed it will happen for you.
Hello Sean i have tried every USB port three or four times in each, still no joy just keeps stopping at the same 9% ….with the same error as in picture 2 in my earlier post. Is there any other way to flash the firmware say with a Linux pc or using scrt_sfx852-x64??
barry
![]()
-
#8
If it is stopping at the same place then it could be an error on the device itself such as faulty storage. I do not know off hand if there is flashing software for Linux etc, we only have and use a Windows version. Have you tried it on a different PC?
-
#9
If it is stopping at the same place then it could be an error on the device itself such as faulty storage. I do not know off hand if there is flashing software for Linux etc, we only have and use a Windows version. Have you tried it on a different PC?
Morning Dave C, Yes mate three computers and one laptop, is there any other firmware I could try on this box??
![]()
-
#10
The only firmware we have is the one on the forum guide. If it is failing on other PC’s then the issue is most likely that the hardware is faulty. You will need to contact the seller for a return for repair.
-
#11
Merhaba
Bende de aynı problem var H96 max x2 lpddr3 4 ram 32 rom
çözdün mü
![]()
![]()
-
#14
It is the firmware we use in our devices. I can not guarantee it will work for you if you did not buy from us. But if your device is bricked then it is worth trying.
-
Mohannad84
- Verified Member
- Posts: 12
- Joined: Sun Jun 07, 2020 6:30 pm
Wed Jun 10, 2020 2:11 pm
yes.. I did unzip the file, and took the image file and put it in separate folder and then I open USB burning tool and i click on import image and choose the image file . is there something wrong ?!
-
Mohannad84
- Verified Member
- Posts: 12
- Joined: Sun Jun 07, 2020 6:30 pm
#12
Wed Jun 10, 2020 2:15 pm
yes I unzipped the file and took the image file and put it in a separate folder.. then I opened USB burning tool and clicked in import image and choose that image file..and then it gave me error (( Parse burning image fail )) …
is there something wrong ?!
-
Mohannad84
- Verified Member
- Posts: 12
- Joined: Sun Jun 07, 2020 6:30 pm
#13
Thu Jun 11, 2020 12:23 pm
bumerc wrote: ↑Wed Jun 10, 2020 5:39 am
Mohannad84 wrote: ↑Tue Jun 09, 2020 8:53 pm
When I’m inside the burning tool, I clicked on import image and choose the images file you added in the link, but the burning tool is giving me the following message (( Parse burning image fail )).did you unzip the image earlier?
yes I did .. see my reply up … waiting for your reply ..
-
bumerc
- Administrator & Developer
- Posts: 1656
- Joined: Tue Oct 02, 2018 6:19 pm
- Has thanked: 256 times
- Been thanked: 350 times
#14
Thu Jun 11, 2020 1:03 pm
Mohannad84 wrote: ↑Wed Jun 10, 2020 2:15 pm
yes I unzipped the file and took the image file and put it in a separate folder.. then I opened USB burning tool and clicked in import image and choose that image file..and then it gave me error (( Parse burning image fail )) …
is there something wrong ?!
try sdcard method. Also try 2ff version and post logs if it doesn’t work
-
Mohannad84
- Verified Member
- Posts: 12
- Joined: Sun Jun 07, 2020 6:30 pm
#15
Thu Jun 11, 2020 8:24 pm
bumerc wrote: ↑Thu Jun 11, 2020 1:03 pm
Mohannad84 wrote: ↑Wed Jun 10, 2020 2:15 pm
yes I unzipped the file and took the image file and put it in a separate folder.. then I opened USB burning tool and clicked in import image and choose that image file..and then it gave me error (( Parse burning image fail )) …
is there something wrong ?!try sdcard method. Also try 2ff version and post logs if it doesn’t work
I tried with SD card through program called ( Burn card maker ) and after I put the SD card in the box and turn it on, there is no picture on TV.. only black picture and nothing happening even if I wait for more than several minutes !!
by the way what do you mean by (( Also try 2ff version )) what does 2ff means ?!!
-
bumerc
- Administrator & Developer
- Posts: 1656
- Joined: Tue Oct 02, 2018 6:19 pm
- Has thanked: 256 times
- Been thanked: 350 times
-
Mohannad84
- Verified Member
- Posts: 12
- Joined: Sun Jun 07, 2020 6:30 pm
#17
Wed Jun 17, 2020 8:09 pm
Hello my friend,
I tried the first version v2FF and it gave me the same error at 2%. log file attached.
then I closed the program USB burning tool and opened it again and load the second image file ( LPDDR v2FF ) this one maybe better because this is the first time it moved more than 2% but it stopped at 4% and no error but kept going between 3% and 4% saying Downlod UBOOT :
[0X10202003] ROMCODE/Lead UBOOT/Download UBOOT/Date transfer error
but I waited more than 4 or 5 minutes and nothing happened and sometimes where it says ((Device Connected)) it disappeared and the windows gave me error notification saying that there is unknown USB device !!! anyway I also attached the log file when I restart the USB burning tool and used the PLDDR version only.
please have a look and waiting for your help.
You do not have the required permissions to view the files attached to this post.
-
Mohannad84
- Verified Member
- Posts: 12
- Joined: Sun Jun 07, 2020 6:30 pm
#19
Fri Jun 19, 2020 12:44 pm
bumerc wrote: ↑Wed Jun 17, 2020 10:53 pm
[mention]Mohannad84[/mention]
Your device is in a boot loop, please post uart log while running sdcard update
viewtopic.php?f=16&t=453
is there any other way to fix or bypass this Boot loop !! because I don’t have the tools and cables mentioned in that post, and if I will order them online they will take at least 25 to 35 days to arrive.
![]()
I changed partition sizes in aml_upgrade_package.img, but after flashing it, bootloader still sees old partition table — system and cache sizes are wrong:
[mmc_startup] mmc refix success
init_part() 297: PART_TYPE_AML
[mmc_init] mmc init success
      Amlogic multi-dtb tool
      Single dtb detected
start dts,buffer=0000000073e8a240,dt_addr=0000000073e8a240
get_partition_from_dts() 71: ret 0
      Amlogic multi-dtb tool
      Single dtb detected
parts: 17
00:      logo   0000000000800000 1
01:  recovery   0000000001800000 1
02:      misc   0000000000800000 1
03:      dtbo   0000000000800000 1
04:  cri_data   0000000000800000 2
05:     param   0000000001000000 2
06:      boot   0000000001000000 1
set has_boot_slot = 0
07:       rsv   0000000001000000 1
08:  metadata   0000000001000000 1
09:    vbmeta   0000000000200000 1
10:       tee   0000000002000000 1
11:    vendor   0000000010000000 1
12:       odm   0000000008000000 1
**13:    system   0000000050000000 1**
14:   product   0000000008000000 1
**15:     cache   0000000046000000 2**
16:      data   ffffffffffffffff 4
init_part() 297: PART_TYPE_AML
eMMC/TSD partition table have been checked OK!
crc32_s:0x1577dad == storage crc_pattern:0x1577dad!!!
crc32_s:0xee152b83 == storage crc_pattern:0xee152b83!!!
crc32_s:0x7fd3b243 == storage crc_pattern:0x7fd3b243!!!
mmc env offset: 0x4d400000
In:    serial
Out:   serial
Err:   serial
reboot_mode=watchdog_reboot
[store]To run cmd[emmc dtb_read 0x1000000 0x40000]
_verify_dtb_checksum()-2755: calc b62fcfb7, store b62fcfb7
_verify_dtb_checksum()-2755: calc b62fcfb7, store b62fcfb7
dtb_read()-2972: total valid 2
update_old_dtb()-2953: do nothing
      Amlogic multi-dtb tool
      Single dtb detected
In the result box can’t boot and resets to USB Burning mode:
...
active slot = 0
CONFIG_AVB2:
active_slot: normal avb2: 0
Err imgread(L328):Fmt unsupported!genFmt 0x0 != 0x3
InUsbBurn
[MSG]sof
Set Addr 25
Get DT cfg
Get DT cfg
set CFG
Flashing the same image with official USB Burning Tool has no problem.
![]()
You have to change partition size inside device tree(s), not just size of actual partition. Search github for dtbSplit or dtbTool scripts, someone reverse-engineered aml-s version of dtbTool to split and combine DTBs from/into dtb.img
![]()
@Stane1983 If I understand you right I’ve already done all the needed:
--- a/arch/arm/boot/dts/amlogic/partition_mbox_normal_P_32.dtsi
+++ b/arch/arm/boot/dts/amlogic/partition_mbox_normal_P_32.dtsi
@@ -102,7 +102,7 @@
                system:system
                {
                        pname = "system";
-                       size = <0x0 0x50000000>;
+                       size = <0x0 0x46000000>;
                        mask = <1>;
                };
                product:product{
@@ -113,7 +113,7 @@
                cache:cache
                {
                        pname = "cache";
-                       size = <0x0 0x46000000>;
+                       size = <0x0 0x25000000>;
                        mask = <2>;
                };
                data:data

--- a/SWG2001A/BoardConfig.mk
+++ b/SWG2001A/BoardConfig.mk
@@ -83,7 +83,7 @@ BOARD_HAVE_FLASHLIGHT := false
 BOARD_HAVE_HW_JPEGENC := true

 TARGET_USERIMAGES_USE_EXT4 := true
-BOARD_USERDATAIMAGE_PARTITION_SIZE := 576716800
+BOARD_USERDATAIMAGE_PARTITION_SIZE := 4294967296
 BOARD_FLASH_BLOCK_SIZE := 4096

 BOARD_VENDORIMAGE_FILE_SYSTEM_TYPE := ext4
@@ -112,7 +112,7 @@ BOARD_VENDORIMAGE_PARTITION_SIZE := 268435456
 BOARD_ODMIMAGE_PARTITION_SIZE := 134217728
 BOARD_PRODUCTIMAGE_PARTITION_SIZE := 134217728
 else
-BOARD_SYSTEMIMAGE_PARTITION_SIZE := 1342177280
+BOARD_SYSTEMIMAGE_PARTITION_SIZE := 1174405120
 BOARD_VENDORIMAGE_PARTITION_SIZE := 268435456
 BOARD_ODMIMAGE_PARTITION_SIZE := 134217728
 BOARD_PRODUCTIMAGE_PARTITION_SIZE := 134217728
Nevertheless, the tool didn’t flash the DTB changes.
Again, the same aml_upgrade_package.img flashed fine with USB Burning Tool, so I assume there is problem with this tool.
Sorry if I misunderstand something.
![]()
![]()
DTB seem just doesn’t flashed for some reason. If I flash it afterwards (with fastboot) — all is OK
![]()
Can it be due to this condition: "$parts" != "dtb"?
| if [[ ${partitions_name[$i]} == «bootloader« ]] || [[ ${partitions_name[$i]} == «_aml_dtb« && «$parts« != «dtb« ]]; then |
![]()
![]()
Ok, I’ll try to fix it.
Seems this part from http://openlinux.amlogic.com:8000/download/A113/DOC/Amlogic_update_usb_tool_user_guide.pdf is skipped in the script due aforementioned "$parts" != "dtb" condition:
3.3.1 Commonly way to upgrading dtb
Step 1. Download dtb.img to memory
update mwrite z:xxxp200dtb.img mem 0x1080000 normalStep 2. Using flash command to updating the dtb.img
update bulkcmd "store dtb write 0x1080000"3.3.2 Newly way to upgrading dtb
If your uboot code is the latest version, try this combined command to upgrading dtb:
update partition _aml_dtb z:/xxx/dtb.img
![]()
bam80
changed the title
DTS is not flashed properly, boot failed
DTB is not flashed, boot failed if partition layout changes
Sep 26, 2019

Ваня Якименко
3 месяца назад
Как вернуть из кирпича?

L Samus
4 месяца назад
Как устновить EPG телепрограмму

Władimir Kliuczinski
1 год назад
Добрый, пришла такая при подключении просто горит синий диод и все, помогите пожалуйста если есть возможность, заранее спасибо

Александр Парыгин
1 год назад
Приветствую! Прошёлся все работает кроме wi-fi подскажи что делать

Алексей Токарев
1 год назад
Привет подскажи пож у меня пульт на этой же приставке ели ели роботает по десять раз жму можно его как нибудь настроить он никакой воообще

Nicolae Butnaru
1 год назад
Все работает замечательно. прошил за 10 мин и оживил свой TV Box/

Евгений Туников
1 год назад
Помоги пожалуйста обучить пульт от приставки. У меня не получилось. А может попалась подделка.

Ivan Пономаренко
2 года назад
Эта прошивка на x3 а нельзя с твоего magicsee n5max x2 сделать копию прошивки и выложить её на Гугл диске.А то я замучился искать прошивки на тонкой тв бокс как у тебя с 905 x2

виктор химич
2 года назад
где файл не обнаружен

Arkadiy Bahgdasaryan
2 года назад
У меня magicsee S905X3 n5 max после сброса на заводские настройки тв приложения показывает с зеленым экраном(то есть при переключении на весь экран тв канал показывает зеленный экран а звук нормальный. Тоже самое происходит на ютубе не которые показывают нормально а остальные зеленный экран. Интересно то что на пуфинг ютубе все нормально. как решить проблему.
Arkadiy Bahgdasaryan
2 года назад
У тебя S905X3 N5 MAX а устанавливаешь где пршивки для S2. Я правильно понял

George Clooney
2 года назад
И что поменялось?

Руслан Москаленко
3 года назад
Я правильно понимаю у вас на процессоре x3 ? Как с нагревом ведёт себя приставка ? Интересно узнать непосредственно от пользователя!!!!
Ivan Пономаренко
3 года назад
Видео классное теперь после пользования с неделю как не глючит а то тоже такой же у меня хочу прошить,не знаешь через флешку можно?

Igor
3 года назад
При перепрошивка выбило HUB2-1 0X30403003 UBOOT PARTITION SYSTEM DOWNLOAD BUFFER DATA TRANSFER ERROR что делать, теперь не включается?

Sergey
3 года назад
как в прошивке работает вывод экрана смартфона на экран телевизора и AV выход?
Форум РадиоКот • Просмотр темы — Восстановление прошивки тв бокса
Сообщения без ответов | Активные темы
| ПРЯМО СЕЙЧАС: |
| Автор | Сообщение |
|---|---|
|
|
Заголовок сообщения: Восстановление прошивки тв бокса
|
|
Первый раз сказал Мяу! Зарегистрирован: Сб мар 10, 2012 13:10:53 Рейтинг сообщения: 0 |
Уважаемые коты прошу помощи!После не удачной прошивки через USB_Burning_Tool-бокс перестал видиться компом,поначалу он выдавал ошибку при прошивке,потом я снял галку с erase Bootloader прошивка прошла до конца и все бокс висит на бутлупе не в рикавери никуда не заходит.Можно ли его как то ввести Mask ROM Mode или прошить через UART ?Чтобы здесь не засорять фотками тему дам ссылку на фотки бокса на freaktabе. |
| Вернуться наверх |
Профиль |

| Реклама | |
|
an.ig.nik |
Заголовок сообщения: Re: Восстановление прошивки тв бокса
|
|
Карма: 4 Рейтинг сообщений: 61
Зарегистрирован: Вс фев 14, 2010 00:37:35 Рейтинг сообщения: 0 |
|
| Вернуться наверх | |
| Реклама | |
|
|
|

|
Spider1973 |
Заголовок сообщения: Re: Восстановление прошивки тв бокса
|
|
Зарегистрирован: Сб мар 10, 2012 13:10:53 Рейтинг сообщения: 0 |
уже бы давно попробовал если бы в этом боксе был слот по карту |
| Вернуться наверх | |
|
musor |
Заголовок сообщения: Re: Восстановление прошивки тв бокса
|
||
Карма: 112 Рейтинг сообщений: 7850
Зарегистрирован: Сб сен 13, 2014 16:27:32 Рейтинг сообщения: 0 |
а Добавлено after 2 minutes 14 seconds: |
||
| Вернуться наверх | |||

| Реклама | |
|
|
Выгодные LED-драйверы для решения любых задач КОМПЭЛ представляет со склада и под заказ широкий выбор LED-драйверов производства MEAN WELL, MOSO, Snappy, Inventronics, EagleRise. Линейки LED-драйверов этих компаний, выполненные по технологии Tunable White и имеющие возможность непосредственного встраивания в систему умного дома (димминг по шине KNX), перекрывают практически полный спектр применений: от простых световых указателей и декоративной подсветки до диммируемых по различным протоколам светильников внутреннего и наружного освещения. Подобрать LED-драйвер>> |
|
Spider1973 |
Заголовок сообщения: Re: Восстановление прошивки тв бокса
|
|
Зарегистрирован: Сб мар 10, 2012 13:10:53 Рейтинг сообщения: 0 |
осталось только понять где взять файлы как в статье по раскирпичиванию,в стоковой прошиве имеем только :aml_sdc_burn.ini ,aml_upgrade_package.img и u-boot.bin.sd.bin |
| Вернуться наверх | |
| Реклама | |
| Реклама | |
|
|
LIMF – источники питания High-End от MORNSUN со стандартным функционалом на DIN-рейку На склад Компэл поступили ИП MORNSUN (крепление на DIN-рейку) с выходной мощностью 240 и 480 Вт. Данные источники питания обладают 150% перегрузочной способностью, активной схемой коррекции коэффициента мощности (ККМ; PFC), наличием сухого контакта реле для контроля работоспособности (DC OK) и возможностью подстройки выходного напряжения. Источники питания выполнены в металлическом корпусе, ПП с компонентами покрыта лаком с двух сторон, что делает ее устойчивой к соляному туману и пыли. Изделия соответствуют требованиям ANSI/ISA 71.04-2013 G3 на устойчивость к коррозии, а также нормам ATEX для взрывоопасных зон. Подробнее>> |
|
an.ig.nik |
Заголовок сообщения: Re: Восстановление прошивки тв бокса
|
|
Карма: 4 Рейтинг сообщений: 61
Зарегистрирован: Вс фев 14, 2010 00:37:35 Рейтинг сообщения: 0 |
|
| Вернуться наверх | |
|
Spider1973 |
Заголовок сообщения: Re: Восстановление прошивки тв бокса
|
|
Зарегистрирован: Сб мар 10, 2012 13:10:53 Рейтинг сообщения: 0 |
сомнительное видео,у автора 3 способ именно по раскирпичиванию это прошивка с помощью компа,интересно ,как бы он это делал если ,как у меня бокс перестал бы видеть комп. |
| Вернуться наверх | |
|
musor |
Заголовок сообщения: Re: Восстановление прошивки тв бокса
|
||
Карма: 112 Рейтинг сообщений: 7850
Зарегистрирован: Сб сен 13, 2014 16:27:32 Рейтинг сообщения: 0 |
савсем? неужелит при втычке не появлется дажне на короткое ремя «найдено неизвмное устройств МТКхххх» лодер в этих чипахи апаратный в кистале и должен работать по идее |
||
| Вернуться наверх | |||
|
Spider1973 |
Заголовок сообщения: Re: Восстановление прошивки тв бокса
|
|
Зарегистрирован: Сб мар 10, 2012 13:10:53 Рейтинг сообщения: 0 |
в том то и дело пока галку на стирании бутлодера не убирал всё появлялось а теперь,полный труп,ничего не булькает и ничего не появляется |
| Вернуться наверх | |
|
musor |
Заголовок сообщения: Re: Восстановление прошивки тв бокса
|
||
Карма: 112 Рейтинг сообщений: 7850
Зарегистрирован: Сб сен 13, 2014 16:27:32 Рейтинг сообщения: 0 |
вы путаеть бутлодер заливаемый в нанд(тот можно затереть) и бутлодер чипа в ряде чипоф тел и планцетоф (думаю и смарт боксах) он апаратныйи не стираемый но вот активировать его иногда можно ток замыкая при старте нужные EP PCB или того худе1 ноги чипа ищи подробности в сети я с этим девайсом не работал даже не вкурсе какой nmfv процик стоит а то б даташиту можно полискать и референц схекмки на том кристале.. |
||
| Вернуться наверх | |||
|
Spider1973 |
Заголовок сообщения: Re: Восстановление прошивки тв бокса
|
|
Зарегистрирован: Сб мар 10, 2012 13:10:53 Рейтинг сообщения: 0 |
в интернете по этому чипу нет ничего,да и как тут с бга чипами найти ноги для включения режима Mask ROM ,вот я и спрашиваю может можно как то через UART что то сделать |
| Вернуться наверх | |
|
musor |
Заголовок сообщения: Re: Восстановление прошивки тв бокса
|
||
Карма: 112 Рейтинг сообщений: 7850
Зарегистрирован: Сб сен 13, 2014 16:27:32 Рейтинг сообщения: 0 |
метод должен быть завот паяет туда непрошитые чипы и прошивает на месте |
||
| Вернуться наверх | |||
|
Spider1973 |
Заголовок сообщения: Re: Восстановление прошивки тв бокса
|
|
Зарегистрирован: Сб мар 10, 2012 13:10:53 Рейтинг сообщения: 0 |
а если с рабочей коробки попробовать считать флеш и сюда влить программатором или бесполезно,биты защиты не дадут?Просто есть вторая такая же но с горелым портом HDMI но по VGA работает |
| Вернуться наверх | |
|
musor |
Заголовок сообщения: Re: Восстановление прошивки тв бокса
|
||
Карма: 112 Рейтинг сообщений: 7850
Зарегистрирован: Сб сен 13, 2014 16:27:32 Рейтинг сообщения: 0 |
если обе одинаковые пересадите нанду с живой на труп если оборудование и опыт есть если нет -забейте просите спеца -а то вместо 1х 200 +1х 300 будет 2х 200… |
||
| Вернуться наверх | |||
Кто сейчас на форуме |
|
Сейчас этот форум просматривают: нет зарегистрированных пользователей и гости: 12 |
| Вы не можете начинать темы Вы не можете отвечать на сообщения Вы не можете редактировать свои сообщения Вы не можете удалять свои сообщения Вы не можете добавлять вложения |

Всем привет! 
Лежала давно неисправная приставка T95Q S905X2.
Так вот, решил ради интереса заняться его ремонтом, в итоге причиной его неработаспособности оказался процессор.
Ради интереса заказал процессор с Алика, и заменил.
И ВУалЯ, приставка включилась и запустилась.
Стояла стоковая прошивка 20003.
С целью обновится на другую прошивку, получил кирпич.
Теперь, опознается компом не с первого раза и без замыкания пятоков, для ввода в режим раскирпичивания.
Делал все по инструкции, скачал стоковую 20003, запустил USB Burning Tool, открыл файл aml_upgrade_package.img, нажал старт, подключаю и сразу как опознается, получаю ошибки
[0x00101004] Erase bootloader/Lowper/Identify/Error result
или
[0x10101002] Romcode/Initialize DDR/Identify/USB Control setup
Пробовал в нескольких версиях USB Burning Tool.
Так-же пробовал разные прошивки.
Так-же пробовал на другом ПК.
Подключал через UART, чтоб увидеть что происходит.
Если просто включить приставку, вот что мы видим:
Цитата:
G12A:BL:0253b8:61aa2d;FEAT:C0F97000:802000;POC:F;RCY:0;EMMC:0;READ:0;CHK:1F;READ:0;CHK:1F;READ:0;CHK:1F;SD?:20000;USB:8;
или
Цитата:
LOOP:8;EMMC:0;READ:0;CHK:1F;READ:0;CHK:1F;READ:0;CHK:1F;SD?:0;SD:800;USB:8;
LOOP:9;EMMC:0;READ:0;CHK:1F;READ:0;CHK:1F;READ:0;CHK:1F;SD?:0;SD:800;USB:8;
LOOP:A;EMMC:0;READ:0;CHK:1F;READ:0;CHK:1F;READ:0;CHK:1F;SD?:0;SD:800;USB:8;
LOOP:B;EMMC:0;READ:0;CHK:1F;READ:0;CHK:1F;READ:0;CHK:1F;SD?:0;SD:800;USB:8;
и т.д…
А когда процесс обрывается на 2% [0x10101002] Romcode/Initialize DDR/Identify/USB Control setup
Вот что происходит в логе:
Так-же где то читал, что не прошивается так-как был стерт bootloader, перед началом прошивки нужно было убрать галку Erase bootloader, о чем я и не знал.
Так как, ранее прошивал много приставок S809, S905X, S905W, такой проблемы не было.
Думаю нужно найти способ прошить bootloader.
Или-же, проблема в железе, может где-то не хватает необходимого питания, или оно отсутствует.
Прилагаю фото платы с замерами.
Думал может проц. плохо сел, решил его пошатать, не это не помогло.
Так-же, приставка отказывается запускаться с SD-карты.
Пробовал создать CoreELEC, на SD-карту.
P.S. Распаковал стоковую прошивку и обнаружил что в нем нет файла bootloader.PARTITION
Сравнивал между прошивкой от T95M которую прошивал ранее после замены eMMC, там после распаковки я обнаружил наличие файла bootloader.PARTITION
Не знаю имеет ли это отношения к тому что оно не прошивается.
Так-же обращался в ветку T95Q на 4PDA, там помочь никто не смог.
Содержание
- atvXperience : The Forum
- [HELP] h96 pro+ How to solve Romcode/Initialize DDR/Read initialize status.
- atvXperience : The Forum
- [INSTALL] Common USB Burning Tool Errors and Fixes
- Announcement
- USB Burning Tool errors
- USB Burning Tool errors
- Comment
- Comment
- Comment
- Comment
- Comment
- Comment
- Comment
- Comment
- Comment
- Romcode Initialize/USB Control Setup Error
- Attachments
- Villa
- Announcement
- USB Burning Tool problem
- USB Burning Tool problem
- Comment
- Comment
atvXperience : The Forum
One of the Biggest Android TV Box Forums on the internet!
[HELP] h96 pro+ How to solve Romcode/Initialize DDR/Read initialize status.
I’m trying to recover my tv box, but whenever I try, the same error appears.
[Romcode / Initialize DDR / Read initialize status / USB Control setup error]
I tried some roms from atvxperience but they all return the same problem, at 2% for and return the mentioned error. 
My Tv Box (h96 pro + (s32-v6 lpddr3)), can someone help me?


Try one of these versions for LPDDR3:

Put your device in MASK Rom mode by shortening the pins on NAND chip and flash good working stock ROM or atvX LPDDR3 image from post above.
em3ka wrote: ↑ Mon May 25, 2020 11:19 am Put your device in MASK Rom mode by shortening the pins on NAND chip and flash good working stock ROM or atvX LPDDR3 image from post above.
em3ka wrote: ↑ Mon May 25, 2020 11:19 am Put your device in MASK Rom mode by shortening the pins on NAND chip and flash good working stock ROM or atvX LPDDR3 image from post above.
I’m having the same problem..
do I have to pinch those 2 pins and keep pinching them while I’m connecting the USB cable to my box and then press the Start button on the program ( USB burning tool ) or I have to keep pinching the pins even after I click the start button .
also please give me the URL link for the correct firmware for my box ..because when I download the ones in the google drive that you added, the USB burning tool is giving me this message (( Parse burning image fail )) .
it’s like the USB burning tool is not accepting that image file.
Источник
atvXperience : The Forum
One of the Biggest Android TV Box Forums on the internet!
So, having problems with usb burning tool?
Well, here’s how you do it. Don’t forget to reply to this topic if you want to add anything.
1. Don’t forget to plug in power cable if you get lowper error.
2. If your device isn’t getting detected, even after pushing the reset button, try shorting nand pins. You can find a video tutorial on mxq project YouTube channel.
3. DDR Error? Tried using different ddr version atvX? DDR3, DDR4, LPDDR to name a few.
4. Flashed but not working? Try flashing again, or a different image. Still getting a black screen?
a) If you see the bootlogo but not the UI after booting, try atvx on a 1080p tv.
b) If you don’t see anything at all, the device is incompatible, Sorry
5. 7% Uboot error? Try another image or version. Chances are, your box uses a modded uboot which doesn’t accept other original uboot partitions. Fix? Point 6.
6. 2GB/3GB RAM but after flashing it’s 1GB/2GB? You’ve got a fake box. Your uboot was modified to read wrong dtb header to show more RAM than the actual physical one(maybe). The only way to fix(fake your ram) this is unpacking atvx and your stock rom to level 1 with Ricky’s customization tool and replacing your stock’s system, boot, recovery and bootloader partitions with atvx’s and re-packing.
Источник
Announcement
![]()
I have been using USB burning tool v2.0.6.2 to update my OTT MXQ Pro 4K box a couple of times but recently I have been getting these errors below and have not been able to flash the firmware:
— Romcode/Initialize DDR/Initialize PLL/USB Control setup error
— Erase bootloader/Lowper/Identify/ Error result
I have tried using a few other PCs with USB 2 ports but were getting the same errors and I only managed to erase the bootloader once.
Can any one help?
![]()
I had the same problem, but ended up getting it to work by doing the following. Frustrated, I tried different versions of USB Burning tool with no success. The 2.0.5.15 works just fine. You click the middle (2nd) Chinese writing on the upper left corner and select «English.» Remember to open, load, start, then, connect.
1. Open the USB Burning Tool as an Administrator
2. Load the Firmware image file
3. Press «Start»
4. Connect your box via USB
How.did you load the license in the flastool i cant get i right
Sent from my SM-N9300 using Tapatalk
- Join Date: Jun 2014
- Posts: 6441
And were can i find the license it doent come with the rar compressed file
Sent from my SM-N9300 using Tapatalk
- Join Date: Jun 2014
- Posts: 6441
We have a bricked T95u Pro 3/32. USB burning tool now sees the box after a pin short. It goes to 7 percent and then errors out. Any help to get it running again would be greatly appreciated
this is the error we see
[10:12:07 517][Global][Inf]—DevPath:?pci#ven_8086&dev_293c&subsys_02be1028& rev_03#3&11583659&0&d7#<3abf6f2d-71c4-462a-8a92-1e6861e6af27>
[10:12:07 517][Global][Inf]—->Roothub:USB#ROOT_HUB20#4&13e35410&0#
[10:12:07 589][Global][Inf]———>[Port0]NoDeviceConnected
[10:12:07 589][Global][Inf]———>[Port1]NoDeviceConnected
[10:12:07 589][Global][Inf]———>[Port2]NoDeviceConnected
[10:12:07 589][Global][Inf]———>[Port3]NoDeviceConnected
[10:12:07 589][Global][Inf]———>[Port4]NoDeviceConnected
[10:12:07 590][Global][Inf]———>[Port5]Other device
[10:12:07 590][Global][Inf]—Scan USB host controller complete
[10:12:07 591][Global][Inf]—Update data center with HubMap
[10:12:13 935][Global][Inf]—User click open button
[10:12:58 786][Global][Inf]—Image path C:UsersajcdnDownloadsT95UT95U_S912_03092017_A ndroidTVBox.euT95U_S912_03092017_AndroidTVBox.eu aml_upgrade_package.img
[10:13:22 934][Global][Inf]—Parsing burning package
[10:13:22 934][Global][Inf]—Load configuration file C:Program Files (x86)AmlogicUSB_Burning_Tooltemp
[10:13:22 935][Global][Inf]—Parse burning configuration file C:Program Files (x86)AmlogicUSB_Burning_Tooltempburn_config.xm l
[10:13:22 938][Global][Inf]—Get burning key
can you advise us please?
![]()
I had the same problem, but ended up getting it to work by doing the following. Frustrated, I tried different versions of USB Burning tool with no success. The 2.0.5.15 works just fine. You click the middle (2nd) Chinese writing on the upper left corner and select «English.» Remember to open, load, start, then, connect.
1. Open the USB Burning Tool as an Administrator
2. Load the Firmware image file
3. Press «Start»
4. Connect your box via USB
I have a Mecool M8s PRO L and i got this 2% error when i try to connect only with USB male to male to the pc:
«Romcode/Initialize DDR/Read initialize status/USB Control setup error»
Even if i try to short the reset pins out. Blue LED on the box stays allways on.
If i plug the power cable when we tries to pass the 2% error, we reaches 7% and the following error:
UBOOT/Disk initialize/Send command/Error result’
Источник
Romcode Initialize/USB Control Setup Error
Member
Hi Guys
I have this problem while flashing my U9H:
[12:11:25 210][HUB1-6][Inf]—2-2-0-0
[12:11:25 210][HUB1-6][Inf]—Control write pll reg1 0xd9000000:0x000000b1
[12:11:25 713][HUB1-6][Inf]—Control write pll reg1 0xd9000000:0x00005183
[12:11:26 217][HUB1-6][Inf]—Control write pll reg1 0xd9000000:0x000000b1
[12:11:26 719][HUB1-6][Inf]—Control write pll reg1 0xd9000000:0x00005183
[12:11:27 223][HUB1-6][Inf]—Write initial succeed
[12:11:27 223][HUB1-6][Inf]—Upload encrypt at 0xc8100228
[12:11:27 225][HUB1-6][Inf]—ulValue = 0xadfd718c
[12:11:27 225][HUB1-6][Inf]—Read encrypt value succeed
[12:11:27 225][HUB1-6][Inf]—Download DDR.USB,size: 49152!
[12:11:27 238][HUB1-6][Inf]—Transfer complete 49152
[12:11:27 240][HUB1-6][Inf]—Run at address 0xd9000000
[12:11:27 246][HUB1-6][Inf]—RunInRam success
[12:11:27 271][HUB1-6][Inf]—2-2-0-0-0-1-0-0
[12:11:27 271][HUB1-6][Inf]—CheckFileRunState succeed
[12:11:42 275][HUB1-6][Err]—usbReadFile failed ret = -116
[12:11:42 275][HUB1-6][Err]—ReadPara failed
[12:11:42 282][HUB1-6][Err]—[0x10105002]Romcode/Initialize DDR/Read initialize status/USB Control setup error
[12:11:42 283][HUB1-6][Inf]—Close device handle 0x00000b44
Is there somebody else, with the same problem? Actually tried to flash the Latest Official Firmware because (after a long pause while it was offline) my box didnt want to boot (splash screen appear with Android logo and then nothing happened). For additional info there is a screenshot attached.
Attachments

Villa
Hi Guys
I have this problem while flashing my U9H:
[12:11:25 210][HUB1-6][Inf]—2-2-0-0
[12:11:25 210][HUB1-6][Inf]—Control write pll reg1 0xd9000000:0x000000b1
[12:11:25 713][HUB1-6][Inf]—Control write pll reg1 0xd9000000:0x00005183
[12:11:26 217][HUB1-6][Inf]—Control write pll reg1 0xd9000000:0x000000b1
[12:11:26 719][HUB1-6][Inf]—Control write pll reg1 0xd9000000:0x00005183
[12:11:27 223][HUB1-6][Inf]—Write initial succeed
[12:11:27 223][HUB1-6][Inf]—Upload encrypt at 0xc8100228
[12:11:27 225][HUB1-6][Inf]—ulValue = 0xadfd718c
[12:11:27 225][HUB1-6][Inf]—Read encrypt value succeed
[12:11:27 225][HUB1-6][Inf]—Download DDR.USB,size: 49152!
[12:11:27 238][HUB1-6][Inf]—Transfer complete 49152
[12:11:27 240][HUB1-6][Inf]—Run at address 0xd9000000
[12:11:27 246][HUB1-6][Inf]—RunInRam success
[12:11:27 271][HUB1-6][Inf]—2-2-0-0-0-1-0-0
[12:11:27 271][HUB1-6][Inf]—CheckFileRunState succeed
[12:11:42 275][HUB1-6][Err]—usbReadFile failed ret = -116
[12:11:42 275][HUB1-6][Err]—ReadPara failed
[12:11:42 282][HUB1-6][Err]—[0x10105002]Romcode/Initialize DDR/Read initialize status/USB Control setup error
[12:11:42 283][HUB1-6][Inf]—Close device handle 0x00000b44
Is there somebody else, with the same problem? Actually tried to flash the Latest Official Firmware because (after a long pause while it was offline) my box didnt want to boot (splash screen appear with Android logo and then nothing happened). For additional info there is a screenshot attached.
Why do you have «Erase flash» set to «Erase all»? «Normal erase» should be sufficient!
Also you shouldn’t have «Reset after success» and «Whether overwrite key» Enabled.
Источник
Announcement
![]()
I have H96 pro tv box, I’m trying to install a new firmware but I have a problem with the usb connection.
Whenever I try to connect the box to usb ,it recognized for 1-2 seconds and then disconnecting.
I tried it with 4 different computers (including desktop), I installed the driver, I tried 2 different usb cables — all with the same results.
I tried to press the reset button and then to start the box — it doesn’t recognized at all.
I tried to connect it to the power adapter ,then to start the box and then to connect it to usb- it doesn’t recognized at all.
I tried to connect the hdmi cable so I can see what happens when it starts ,I see that when i press the reset button it goes into the recovery menu — but it seems that when it in this menu it doesn’t recognized by usb.
this is the error that I get:
[2018-11-23 13:50:21 662][HUB2-2][0x10102002]Romcode/Initialize DDR/Initialize PLL/USB Control setup error
[2018-11-23 13:51:36 983][HUB2-2][0x10105002]Romcode/Initialize DDR/Read initialize status/USB Control setup error
![]()
- Join Date: May 2014
- Posts: 1316
Which version of USB Burn Tool?
Which version of Windows?
(Which China Box revision. update to which firmware? (Not immediately important to your question.)
Do you have a firewall running?
Do you have Anti-Virus running?
I suggest that you you give more info.
(All 4 computers only recognize connection (1-2 sec.)?
![]()
USB burn tool v.2.0.7.2, I also use the usbview.exe to see if the box recognized.
I tried on win7 and win10
box version you can see attached, trying to install h96pro.H96PRO+_2G(16)_HS2734A_1000M_7.1.2018.04.10 .20.38
I don’t have a firewall
I have Symantec Endpoint Protection
I attached the log files
![]()
- Join Date: May 2014
- Posts: 1316
Amlogic Worldcup Drivers..no longer installed properly??
«Romcode/Initialize DDR/Initialize PLL/USB Control setup error
Romcode/Initialize DDR/Read initialize status/USB Control setup error.»
2018-11-23. «attempting to erase bootloader». Did USB Burn Tool succeed in seeing and flashing your China Box?
Источник
Приставка X96 mini 2/16 Gb широко распространена. Данный экземпляр при подключении к телевизору не выдает изображение и не реагирует на пульт.

Светодиод горит тускло красным цветом и не меняет свой цвет на синий.

Маркировка используемого блока питания — RSF-DY009-0502000.

Приставка со стороны задней крышки выглядит следующим образом. На ней наклейка с точным названием модели.
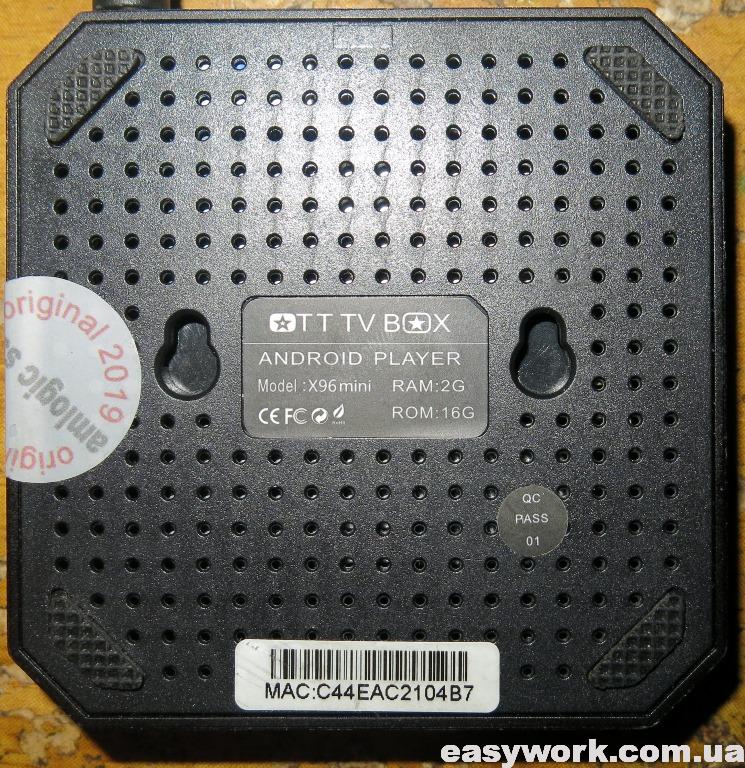
Крышка отщелкивается и мы можем получить доступ к плате. Запоминаем расположение крышки, т.к. на ней находится термопрокладка, которая должна попасть на процессор Amlogic S905W.

Маркировка платы Q6X V2.2 17355. По отзывам на 4PDA данная маркировка имеет проблемы при прошивке.

С обратной стороны плата выглядит следующим образом.

Входное напряжение равно 5.2 В и поэтому неисправность внешнего блока питания исключается.

Далее входное напряжение понижается при помощи DC/DC преобразователей с маркировкой S15BLQ.

Напряжения на плате распределены следующим образом. Также необходимо обратить внимание на исправность электролитического конденсатора 100 мкФ х 10 В. Он один на плате.

Для прошивки устройства я использовал программу USB Burning Tool 2.09. При подключении необходимо выполнить сброс приставки. Для этого удобно использовать спичку (токонепроводящий предмет). USB шнур необходимо вставлять в белый разъем. Вот подробная инструкция по прошивке через ПК. Если кому-то не нравится — то вот другая.

После этого в программе отображается устройство с пометкой Connect success.

Однако прошивка прерывалась на 7%. Ошибка была либо [0x30201004]UBOOT/Disk initialize/Send command/Error result.
![Ошибка [0x30201004]](https://easywork.com.ua/wp-content/uploads/2020/01/remont-pristavki-x96-mini-2-16-gb-ne-vklyuchaetsya-13.jpg)
В версии программы USB Burning Tool 2.12 код ошибки сменился на [0x32030201]Uboot/Get result/DiskInitial error.
![Ошибка [0x32030201]](https://easywork.com.ua/wp-content/uploads/2020/01/remont-pristavki-x96-mini-2-16-gb-ne-vklyuchaetsya-14.jpg)
Кому-то помог при прошивке выбор опции «Force Erase All». Однако при этом придется в дальнейшем восстанавливать MAC-адрес. Такая проблема может быть при проблемах с флеш-памятью.
В таком случае можно попробовать воспользоваться оболочкой LibreELEC. По следующей ссылке описана штатная установка LibreELEC — KODI — 8.2.3.1 на X96 Mini Amlogic S905W. Нас интересует вариант полноценной загрузки LibreELEC с miniSD карты, описанный тут и тут.

Задействованные программы Win32DiskImager и Burn_Card_Maker. Однако мне это не помогло, т.к. неисправность была где-то гораздо глубже. Возможно кому-то данная инструкция и вышеуказанные ссылки помогут.
Ранее прошивал TV Box X96 mini, которая зависала на заставке.
Hello! I’m currently unable to flash my X96 Mini. I’m using USB Burning Tool and it gets stuck on the same error every time.
[0x30405004]UBOOT/Partition _aml_dtb/Verify patition/Error result
I have tried:
- 3 different PCs (more than 10 USB-ports)
- Different versions of USB Burning Tool
- Different ROMs, stock and non-stock
- Holding AV
- Power-adapter on/off
Always end up on the exact same error.
This device is 3 years old and 2 years ago I was able to flash it with the same method. I has just been laying in the drawer since then.
Code: Select all
Android TV Box Smart TV Box Quad Core X96
7.1 Mini Android TV Box
Amlogic S905 W
2G RAM
16G ROM
H.265
64 Bit
WiFi
Bluetooth 4.1 Aoxun
Code: Select all
[08:35:44 597][HUB1-3][Inf]-------------Download _aml_dtb.PARTITION-----------
[08:35:44 599][HUB1-3][Inf]--0-7-0-16
[08:35:44 599][HUB1-3][Inf]--download store _aml_dtb normal 92160
[08:35:44 599][HUB1-3][Inf]--Send download command success
[08:35:44 613][HUB1-3][Inf]--Read command status success
[08:35:44 817][HUB1-3][Inf]--Transfer complete
[08:35:44 818][HUB1-3][Inf]--Send download get_status command succeed
[08:35:44 821][HUB1-3][Inf]--get_status success
[08:35:44 821][HUB1-3][Inf]--verify sha1sum ccb77d2fff65661d43041a1e03c94e3769c99ea1
[08:35:44 822][HUB1-3][Inf]--Send verify cmd succeed
[08:35:44 879][HUB1-3][Err]--failed:Verify Failed with sha1sum, origin sum "ccb77d2fff65661d43041a1e03c94e3769c99ea1" != gen sum "1a3cc57a70cf82644554eb32a2c1a7802d77b63f"

[08:35:44 882][HUB1-3][Err]--[0x30405004]UBOOT/Partition _aml_dtb/Verify patition/Error result
[08:35:44 882][HUB1-3][Inf]--Close device handle 0x0000040c


Any ideas to bring it alive? It shows up in USB Burning Tool, it just doesn’t want to flash.
Здесь мы переходим в каталог, где лежат исходники u-boot и скомпилированный образ прошивки (файл u-boot).
Далее подключаемся к железке и загружаем прошивку:
(gdb) target remote localhost:2331
Remote debugging using localhost:2331
(gdb) monitor reset
Resetting target
(gdb) monitor halt
(gdb) monitor sleep 200
Sleep 200ms
(gdb) load
Loading section .text, size 0x5c610 lma 0x87800000
...
Loading section .gnu.hash, size 0x18 lma 0x87882e2c
Start address 0x87800000, load size 536128
Transfer rate: 69 KB/sec, 12468 bytes/write.
Подгружаем device tree blob и запускаем работу процессора:
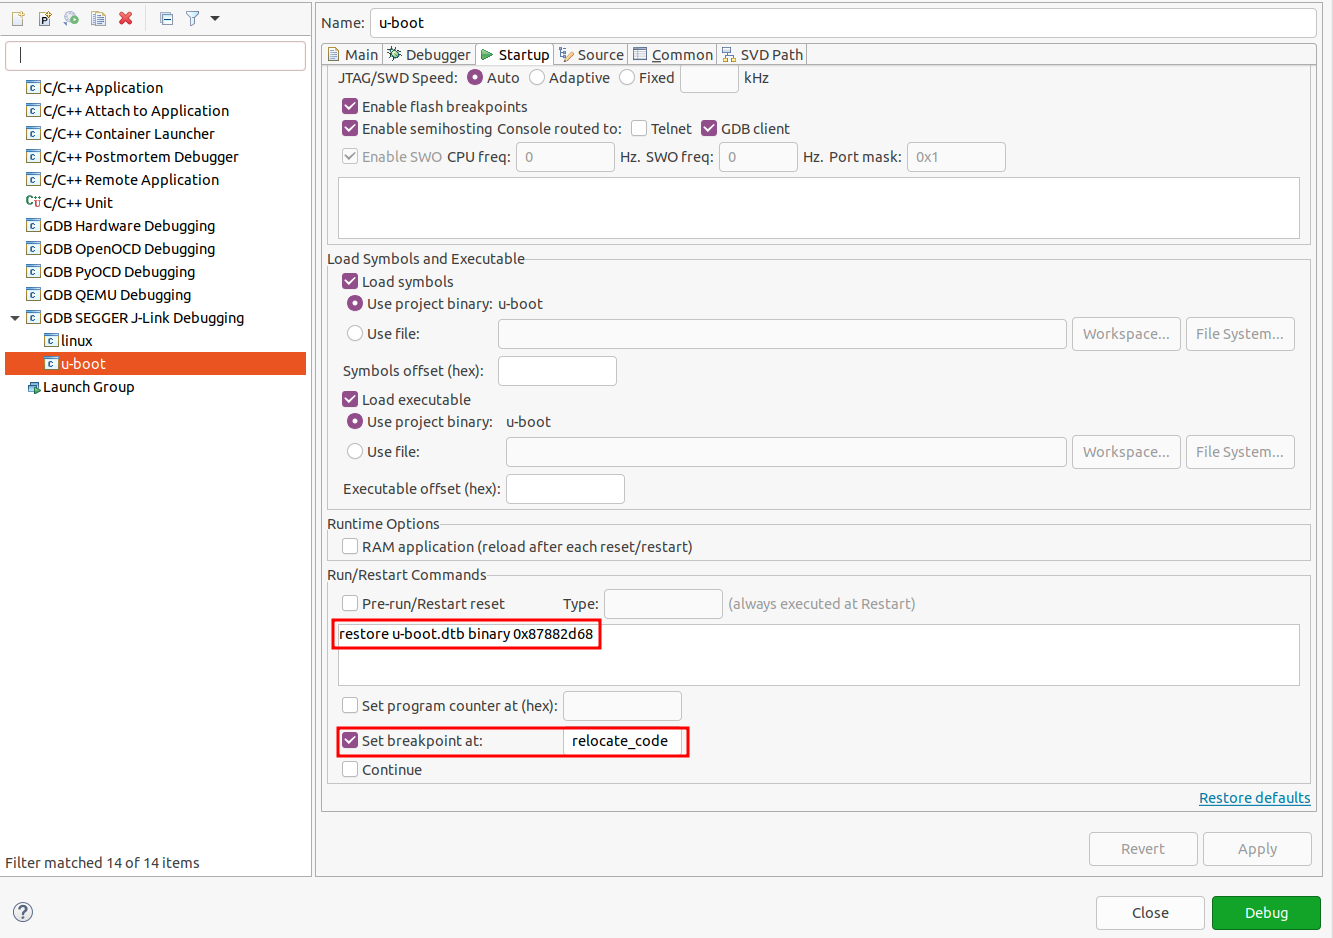
(gdb) restore u-boot.dtb binary 0x87882d68
Restoring binary file u-boot.dtb into memory (0x87882d68 to 0x8788953b)
(gdb) c
В консоли загрузчика видим логи загрузки, значит процессор стартанул.
Теперь можно добавить эту команду в Debug конфигурацию Eclipse:

Казалось бы все, — мы получили долгожданную возможность полноценной отладки кода, получили способ проследить весь путь процедуры инициализации, заглянуть в каждый закоулок исходного кода. Перезапускаем GDB сессию, ставим точку остановки в одной из самыъ последних вызываемых функций (main_loop) и запускаем работу процессора:
(gdb) b main_loop
c
и с удивлением обнаруживаем, что U-boot стартанул, прогрузился сам и запустил процедуру инициализации ядра Linux, но точка остановки так и не сработала! Магия!
Снова лезем в исходники и интернет. Несколько часов поисков и находим то, что лежало под носом (да-да, rtfm).
Как выясняется, в процессе инициализации загрузчик получает возможность узнать полный размер располагаемой оперативной памяти, вычисляет точку в самом ее конце, копирует самого себя и после этого продолжает работу как ни в чем не бывало. Там же, в документации описывается, как данную проблему обойти в случае, если возникла необходимость отладки кода.
В случае нашей железки это выглядит следующим образом. Снова запускаем gdb сервер:
$ JLinkGDBServer -device MCIMX6Y2 -if JTAG -speed 1000$ gdb-multiarch u-boot --nx
(gdb) target remote localhost:2331
(gdb) monitor reset
(gdb) monitor halt
(gdb) monitor sleep 200
(gdb) load
(gdb) restore u-boot.dtb binary 0x87882d68Смотрим адрес, с которого начнется исполнение кода:
(gdb) display /x $pc
1: /x $pc = 0x87800000
Ставим точку остановки в функции relocate_code, как это описывается в документации и запускаем работу процессора:
(gdb) b relocate_code
Breakpoint 1 at 0x87802db4: file arch/arm/lib/relocate.S, line 81.
(gdb) c
Continuing.
Breakpoint 1, relocate_code () at arch/arm/lib/relocate.S:81
Теперь, нам нужно загрузить ту же самую отладочную прошивку (с отладочными символами), но уже по другому адресу, в который намеревается перепрыгнуть процессор. Если мы этого не сделаем, то ничего страшного не случится, — u-boot продолжит работу штатно, но мы уже не сможем ловить процессор точками остановки, поскольку он будет работать по новым адресам. Подгрузим по этому адресу отладочные символы, — и сохраним возможность сопровождать процессор дебаггером. Определить адрес, по которому планируется прыжок можно двумя способами:
-
в консоли загрузчика ввести команду bdinfo:
=> bdinfo
arch_number = 0x00000000
boot_params = 0x80000100
DRAM bank = 0x00000000
-> start = 0x80000000
-> size = 0x10000000
eth0name = FEC
ethaddr = 86:72:04:c5:7e:83
current eth = FEC
ip_addr = 192.168.31.99
baudrate = 115200 bps
TLB addr = 0x8FFF0000
relocaddr = 0x8FF2B000
reloc off = 0x0872B000
irq_sp = 0x8EF216C0
sp start = 0x8EF216B0
Early malloc usage: 188 / 400
fdt_blob = 8ef216d8
и глянуть значение переменной relocaddr (0x8FF2B000).
-
дебаггером вывести значение переменной gd->relocaddr:
(gdb) p /x gd->relocaddr
$1 = 0x8ff2b000
Итак, располагаем отладочные символы по этому адресу, проверяем расположение счетчика программы:
(gdb) add-symbol-file u-boot 0x8FF2B000
add symbol table from file "u-boot" at
.text_addr = 0x8ff2b000
(y or n) y
Reading symbols from u-boot...
(gdb) display /x $pc
2: /x $pc = 0x87802db4
И пробегаем функцию relocation_code:
(gdb) fin
Run till exit from #0 relocate_code () at arch/arm/lib/relocate.S:81
_main () at arch/arm/lib/crt0.S:116
116 bl relocate_vectors
Снова смотрим расположение счетчика программ:
(gdb) display /x $pc
3: /x $pc = 0x8ff2d8cc
И вздыхаем с облегчением, — адрес больше того значения, по которому мы только что разместили прошивку. Значит перепрыгнули)
Теперь ставим точку остановки в функции board_init_r и видим, что установилось две точки (в прошивке по первоначальному адресу и в прошивке по адресу релокации):
(gdb) b board_init_r
Note: breakpoint 1 also set at pc 0x87815b4c
Note: breakpoint 1 also set at pc 0x8ff40b4c
Breakpoint 5 at 0x87815b4c: board_init_r. (2 locations)
запускаем исполнение процессора и убеждаемся, что точка остановки по новому адресу сработала:
gdb) c
Continuing.

Breakpoint 2, board_init_r (new_gd=0x8ef28eb8, dest_addr=2415046656) at common/board_r.c:904
904 {
1: /x $pc = 0x8ff40b4c
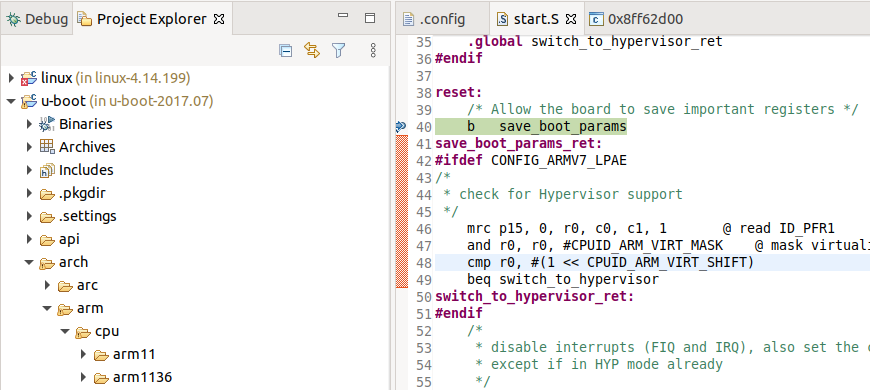
В Eclipse то же самое будет выглядеть следующим образом. Ставим точку остановки на функцию relocate_code
:
Запускаем работу процессора:

И перед тем как выполнить релокацию кода, в отладочной консоли (Debugger console) вводим те же самые команды:

Вот теперь можно смело сказать, что появилась полноценная возможность дебажить U-boot. И в качестве вознаграждения можем пробежаться отладчиком от самой первой исполняемой команды и до самой последней, построив попутно подробную диаграмму процедуры инициализации загрузчика:

Сама диаграмма в виде png, pdf и libreOffice.
Процедура инициализации загрузчика U-boot
В целом, всю процедуру можно разделить на два этапа:
-
Инициализация до релокации (фиолетовая ветвь/путь, шаги 1-43)
-
Инициализация после релокации (зеленая ветвь/путь, шаги 45-80)
разделенных между собой упоминавшейся выше процедурой релокации (красный узел — узел 44)
На каждом из этапов происходит вызов одной и той же функции — initcall_run_list, принимающей на вход аргумент в виде массива указателей на функции инициализации, которые она вызывает в цикле). Естественно, на каждом этапе передаются разные массивы функций. На первом этапе это init_sequence_f, который можно найти в файле common/board_f.c:

На втором этапе — init_sequnce_r (файл common/board_r.c):

Где все начинается
-
Шаг 1 на графе.
Исполнение программного кода загрузчика расположено в файле /arch/arm/cpu/<arch>/startup.S. В нашем случае это — /arch/arm/cpu/armv7/startup.S:
Да, все начинается с ассемблера. Если вы пришли в embedded linux, из микроконтроллеров, то, возможно, вы уже сталкивались с ним.
-
Шаги 2, 3 и 4.
Последовательно производится: отключение предываний, инициализация таблицы векторов прерываний, отключение MMU и TLBs, инициализация временного стека и минимально необходимой периферии.
-
Шаги 5, 6 и 7
Функция _main выделяет память под глобальный дескриптор (global_data, gd), — структуру данных, описывающей текущее состояние загрузчика.
-
Шаги 8 и 9
После чего происходит вызов функции board_init_f, в свою очередь вызывающую уже упоминавшуюся функцию initcall_run_list в первый раз.
-
Шаги 10-43
которая вызывает в цикле все переденные ей входным аргументом функции инициализации. Тут происходит и инициализация переменных окружения u-boot, и инициализация консоли, вывод первых логов, парсинг дерева устройств, бинд драйверов, соответствующих узлам дерева. Под конец производится вычисления адреса, по которому будет произведена релокация загрузчика.
-
Шаги 44-45
Собственно, релокация, в процессе которой загрузчик копирует сам себя в конец оперативной памяти, чтобы выделить мах количество свободной оперативной памяти для ядра linux в виде единого цельного участка памяти.
-
Шаги 48-49
Происходит вызов функции board_init_r, вызывающей, в свою очередь, функцию initcall_run_list во второй раз.
-
Шаги 50-75
Последовательно вызываются все функции, переданные board_init_r. Самой последней вызывается функция run_main_loop, которая вызывает main_loop, в которой запускается таймер обратного отсчета, по прошествии которого управление передается ядру Linux, либо нет, если пользователь ввел что-либо в консоль.
Естественно, это лишь верхушка айсберга, и исходники еще вычитывать и вычитывать. Определенно, стоит разобраться с тем, как парсится дерево устройств и биндятся соответствующие драйвера; с тем как передается управление ядру Linux. Но это уже в других статьях.
Have had a U9-h for 2 years now. No problems till this summer. While streaming video (using apps, not Kodi) my screen would go black, but audio would carry on. Sometimes video would return back to normal; other times the screen would go blue. Had to turn it off and reboot to get going again.
Now the problem is getting worse. I get a black screen sometimes without doing anything (i.e. at the Launcher screen). Have tried a factory reset to no avail. Any suggestions to rectify the situation?
To make matters worse, I have an old MXQ Pro which functions fine (except that it is much slower than the U9-h.
Any suggestions you might have would be greatly appreciated.

Firmware is up to date. No updates per the OTA firmware check.
Any suggestions you might have would be greatly appreciated.
Try with another hdmi cable
Firmware is up to date. No updates per the OTA firmware check.
You have to flash the firmware via manual update with usb burning tool and not via OTA (automatic).
Tried the manual update. Got through to 38% complete and received the following error message:
[0x30403003] UBoot/Partition System/Download Buffer/Data Transfer Error
Now my PC will not even recognize the U9-h as an external device. Any suggestions?
Tried the manual update. Got through to 38% complete and received the following error message:
[0x30403003] UBoot/Partition System/Download Buffer/Data Transfer Error
Now my PC will not even recognize the U9-h as an external device. Any suggestions?
Did you try a Factory Reset before this?
Gave it one last try. Got much further this time, but stopped on the 1-yard line (i.e. 98%) and received this message:
[0x30401002]UBoot/Partition Bootloader/Identify/USB Control Setup Error. Suggestions?
Gave it one last try. Got much further this time, but stopped on the 1-yard line (i.e. 98%) and received this message:
[0x30401002]UBoot/Partition Bootloader/Identify/USB Control Setup Error. Suggestions?
Try it a third time .
Have tried numerous times with both the Android 6 and Android 7 versions. Both get me to the 98% mark with the error message as noted above. Also tried hooking the unit back up with my TV. No start up. As well, nothing happens when I hold the Power Button down for 6+ seconds to try to get to the Factory Reset screen. Is this the end?
Did you try a Factory Reset before this?
If you performed a Factory Reset, why did you then progress to burning the image?
nothing happens when I hold the Power Button down for 6+ seconds to try to get to the Factory Reset screen.
As your device has been partly flashed then Factory Reset will no longer be an option as it needs a fully flashed firmware to do this.
Have had a U9-h for 2 years now. No problems till this summer. While streaming video (using apps, not Kodi) my screen would go black, but audio would carry on. Sometimes video would return back to normal; other times the screen would go blue. Had to turn it off and reboot to get going again.
Now the problem is getting worse. I get a black screen sometimes without doing anything (i.e. at the Launcher screen). Have tried a factory reset to no avail. Any suggestions to rectify the situation?
To make matters worse, I have an old MXQ Pro which functions fine (except that it is much slower than the U9-h.
Any suggestions you might have would be greatly appreciated.
I have kind off the same problem but my minix reboot after +/_ 1 hour of streaming… I just wondering do you use a VPN app?
Всем привет!
Лежала давно неисправная приставка T95Q S905X2.
Так вот, решил ради интереса заняться его ремонтом, в итоге причиной его неработаспособности оказался процессор.
Ради интереса заказал процессор с Алика, и заменил.
И ВУалЯ, приставка включилась и запустилась.
Стояла стоковая прошивка 20003.
С целью обновится на другую прошивку, получил кирпич.
Теперь, опознается компом не с первого раза и без замыкания пятоков, для ввода в режим раскирпичивания.
Делал все по инструкции, скачал стоковую 20003, запустил USB Burning Tool, открыл файл aml_upgrade_package.img, нажал старт, подключаю и сразу как опознается, получаю ошибки
[0x00101004] Erase bootloader/Lowper/Identify/Error result
или
[0x10101002] Romcode/Initialize DDR/Identify/USB Control setup
Пробовал в нескольких версиях USB Burning Tool.
Так-же пробовал разные прошивки.
Так-же пробовал на другом ПК.
Подключал через UART, чтоб увидеть что происходит.
Если просто включить приставку, вот что мы видим:
Цитата:
G12A:BL:0253b8:61aa2d;FEAT:C0F97000:802000;POC:F;RCY:0;EMMC:0;READ:0;CHK:1F;READ:0;CHK:1F;READ:0;CHK:1F;SD?:20000;USB:8;
или
Цитата:
LOOP:8;EMMC:0;READ:0;CHK:1F;READ:0;CHK:1F;READ:0;CHK:1F;SD?:0;SD:800;USB:8;
LOOP:9;EMMC:0;READ:0;CHK:1F;READ:0;CHK:1F;READ:0;CHK:1F;SD?:0;SD:800;USB:8;
LOOP:A;EMMC:0;READ:0;CHK:1F;READ:0;CHK:1F;READ:0;CHK:1F;SD?:0;SD:800;USB:8;
LOOP:B;EMMC:0;READ:0;CHK:1F;READ:0;CHK:1F;READ:0;CHK:1F;SD?:0;SD:800;USB:8;
и т.д…
А когда процесс обрывается на 2% [0x10101002] Romcode/Initialize DDR/Identify/USB Control setup
Вот что происходит в логе:
Так-же где то читал, что не прошивается так-как был стерт bootloader, перед началом прошивки нужно было убрать галку Erase bootloader, о чем я и не знал.
Так как, ранее прошивал много приставок S809, S905X, S905W, такой проблемы не было.
Думаю нужно найти способ прошить bootloader.
Или-же, проблема в железе, может где-то не хватает необходимого питания, или оно отсутствует.
Прилагаю фото платы с замерами.
Думал может проц. плохо сел, решил его пошатать, не это не помогло.
Так-же, приставка отказывается запускаться с SD-карты.
Пробовал создать CoreELEC, на SD-карту.
P.S. Распаковал стоковую прошивку и обнаружил что в нем нет файла bootloader.PARTITION
Сравнивал между прошивкой от T95M которую прошивал ранее после замены eMMC, там после распаковки я обнаружил наличие файла bootloader.PARTITION
Не знаю имеет ли это отношения к тому что оно не прошивается.
Так-же обращался в ветку T95Q на 4PDA, там помочь никто не смог.
Содержание
- atvXperience : The Forum
- [HELP] h96 pro+ How to solve Romcode/Initialize DDR/Read initialize status.
- atvXperience : The Forum
- [INSTALL] Common USB Burning Tool Errors and Fixes
- Announcement
- USB Burning Tool errors
- USB Burning Tool errors
- Comment
- Comment
- Comment
- Comment
- Comment
- Comment
- Comment
- Comment
- Comment
- Romcode Initialize/USB Control Setup Error
- Attachments
- Villa
- Announcement
- USB Burning Tool problem
- USB Burning Tool problem
- Comment
- Comment
atvXperience : The Forum
One of the Biggest Android TV Box Forums on the internet!
[HELP] h96 pro+ How to solve Romcode/Initialize DDR/Read initialize status.
I’m trying to recover my tv box, but whenever I try, the same error appears.
[Romcode / Initialize DDR / Read initialize status / USB Control setup error]
I tried some roms from atvxperience but they all return the same problem, at 2% for and return the mentioned error.
My Tv Box (h96 pro + (s32-v6 lpddr3)), can someone help me?
Try one of these versions for LPDDR3:
Put your device in MASK Rom mode by shortening the pins on NAND chip and flash good working stock ROM or atvX LPDDR3 image from post above.
em3ka wrote: ↑ Mon May 25, 2020 11:19 am Put your device in MASK Rom mode by shortening the pins on NAND chip and flash good working stock ROM or atvX LPDDR3 image from post above.
em3ka wrote: ↑ Mon May 25, 2020 11:19 am Put your device in MASK Rom mode by shortening the pins on NAND chip and flash good working stock ROM or atvX LPDDR3 image from post above.
I’m having the same problem..
do I have to pinch those 2 pins and keep pinching them while I’m connecting the USB cable to my box and then press the Start button on the program ( USB burning tool ) or I have to keep pinching the pins even after I click the start button .
also please give me the URL link for the correct firmware for my box ..because when I download the ones in the google drive that you added, the USB burning tool is giving me this message (( Parse burning image fail )) .
it’s like the USB burning tool is not accepting that image file.
Источник
atvXperience : The Forum
One of the Biggest Android TV Box Forums on the internet!
So, having problems with usb burning tool?
Well, here’s how you do it. Don’t forget to reply to this topic if you want to add anything.
1. Don’t forget to plug in power cable if you get lowper error.
2. If your device isn’t getting detected, even after pushing the reset button, try shorting nand pins. You can find a video tutorial on mxq project YouTube channel.
3. DDR Error? Tried using different ddr version atvX? DDR3, DDR4, LPDDR to name a few.
4. Flashed but not working? Try flashing again, or a different image. Still getting a black screen?
a) If you see the bootlogo but not the UI after booting, try atvx on a 1080p tv.
b) If you don’t see anything at all, the device is incompatible, Sorry
5. 7% Uboot error? Try another image or version. Chances are, your box uses a modded uboot which doesn’t accept other original uboot partitions. Fix? Point 6.
6. 2GB/3GB RAM but after flashing it’s 1GB/2GB? You’ve got a fake box. Your uboot was modified to read wrong dtb header to show more RAM than the actual physical one(maybe). The only way to fix(fake your ram) this is unpacking atvx and your stock rom to level 1 with Ricky’s customization tool and replacing your stock’s system, boot, recovery and bootloader partitions with atvx’s and re-packing.
Источник
Announcement
![]()
I have been using USB burning tool v2.0.6.2 to update my OTT MXQ Pro 4K box a couple of times but recently I have been getting these errors below and have not been able to flash the firmware:
— Romcode/Initialize DDR/Initialize PLL/USB Control setup error
— Erase bootloader/Lowper/Identify/ Error result
I have tried using a few other PCs with USB 2 ports but were getting the same errors and I only managed to erase the bootloader once.
Can any one help?
![]()
I had the same problem, but ended up getting it to work by doing the following. Frustrated, I tried different versions of USB Burning tool with no success. The 2.0.5.15 works just fine. You click the middle (2nd) Chinese writing on the upper left corner and select «English.» Remember to open, load, start, then, connect.
1. Open the USB Burning Tool as an Administrator
2. Load the Firmware image file
3. Press «Start»
4. Connect your box via USB
How.did you load the license in the flastool i cant get i right
Sent from my SM-N9300 using Tapatalk
- Join Date: Jun 2014
- Posts: 6441
And were can i find the license it doent come with the rar compressed file
Sent from my SM-N9300 using Tapatalk
- Join Date: Jun 2014
- Posts: 6441
We have a bricked T95u Pro 3/32. USB burning tool now sees the box after a pin short. It goes to 7 percent and then errors out. Any help to get it running again would be greatly appreciated
this is the error we see
[10:12:07 517][Global][Inf]—DevPath:?pci#ven_8086&dev_293c&subsys_02be1028& rev_03#3&11583659&0&d7#<3abf6f2d-71c4-462a-8a92-1e6861e6af27>
[10:12:07 517][Global][Inf]—->Roothub:USB#ROOT_HUB20#4&13e35410&0#
[10:12:07 589][Global][Inf]———>[Port0]NoDeviceConnected
[10:12:07 589][Global][Inf]———>[Port1]NoDeviceConnected
[10:12:07 589][Global][Inf]———>[Port2]NoDeviceConnected
[10:12:07 589][Global][Inf]———>[Port3]NoDeviceConnected
[10:12:07 589][Global][Inf]———>[Port4]NoDeviceConnected
[10:12:07 590][Global][Inf]———>[Port5]Other device
[10:12:07 590][Global][Inf]—Scan USB host controller complete
[10:12:07 591][Global][Inf]—Update data center with HubMap
[10:12:13 935][Global][Inf]—User click open button
[10:12:58 786][Global][Inf]—Image path C:UsersajcdnDownloadsT95UT95U_S912_03092017_A ndroidTVBox.euT95U_S912_03092017_AndroidTVBox.eu aml_upgrade_package.img
[10:13:22 934][Global][Inf]—Parsing burning package
[10:13:22 934][Global][Inf]—Load configuration file C:Program Files (x86)AmlogicUSB_Burning_Tooltemp
[10:13:22 935][Global][Inf]—Parse burning configuration file C:Program Files (x86)AmlogicUSB_Burning_Tooltempburn_config.xm l
[10:13:22 938][Global][Inf]—Get burning key
can you advise us please?
![]()
I had the same problem, but ended up getting it to work by doing the following. Frustrated, I tried different versions of USB Burning tool with no success. The 2.0.5.15 works just fine. You click the middle (2nd) Chinese writing on the upper left corner and select «English.» Remember to open, load, start, then, connect.
1. Open the USB Burning Tool as an Administrator
2. Load the Firmware image file
3. Press «Start»
4. Connect your box via USB
I have a Mecool M8s PRO L and i got this 2% error when i try to connect only with USB male to male to the pc:
«Romcode/Initialize DDR/Read initialize status/USB Control setup error»
Even if i try to short the reset pins out. Blue LED on the box stays allways on.
If i plug the power cable when we tries to pass the 2% error, we reaches 7% and the following error:
UBOOT/Disk initialize/Send command/Error result’
Источник
Romcode Initialize/USB Control Setup Error
Member
Hi Guys
I have this problem while flashing my U9H:
[12:11:25 210][HUB1-6][Inf]—2-2-0-0
[12:11:25 210][HUB1-6][Inf]—Control write pll reg1 0xd9000000:0x000000b1
[12:11:25 713][HUB1-6][Inf]—Control write pll reg1 0xd9000000:0x00005183
[12:11:26 217][HUB1-6][Inf]—Control write pll reg1 0xd9000000:0x000000b1
[12:11:26 719][HUB1-6][Inf]—Control write pll reg1 0xd9000000:0x00005183
[12:11:27 223][HUB1-6][Inf]—Write initial succeed
[12:11:27 223][HUB1-6][Inf]—Upload encrypt at 0xc8100228
[12:11:27 225][HUB1-6][Inf]—ulValue = 0xadfd718c
[12:11:27 225][HUB1-6][Inf]—Read encrypt value succeed
[12:11:27 225][HUB1-6][Inf]—Download DDR.USB,size: 49152!
[12:11:27 238][HUB1-6][Inf]—Transfer complete 49152
[12:11:27 240][HUB1-6][Inf]—Run at address 0xd9000000
[12:11:27 246][HUB1-6][Inf]—RunInRam success
[12:11:27 271][HUB1-6][Inf]—2-2-0-0-0-1-0-0
[12:11:27 271][HUB1-6][Inf]—CheckFileRunState succeed
[12:11:42 275][HUB1-6][Err]—usbReadFile failed ret = -116
[12:11:42 275][HUB1-6][Err]—ReadPara failed
[12:11:42 282][HUB1-6][Err]—[0x10105002]Romcode/Initialize DDR/Read initialize status/USB Control setup error
[12:11:42 283][HUB1-6][Inf]—Close device handle 0x00000b44
Is there somebody else, with the same problem? Actually tried to flash the Latest Official Firmware because (after a long pause while it was offline) my box didnt want to boot (splash screen appear with Android logo and then nothing happened). For additional info there is a screenshot attached.
Attachments
Villa
Hi Guys
I have this problem while flashing my U9H:
[12:11:25 210][HUB1-6][Inf]—2-2-0-0
[12:11:25 210][HUB1-6][Inf]—Control write pll reg1 0xd9000000:0x000000b1
[12:11:25 713][HUB1-6][Inf]—Control write pll reg1 0xd9000000:0x00005183
[12:11:26 217][HUB1-6][Inf]—Control write pll reg1 0xd9000000:0x000000b1
[12:11:26 719][HUB1-6][Inf]—Control write pll reg1 0xd9000000:0x00005183
[12:11:27 223][HUB1-6][Inf]—Write initial succeed
[12:11:27 223][HUB1-6][Inf]—Upload encrypt at 0xc8100228
[12:11:27 225][HUB1-6][Inf]—ulValue = 0xadfd718c
[12:11:27 225][HUB1-6][Inf]—Read encrypt value succeed
[12:11:27 225][HUB1-6][Inf]—Download DDR.USB,size: 49152!
[12:11:27 238][HUB1-6][Inf]—Transfer complete 49152
[12:11:27 240][HUB1-6][Inf]—Run at address 0xd9000000
[12:11:27 246][HUB1-6][Inf]—RunInRam success
[12:11:27 271][HUB1-6][Inf]—2-2-0-0-0-1-0-0
[12:11:27 271][HUB1-6][Inf]—CheckFileRunState succeed
[12:11:42 275][HUB1-6][Err]—usbReadFile failed ret = -116
[12:11:42 275][HUB1-6][Err]—ReadPara failed
[12:11:42 282][HUB1-6][Err]—[0x10105002]Romcode/Initialize DDR/Read initialize status/USB Control setup error
[12:11:42 283][HUB1-6][Inf]—Close device handle 0x00000b44
Is there somebody else, with the same problem? Actually tried to flash the Latest Official Firmware because (after a long pause while it was offline) my box didnt want to boot (splash screen appear with Android logo and then nothing happened). For additional info there is a screenshot attached.
Why do you have «Erase flash» set to «Erase all»? «Normal erase» should be sufficient!
Also you shouldn’t have «Reset after success» and «Whether overwrite key» Enabled.
Источник
Announcement
![]()
I have H96 pro tv box, I’m trying to install a new firmware but I have a problem with the usb connection.
Whenever I try to connect the box to usb ,it recognized for 1-2 seconds and then disconnecting.
I tried it with 4 different computers (including desktop), I installed the driver, I tried 2 different usb cables — all with the same results.
I tried to press the reset button and then to start the box — it doesn’t recognized at all.
I tried to connect it to the power adapter ,then to start the box and then to connect it to usb- it doesn’t recognized at all.
I tried to connect the hdmi cable so I can see what happens when it starts ,I see that when i press the reset button it goes into the recovery menu — but it seems that when it in this menu it doesn’t recognized by usb.
this is the error that I get:
[2018-11-23 13:50:21 662][HUB2-2][0x10102002]Romcode/Initialize DDR/Initialize PLL/USB Control setup error
[2018-11-23 13:51:36 983][HUB2-2][0x10105002]Romcode/Initialize DDR/Read initialize status/USB Control setup error
![]()
- Join Date: May 2014
- Posts: 1316
Which version of USB Burn Tool?
Which version of Windows?
(Which China Box revision. update to which firmware? (Not immediately important to your question.)
Do you have a firewall running?
Do you have Anti-Virus running?
I suggest that you you give more info.
(All 4 computers only recognize connection (1-2 sec.)?
![]()
USB burn tool v.2.0.7.2, I also use the usbview.exe to see if the box recognized.
I tried on win7 and win10
box version you can see attached, trying to install h96pro.H96PRO+_2G(16)_HS2734A_1000M_7.1.2018.04.10 .20.38
I don’t have a firewall
I have Symantec Endpoint Protection
I attached the log files
![]()
- Join Date: May 2014
- Posts: 1316
Amlogic Worldcup Drivers..no longer installed properly??
«Romcode/Initialize DDR/Initialize PLL/USB Control setup error
Romcode/Initialize DDR/Read initialize status/USB Control setup error.»
2018-11-23. «attempting to erase bootloader». Did USB Burn Tool succeed in seeing and flashing your China Box?
Источник
Приставка X96 mini 2/16 Gb широко распространена. Данный экземпляр при подключении к телевизору не выдает изображение и не реагирует на пульт.
Светодиод горит тускло красным цветом и не меняет свой цвет на синий.
Маркировка используемого блока питания — RSF-DY009-0502000.
Приставка со стороны задней крышки выглядит следующим образом. На ней наклейка с точным названием модели.
Крышка отщелкивается и мы можем получить доступ к плате. Запоминаем расположение крышки, т.к. на ней находится термопрокладка, которая должна попасть на процессор Amlogic S905W.
Маркировка платы Q6X V2.2 17355. По отзывам на 4PDA данная маркировка имеет проблемы при прошивке.
С обратной стороны плата выглядит следующим образом.
Входное напряжение равно 5.2 В и поэтому неисправность внешнего блока питания исключается.
Далее входное напряжение понижается при помощи DC/DC преобразователей с маркировкой S15BLQ.
Напряжения на плате распределены следующим образом. Также необходимо обратить внимание на исправность электролитического конденсатора 100 мкФ х 10 В. Он один на плате.
Для прошивки устройства я использовал программу USB Burning Tool 2.09. При подключении необходимо выполнить сброс приставки. Для этого удобно использовать спичку (токонепроводящий предмет). USB шнур необходимо вставлять в белый разъем. Вот подробная инструкция по прошивке через ПК. Если кому-то не нравится — то вот другая.
После этого в программе отображается устройство с пометкой Connect success.
Однако прошивка прерывалась на 7%. Ошибка была либо [0x30201004]UBOOT/Disk initialize/Send command/Error result.
В версии программы USB Burning Tool 2.12 код ошибки сменился на [0x32030201]Uboot/Get result/DiskInitial error.
Кому-то помог при прошивке выбор опции «Force Erase All». Однако при этом придется в дальнейшем восстанавливать MAC-адрес. Такая проблема может быть при проблемах с флеш-памятью.
В таком случае можно попробовать воспользоваться оболочкой LibreELEC. По следующей ссылке описана штатная установка LibreELEC — KODI — 8.2.3.1 на X96 Mini Amlogic S905W. Нас интересует вариант полноценной загрузки LibreELEC с miniSD карты, описанный тут и тут.
Задействованные программы Win32DiskImager и Burn_Card_Maker. Однако мне это не помогло, т.к. неисправность была где-то гораздо глубже. Возможно кому-то данная инструкция и вышеуказанные ссылки помогут.
Ранее прошивал TV Box X96 mini, которая зависала на заставке.

Тема: Обновление GI iTV912 с Android 6.0 до Android 7.1.1 (Прочитано 43662 раз)

0 Пользователей и 1 Гость просматривают эту тему.
Все новые версии программного обеспечения выходят уже с версией Android 7.1.1, но пользователи которые имеют на борту своих GI iTV912 версию Android 6.0 при обновлении с USB не смогут обновить и перейти на версию выше, собственно что делать и как выполнить обновление сейчас и рассмотрим.

Что требуется подготовить для обновления.
1) И самое необходимое, это конечно кабель для подключения к ПК, он должен быть типа USB type A — USB type A, на фото ниже такой как у меня например:
Извините, вам запрещён просмотр содержимого спойлеров.
2) Программа для обновления: Amlogic USB Burning Tool
3) Образ обновления, скачать его можно по ссылке: GI_iTV912-NMF26Q-20170424.204718.V0222.img
Если все условия выполнили, то далее приступаем к выполнению операций обновления, первое и самое необходимое это подключение кабеля от блока питания (подключение блока питания происходит одновременно с USB кабелем от ПК).
Наш кабель для обновления USB type A — USB type A должен быть подключен к ПК, второй конец кабеля держим на готовности для последующего подключения как опишу в инструкции.
Программу Amlogic USB Burning Tool в обязательном порядке требуется запустить с правами администратора, в данном варианте у вас не возникнет последующих проблем:

После запуска программы у вас будет не читаемый интерфейс, по этой причине требуется переключиться на английский.

Далее во вкладке File — Import image — выбираем наш образ обновления

После выбора пойдет верификация образа на ошибки, если всё нормально, то внизу программы появится строка с указанием пути к файлу, а сообщение «Image checking, it will take loger time if the image file is larger, please wait» исчезнет. Больше никакие галочки в программе не трогаем.
Следующий шаг нажимаем кнопку Start, после чего подключаем другой конец кабеля USB type A — USB type A к телеприставке и одновременно начинаем нажимать очень ритмично кнопку пульта цифру 2, программа должна приконектится и начаться процесс обновления, строка Status должна заполниться до 100% без ошибок.

И по удачному завершению в строке Result программа отрапортует [0x00000000]Burning successfully, после чего процесс обновления можно считать завершенным и ожидать на экране полное прохождение инициализации приложений и загрузки рабочего стола GI iTV912.
Лично я не несу никакой ответственности за изложенную здесь информацию, поскольку публикуется она для общего развития и в образовательных целях — чтобы показать, как выполнить обновление GI iTV912 с Android 6.0 до Android 7.1.1.
Всё что описано выполнено на личном опыте.
Видео как происходит процесс обновления в программе Amlogic USB Burning Tool
Эти пользователи сказали Вам СПАСИБО:

Записан
GI ET11000, GI ET7000mini, GI iTV912, GI Uni, GI Spark2&3Combo, VU+ Duo2, VU+ Solo2, VU+ SoloSE, GI 9995, GI 9895, GI 8895, GI 8180, GI 8120, GI HD Slim& Plus& Combo
Satellite: 4w, 1.9е, 4.9e, 7e, 9e, 13e, 16е, 19e, 23.5e, 36e, 53e, 55e, 75e, 85.2e, 90e
Выполнены все условия по описанию,приставка не конектится.Может что упущено в описании или распиновка кабеля не та.У кого получилось,поделитесь опытом.
Записан
sushko62, в описании ничего не упущено, кабель стандартный USB type A — USB type A, может быть от операционных систем отличие, у меня обновлялось на Windows 8.1, у другого пользователя обновлялось на Windows 10. Опять же, что и как вы выполняли мы не знаем, какие действия, правильно ли запускали программу, успеваете ли вы при включении кабеля быстро нажимать кнопку 2, много вопросов.
Эти пользователи сказали Вам СПАСИБО:
Записан
GI ET11000, GI ET7000mini, GI iTV912, GI Uni, GI Spark2&3Combo, VU+ Duo2, VU+ Solo2, VU+ SoloSE, GI 9995, GI 9895, GI 8895, GI 8180, GI 8120, GI HD Slim& Plus& Combo
Satellite: 4w, 1.9е, 4.9e, 7e, 9e, 13e, 16е, 19e, 23.5e, 36e, 53e, 55e, 75e, 85.2e, 90e
Выполнены все условия по описанию,приставка не конектится.Может что упущено в описании или распиновка кабеля не та.У кого получилось,поделитесь опытом.
У меня получилось после 10й или более попытке,я правда использовал метод из этой цитаты с другого сайта:
• После установки запускаем программу USB Burnibg Tool и выбираем разархивированную прошивку с расширением *.img и сразу нажимаем на start.
• Соединить компьютер и бокс без питания с помощью кабеля USB-A >> USB-A к usb разъему. Зажатой кнопкой Power.
Если процесс прошивки не запустился вставляем спичку нажимаем находящеюся внутри кнопку RESET. Если снова не пошёл процесс прошивки пробуем в месте с подключить к приставке питание.
Пойдёт заливка и начнётся прошивка.
Эти пользователи сказали Вам СПАСИБО:
Записан
А есть другая ссылка на образ.Вызвало подозрение что на снимке процесса обновления из инструкции файл весит 1,584,891 кв а скачанный по ссылке 1,570,782кв Спасибо за помощь
Записан
sushko62, скриншоты старые, а вот в видео отображен процесс обновления именно с образом который по ссылке для скачивания.
Эти пользователи сказали Вам СПАСИБО:
Записан
GI ET11000, GI ET7000mini, GI iTV912, GI Uni, GI Spark2&3Combo, VU+ Duo2, VU+ Solo2, VU+ SoloSE, GI 9995, GI 9895, GI 8895, GI 8180, GI 8120, GI HD Slim& Plus& Combo
Satellite: 4w, 1.9е, 4.9e, 7e, 9e, 13e, 16е, 19e, 23.5e, 36e, 53e, 55e, 75e, 85.2e, 90e
Спасибо администратору.Обновление пошло со второго раза.Не подключал HDMI,lan,питание.Время обновления более 4 минут.При первом включении долгая установка системы,предупреждение о запрете отключения питания.Для увеличения памяти использовал быструю карточку памяти.Система не ругается при установке программ на карточку памяти
Эти пользователи сказали Вам СПАСИБО:
Записан
У меня обновление пошло только при подключении к USB разъему, который ближе к разъему питания, причем порядок такой:
Подключаем USB
Зажимаем reset, подключаем питание, отпускаем reset.
Причём через USB 3.03.1 разьёмы категорически не идет, затыкается на 30 секундах. Только через хаб USB 2.0 запустилось стабильно.
Эти пользователи сказали Вам СПАСИБО:
Записан
Здравствуйте! Я смотрю, у каждого здесь свой подход, потому-что далеко не у всех срабатывает способ подключения, описанный админом в данной теме. У меня например, пока никакой из предложенных здесь вариантов не работает. Программа USB Burning Tool просто тупо не видит приставку, как её ни подключай. Поэтому, у меня к админу другое предложение — неужели нельзя взять сам файл прошивки IMG и переделать его каким-то образом в обычный и удобный ZIP формат? Чтобы потом просто зайти в приложение UPDATE на самой приставке и обновить её этим ZIP файлом. Если бы ваш предложенный в данной теме метод обновления прошивки у всех работал, то ладно уже… А так, эти все подключения — только танцы с бубном и всё… Которые причём и не работают, в данном случае у меня.
Записан
Leviofan13xxxl, а как вы думаете если бы был такой вариант обновления, то стал бы я отдельно городить тему с какими то принципами обновления.
В соответствующей теме выложено обновление через update, но его возможно установить только после перехода на Android 7.1.1…исключением является уже изначально из коробки установленный андроид NOUGAT.
Если не получается, то найдите установщика который наладит работу, естественно вы должны быть уверены что это специалист, а не шабашник.
Эти пользователи сказали Вам СПАСИБО:
Записан
GI ET11000, GI ET7000mini, GI iTV912, GI Uni, GI Spark2&3Combo, VU+ Duo2, VU+ Solo2, VU+ SoloSE, GI 9995, GI 9895, GI 8895, GI 8180, GI 8120, GI HD Slim& Plus& Combo
Satellite: 4w, 1.9е, 4.9e, 7e, 9e, 13e, 16е, 19e, 23.5e, 36e, 53e, 55e, 75e, 85.2e, 90e
С USB Burning Tool разобрался.Программа увидела приставку,начался процесс обновления.На 4%останавливается и выдает [0x10303004] Romcode/Switch status/identify/Error result.Образ скачивался 2раза.Что может быть?
Записан
sushko62, такое было и не раз, пробуйте ещё, программу запускаете с правами Администратора?
Эти пользователи сказали Вам СПАСИБО:
Записан
GI ET11000, GI ET7000mini, GI iTV912, GI Uni, GI Spark2&3Combo, VU+ Duo2, VU+ Solo2, VU+ SoloSE, GI 9995, GI 9895, GI 8895, GI 8180, GI 8120, GI HD Slim& Plus& Combo
Satellite: 4w, 1.9е, 4.9e, 7e, 9e, 13e, 16е, 19e, 23.5e, 36e, 53e, 55e, 75e, 85.2e, 90e
Да,с правами.Спасибо буду пробовать.
Записан
Нашел я короче специалистов, которые согласились поставить мне на приставку эту прошивку Android 7.1.1. Работает система немного пошустрее, чем на Android 6.0, спасибо и на этом. Смущает только один немаловажный нюанс — весьма производительный процессор Amlogic S912, который установлен на этой приставке, по своим характеристикам поддерживает 64-битные вычисления, о чем свидетельствуют и показания известного теста Antutu, и даже эмблемка на упаковке самой приставки. С какого тогда перепугу разработчики официальных прошивок ставят 32-разрядные версии Android на 64-битный процессор??? Причем как старая прошивка 6.0 Marshmallow — 32-разрядная, так и новая прошивка 7.1.1 Nougat — тоже 32-разрядная. Я конечно не собираюсь придираться к разрядности прошивок, для меня это не столь принципиально, но ведь раз так громко рекламируется 64-битность процессора, то и система тоже должна быть 64-битной, а не 32. По крайней мере, версии любых приложений для ARMv64 просто не устанавливаются на данную приставку, как ни крути. Соответственно, реклама 64-битного процессора приставки — просто бессмысленна. Досадно немного!
Записан
Прошился с н-ного раза, пробовал все методьі , описанньіе вьіше, грешил на кабель, на Виндовс7, уже почти забил на єто.
Вьіключил, отключил питание и ЮСБ, где-то через час уже напоследок пробую (наверное, нужно бьіло больше времени между прошивками, чтоб смог полностью разрядиться, хз).
1 Открьіваю программу с правами администратора
2 Вьібираю файл имиджа
3 В программе нажимаю Start
4 Подключаю USB-кабель к первому порту (со стороньі гнезда от БП)
5 Зажимаю иглой сквозь отверстие кнопку RESET возле гнезда HDMI, не отпускаю
6 Включаю блок питания в розетку
7 Отпускаю кнопку RESET
8 В программе пошла шкала, пару раз прозвучали сигнальі о подключении-отключении устройства USB
9 Вьідало сообщение об успешном обновлении
10 Вьіключаю блок питания, вьінимаю USB-кабель, в программе кнопка STOP, закрьіваю программу
11 Первое включение занимает еще несколько минут, в єто время не отключать блок питания
Эти пользователи сказали Вам СПАСИБО:
Записан
- Поделиться темой
- Печать
Страницы: [1] 2 3 … 7 Вверх
- Giclub.tv »
- GI Premier, GI iTV912, GI Lunn 18, GI Lunn 28, GI Lunn 216 »
- GI iTV912 ( OTT TV BOX ) (Модераторы: ooolexa, -WadimArt-, Ednaz, wolow) »
- Обновление GI iTV912 с Android 6.0 до Android 7.1.1