
by Radu Tyrsina
Radu Tyrsina has been a Windows fan ever since he got his first PC, a Pentium III (a monster at that time). For most of the kids of… read more
Updated on May 18, 2022
- Tools to monitor network traffic are indispensable for an administrator.
- That is why we included several such tools in the article below, including HDD and USB monitoring.
- We’ve gone into great detail with each of these networks, HDD, and USB monitoring tools.
- We’ve included products from Passler, Gilisoft, and other great developers.

Nobody would ever need monitoring software for all kinds of systems if all devices in the world were as hard-working and as trustworthy as yourself.
But machines have their own flaws and their own performance issues and whims, and the best thing you can do is to monitor them every now and then before anything should happen that cannot be fixed.
Here are 12 monitoring tools for your hard drive, your USB drive, and also for your network, which you can use to make sure that everything that’s related to these systems keeps working as smoothly as possible.
If you plan on building a network you will have to start with architecture, then draw the design and in the end analyze and choose the hardware that best suits your requirements.
Many organizations need their network up and running correctly for generating revenue so having the best set of tools for monitoring and for managing the one you created with so much effort is quite critical.
If you’re wondering how exactly will you winnow out the best monitoring tools for your network from hundreds or even thousands of options we can help you.
Today, there are various commercial products, freeware tools, and open-source software to choose from. There’s also a lot of debate regarding free tools versus paid ones and there are both of them tried and tested and well recommended.
Open-source choices are also a good option and they can even match the commercial tools.
On the other hand, you should be aware of the fact that using an open-source monitoring tool will require a high level of involvement with that particular tool which may not best suit all of your needs.
For one, open-source tools require a significant investment of time and resources for learning, installing, configuring, and using that tool.
Another thing is that some features may have to be built with the help of community support or with the support of an in-house IT team.
Another consideration is security, and this can very easily become an issue in case your enterprise features some strict security guidelines.
Immediate customized fixes may not be available unless you spend some time on their development and so on. There are cases in which some major security flaws are not discovered in the auditing process.
So, our advice is to stick with the free/paid tools for monitoring networks because they’re much more convenient.
In case you are not aware of the state of your hard drives, you may not be able to save all of your precious data, before something nasty happens and then it becomes too late.
You must surely know that not all hard drive crashes are random and this way you have to make time to backup your data before it fails for good.
All the modern drives have a monitoring technology which is called S.M.A.R.T. (Self-Monitoring Analysis and Reporting Technology) and this is targeted at continuously monitoring particular parameters on a hard drive.
Various parameters can be monitors by this technology, and they include read/write error dates, seek error dates, temperatures, spinup time, and so on.
In order to be efficiently warned when some of these parameters are becoming degraded or are on the verge of reaching their threshold, you need a program that is able to track down all these changes that are involved and then that will display them for you.
Such monitoring software should be able to allow you to test and to see whether the hard drive is able to store your data in the safest manner possible, it should give you plenty of time to backup your important files and to start looking for a replacement drive.
The monitoring software is not completely able to show you whether the integrity of all your data can be preserved on a particular hard drive.
The best thing you can do is to scan for unreadable blocks of data once a month in order to make sure that your drive is not degrading and your data that you have stored in your system is not being lost.
PRTG Network Monitor

The PRTG Network tools will monitor every aspect of your IT infrastructure including all devices, systems, traffic, and apps using various technologies.
These technologies include the following: SNMP (ready to use and custom options), WMI and Windows Performance Counters, SSH (for Linux/Unix and macOS systems), Flows, and Packet Sniffing, Ping, HTTP requests and push data, SQL and more.
The tool is able to scan network segments by pinging defined IP ranges and this way PRTG will recognize a broad range of devices and systems in an automatic manner, and it will create sensors from predefined device templates.
All of these will save you lots of configuration work, and you will be able to start monitoring everything right away.
The tool also allows you to create web pages with up-to-date monitoring data in your desired design. You will also be able to create maps with your monitoring data publicly available.
PRTG will alert you when it discovers warnings or important metrics. You will also be able to get push notifications straight to your mobile device and you can set up the notifications via email and SMS the best way to suit all of your needs.
Using the powerful API, you are allowed to even write your own scripts.

PRTG Network Monitor
A complete solution to monitor everything: network, devices, systems, and applications. Setup filters and custom alerts.
Device Control Plus

The first software on our list that deals with the management and limiting of data access from USB devices is Device Control Plus from ManageEngine.
The product is incredibly reliable and it can be used by a wide range of users, from common ones just looking to avoid USB-based viruses to administrators that need to monitor device access to data.
Excessive access privileges will no longer be an issue thanks to Device Control Plus’ zero-trust policy, as it scans every single device before granting it any form of access, regardless if it’s the 100th time you connected it.

Device Control Plus
USB device management and monitoring is crucial for the well-being of your entire PC system. Get Device Control Plus!
Gilisoft USB Lock

USB devices are a prime location for malware to infect your PC since most of the time they instantly gain access to your entire PC’s database of files, so limiting access is the best way to prevent such situations.
Gilisoft USB Lock is a third-party tool specialized in doing just that, as it can easily limit, access of external media to your PC, and you can even use it to shut down PC ports entirely, preventing accidental connections.
More so, the product features an incredibly simple interface, with most of the information being handed to you the moment you connect a new device to your PC, making it extremely beginner-friendly.

Gilisoft USB Lock
The name says it all, and Gilisoft USB Lock will quickly limit the access of any unauthorized USB device.
Site24x7
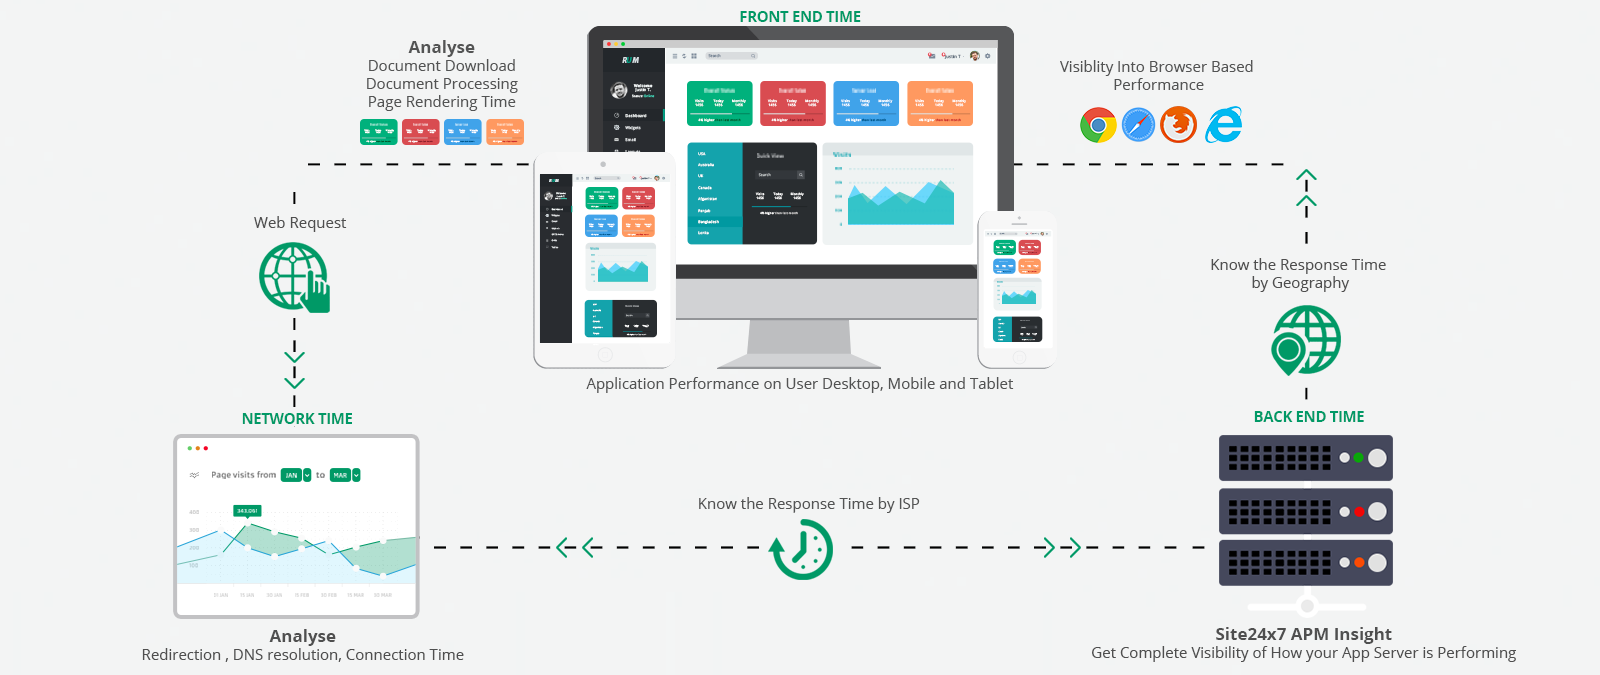
The tool offers centralized cloud monitoring for DevOps and IT operations, and it monitors the experience of real users accessing websites and apps from desktop and mobile devices.
The in-depth monitoring capabilities enable DevOps teams to control and troubleshoot apps, servers, and network infrastructure, including both private and public clouds.
The end-user experience monitoring is done from over 50 locations across the world and various wireless carriers.
The Site24x7 software monitors the performance of Internet services such as HTTPS, DNS, FTP, SSL, SMTP, POP, URLs, and APIs.
It offers comprehensive monitoring for critical network devices such as routers, firewalls, and networks. It can help network teams to get deeper performance visibility that is required for managing complex systems.
⇒ Get Site24x7
CACTI
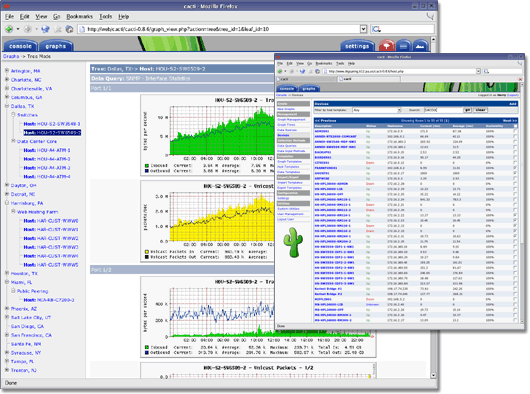
Cacti is a network monitoring tool that allows you to collect data from almost any network element there is including switching and routing systems, load balancers, firewalls, and servers, and it will put all of the data into graphs.
If you own a device, it is possible that Cacti’s active community of developers has created a monitoring template for it.
This tool supports SNMP polling which covers a broad range of network devices.
You will also be able to extend Cacti’s capabilities to use scripts, queries or commands for data collection and then save it as a template and then to use for polling other devices for similar data sets.
Cacti leverages the power of RRDTool. This is an open-source data logging and graphing system which is designed for storing polled data in the database. It also creates graphs from the stored data sets.
RRDTool’s data consolidation allows you to store the collected data forever and it is limited only by the size of your storage. Cacti leveraging on RRDTool can generate any type of graph for any data set.
Some PC issues are hard to tackle, especially when it comes to corrupted repositories or missing Windows files. If you are having troubles fixing an error, your system may be partially broken.
We recommend installing Restoro, a tool that will scan your machine and identify what the fault is.
Click here to download and start repairing.
The graphing used in Cacti is the standard used by various open-source and commercial tools.
Cacti also allows you to add more users and to give them access with or without edit permissions. This is just perfect for service providers and enterprises with a large NOC team.
Cacti leveraging on RRDTool can generate any type of graph for any data set. The graphing used in Cacti is the standard used by various open-source and commercial tools.
Cacti allows you to add more users and to give them access with or without edit permissions. This is just perfect for service providers and enterprises with a large NOC team.
⇒ Get Cacti
NTOP (NTOPng)
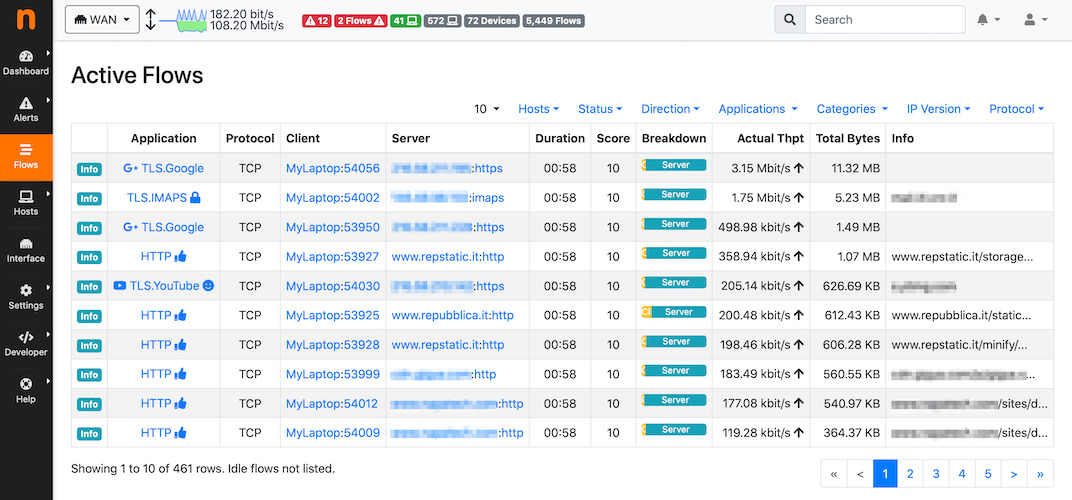
This is a traffic probe that uses libpcap for packet capture to report on network traffic.
You can install it on a server with various interfaces and use port mirroring on a network tap to feed ntopng with the data packets from the network for analysis.
The software can analyze traffic even at 10G speeds; to report on IP addresses, volume, and bytes for each and every transaction.
It can also sort traffic based on IP, protocol, and port, it generates reports for usage and even on AS information.
Such a level of traffic analysis will help you make some informed decisions about capacity planning and QoS design, and it will also help you find bandwidth-hogging users and apps in your network.
The tool has a commercial version that is called ntopng pro which comes with some additional features, but the open-source version seems to be good enough to quickly gain insight into traffic behavior.
The tool will integrate with external monitoring apps such as Nagios for alerting and it will provide data for monitoring.
The program also features some limitations, but its level of network traffic visibility makes it worth your money and efforts.
⇒ Get NTOP
CrystalDiskInfo
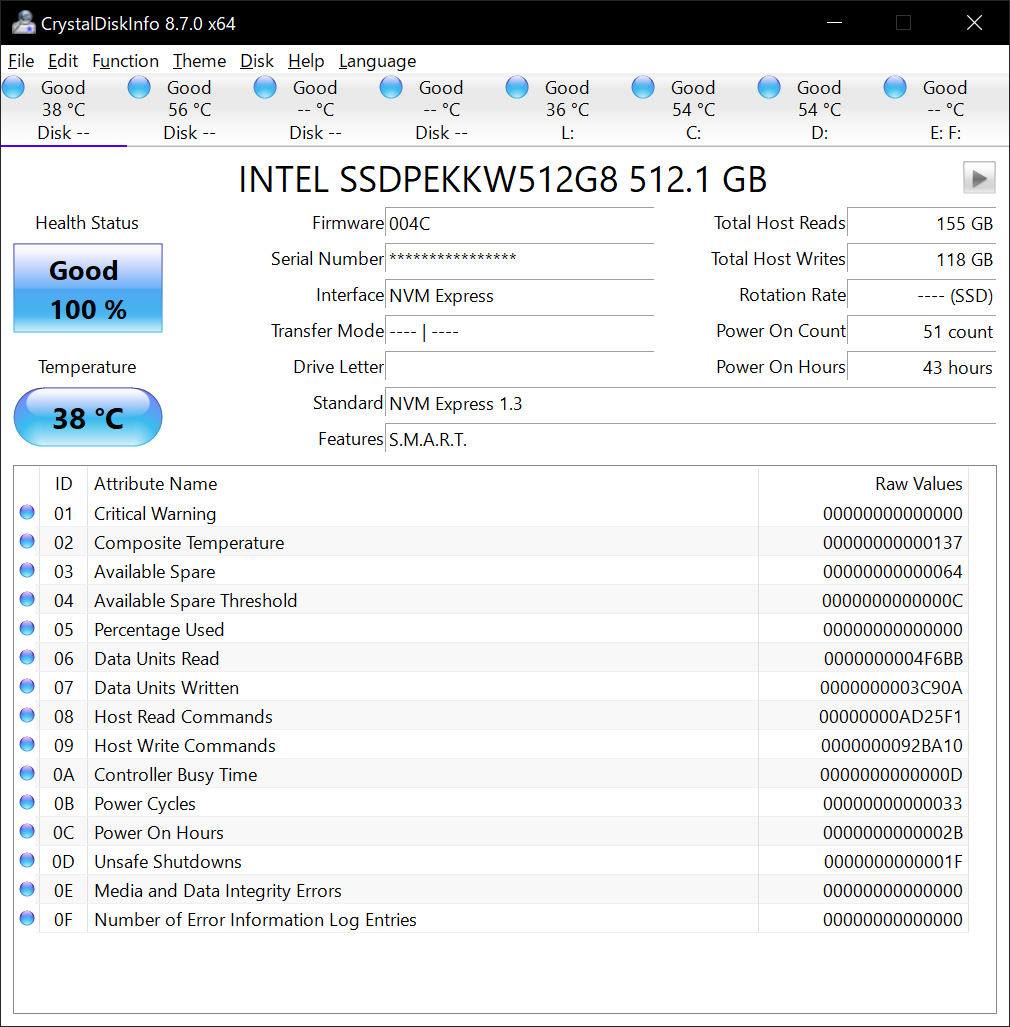
This is an excellent program for monitoring the temperature and health of your hard drive. The software is able to warn you if the temperature and if the health of your drive is deteriorating.
The program’s default temperature warning is set to 50 degrees Celsius, and it can also be adjusted.
It features graphs of the accumulated S.M.A.R.T. data, and it doesn’t have any problems telling users anything there is to know about the drive.
CrystalDiskInfo lists both the Power On Count and the total Power On Hours. The software is open-source, and there is a portable version of the program and also an installer.
The main advantages of the program include resident monitoring, alarm for temperature and health, showing the temperature for each and every drive in the system tray, S.M.A.R.T. and general info about internal/external hard drives and setting for adjusting AAM/APM.
Its minuses include the fact that you must set it up to be a resident and to startup in the system tray for constant monitoring.
⇒ Get CrystalDiskInfo
HDDScan
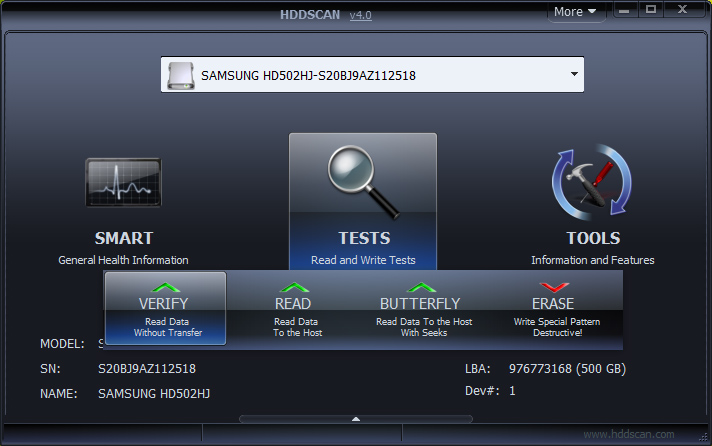
This is quite an amazing piece of software even if its interface needs a little getting used to. One of its best features is the Graph when you are scanning the surface for unreadable blocks of data.
It is able to list the blocks by response time and this way you will get to see how many blocks are getting close to being unreadable before the data in those blocks is lost. It will warn you about un-checking the box that disables the maps dynamic update.
You are advised not to have any other programs running at the same time you are scanning, and there is also the Conveyance text that will turn out to be great in case you receive a new or an old internal/external hard drive.
The program also features settings for adjusting the AAM (Automatic Acoustic Management), the PM (Power Management), and the APM (Advanced Power Management).
Its main features include monitoring temperature, alarm for temperature, showing the temperature for each drive, S.M.A.R.T. offline conveyance and more tests, surface scan, information about internal and external hard drives, and the ones that we have already described above.
The temperature monitor must be selected for each and every drive for it to be able to be continuously monitored and this must be done each time you start the program.
⇒ Get HDDScan
HD Tune
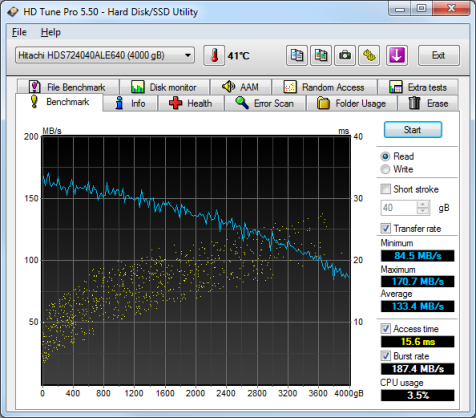
HD Tune is quite a useful benchmark to test your hard drive performance. Its free version provides block scanner capabilities, and it works with both internal and external hard drives.
This utility features a graphical benchmark to bench internal/external hard drives performances and it scans for bad data blocks on internal and on external drives with graphical diagrams.
It can also display power-on hours, S.M.A.R.T., and general info only for internal drives.
You can also make the program portable, and all you have to do for this is to copy HDTune.exe to the folder you like after you install the program.
The program’s free version is not updated anymore, and you have to go for a paid-for Pro version with some more complex features.
The free version of the program does not include any external USB hard drive S.M.A.R.T. monitoring, temperature, and information as it is not updated.
⇒ Get HD Tune
Whenever you buy a new piece of computer hardware, whether it is the memory, a CPU, a hard drive and so on, one of the main factors that will help you determine your buying decision would be the performance of that certain component.
Regarding the hard drives and the SSD drives you will have to look at their capacity and read/write speeds.
The story will be quite similar in case you decide on purchasing a removable memory card or a USB flash drive.
Besides from having to worry about USB drives being at their full capacity and not being fake in case you get them from places such as eBay, the performance of a flash drive can vary by massive amounts.
This will strongly depend on the manufacturer and the type of memory that is used.
Now, the modern devices are reaching up to 64GB and even more than this and, if you purchase a slow USB flash drive with a high capacity, this could literally take hours to fill it up completely.
Besides being incredibly frustrating, this could also turn out to be a total waste of cash if you have to go and buy something else that will be faster and will fit all of your needs.
Many users make their purchases based on the storage size without considering the speed of the drive.
In case you already have some USB flash drives you might like to be able to find out how fast they actually are at writing and reading. In case a 16GB drive only writes at 3-4MB/s it could take forever to fill it.
If you own a fast USB3 flash drive it could do exactly the same tasks in only a matter of minutes.
Check out these tools to benchmark your USB flash drives or also your media cards to find out just how fast they actually are.
Browse through all the software tools listed above and choose the ones that best suit your needs for monitoring the performance of your hard/USB drives and of your network.
Still having issues? Fix them with this tool:
SPONSORED
If the advices above haven’t solved your issue, your PC may experience deeper Windows problems. We recommend downloading this PC Repair tool (rated Great on TrustPilot.com) to easily address them. After installation, simply click the Start Scan button and then press on Repair All.
![]()
Newsletter
by Radu Tyrsina
Radu Tyrsina has been a Windows fan ever since he got his first PC, a Pentium III (a monster at that time). For most of the kids of… read more
Updated on May 18, 2022
- Tools to monitor network traffic are indispensable for an administrator.
- That is why we included several such tools in the article below, including HDD and USB monitoring.
- We’ve gone into great detail with each of these networks, HDD, and USB monitoring tools.
- We’ve included products from Passler, Gilisoft, and other great developers.
Nobody would ever need monitoring software for all kinds of systems if all devices in the world were as hard-working and as trustworthy as yourself.
But machines have their own flaws and their own performance issues and whims, and the best thing you can do is to monitor them every now and then before anything should happen that cannot be fixed.
Here are 12 monitoring tools for your hard drive, your USB drive, and also for your network, which you can use to make sure that everything that’s related to these systems keeps working as smoothly as possible.
If you plan on building a network you will have to start with architecture, then draw the design and in the end analyze and choose the hardware that best suits your requirements.
Many organizations need their network up and running correctly for generating revenue so having the best set of tools for monitoring and for managing the one you created with so much effort is quite critical.
If you’re wondering how exactly will you winnow out the best monitoring tools for your network from hundreds or even thousands of options we can help you.
Today, there are various commercial products, freeware tools, and open-source software to choose from. There’s also a lot of debate regarding free tools versus paid ones and there are both of them tried and tested and well recommended.
Open-source choices are also a good option and they can even match the commercial tools.
On the other hand, you should be aware of the fact that using an open-source monitoring tool will require a high level of involvement with that particular tool which may not best suit all of your needs.
For one, open-source tools require a significant investment of time and resources for learning, installing, configuring, and using that tool.
Another thing is that some features may have to be built with the help of community support or with the support of an in-house IT team.
Another consideration is security, and this can very easily become an issue in case your enterprise features some strict security guidelines.
Immediate customized fixes may not be available unless you spend some time on their development and so on. There are cases in which some major security flaws are not discovered in the auditing process.
So, our advice is to stick with the free/paid tools for monitoring networks because they’re much more convenient.
In case you are not aware of the state of your hard drives, you may not be able to save all of your precious data, before something nasty happens and then it becomes too late.
You must surely know that not all hard drive crashes are random and this way you have to make time to backup your data before it fails for good.
All the modern drives have a monitoring technology which is called S.M.A.R.T. (Self-Monitoring Analysis and Reporting Technology) and this is targeted at continuously monitoring particular parameters on a hard drive.
Various parameters can be monitors by this technology, and they include read/write error dates, seek error dates, temperatures, spinup time, and so on.
In order to be efficiently warned when some of these parameters are becoming degraded or are on the verge of reaching their threshold, you need a program that is able to track down all these changes that are involved and then that will display them for you.
Such monitoring software should be able to allow you to test and to see whether the hard drive is able to store your data in the safest manner possible, it should give you plenty of time to backup your important files and to start looking for a replacement drive.
The monitoring software is not completely able to show you whether the integrity of all your data can be preserved on a particular hard drive.
The best thing you can do is to scan for unreadable blocks of data once a month in order to make sure that your drive is not degrading and your data that you have stored in your system is not being lost.
PRTG Network Monitor
The PRTG Network tools will monitor every aspect of your IT infrastructure including all devices, systems, traffic, and apps using various technologies.
These technologies include the following: SNMP (ready to use and custom options), WMI and Windows Performance Counters, SSH (for Linux/Unix and macOS systems), Flows, and Packet Sniffing, Ping, HTTP requests and push data, SQL and more.
The tool is able to scan network segments by pinging defined IP ranges and this way PRTG will recognize a broad range of devices and systems in an automatic manner, and it will create sensors from predefined device templates.
All of these will save you lots of configuration work, and you will be able to start monitoring everything right away.
The tool also allows you to create web pages with up-to-date monitoring data in your desired design. You will also be able to create maps with your monitoring data publicly available.
PRTG will alert you when it discovers warnings or important metrics. You will also be able to get push notifications straight to your mobile device and you can set up the notifications via email and SMS the best way to suit all of your needs.
Using the powerful API, you are allowed to even write your own scripts.
PRTG Network Monitor
A complete solution to monitor everything: network, devices, systems, and applications. Setup filters and custom alerts.
Device Control Plus
The first software on our list that deals with the management and limiting of data access from USB devices is Device Control Plus from ManageEngine.
The product is incredibly reliable and it can be used by a wide range of users, from common ones just looking to avoid USB-based viruses to administrators that need to monitor device access to data.
Excessive access privileges will no longer be an issue thanks to Device Control Plus’ zero-trust policy, as it scans every single device before granting it any form of access, regardless if it’s the 100th time you connected it.
Device Control Plus
USB device management and monitoring is crucial for the well-being of your entire PC system. Get Device Control Plus!
Gilisoft USB Lock
USB devices are a prime location for malware to infect your PC since most of the time they instantly gain access to your entire PC’s database of files, so limiting access is the best way to prevent such situations.
Gilisoft USB Lock is a third-party tool specialized in doing just that, as it can easily limit, access of external media to your PC, and you can even use it to shut down PC ports entirely, preventing accidental connections.
More so, the product features an incredibly simple interface, with most of the information being handed to you the moment you connect a new device to your PC, making it extremely beginner-friendly.
Gilisoft USB Lock
The name says it all, and Gilisoft USB Lock will quickly limit the access of any unauthorized USB device.
Site24x7
The tool offers centralized cloud monitoring for DevOps and IT operations, and it monitors the experience of real users accessing websites and apps from desktop and mobile devices.
The in-depth monitoring capabilities enable DevOps teams to control and troubleshoot apps, servers, and network infrastructure, including both private and public clouds.
The end-user experience monitoring is done from over 50 locations across the world and various wireless carriers.
The Site24x7 software monitors the performance of Internet services such as HTTPS, DNS, FTP, SSL, SMTP, POP, URLs, and APIs.
It offers comprehensive monitoring for critical network devices such as routers, firewalls, and networks. It can help network teams to get deeper performance visibility that is required for managing complex systems.
⇒ Get Site24x7
CACTI
Cacti is a network monitoring tool that allows you to collect data from almost any network element there is including switching and routing systems, load balancers, firewalls, and servers, and it will put all of the data into graphs.
If you own a device, it is possible that Cacti’s active community of developers has created a monitoring template for it.
This tool supports SNMP polling which covers a broad range of network devices.
You will also be able to extend Cacti’s capabilities to use scripts, queries or commands for data collection and then save it as a template and then to use for polling other devices for similar data sets.
Cacti leverages the power of RRDTool. This is an open-source data logging and graphing system which is designed for storing polled data in the database. It also creates graphs from the stored data sets.
RRDTool’s data consolidation allows you to store the collected data forever and it is limited only by the size of your storage. Cacti leveraging on RRDTool can generate any type of graph for any data set.
Some PC issues are hard to tackle, especially when it comes to corrupted repositories or missing Windows files. If you are having troubles fixing an error, your system may be partially broken.
We recommend installing Restoro, a tool that will scan your machine and identify what the fault is.
Click here to download and start repairing.
The graphing used in Cacti is the standard used by various open-source and commercial tools.
Cacti also allows you to add more users and to give them access with or without edit permissions. This is just perfect for service providers and enterprises with a large NOC team.
Cacti leveraging on RRDTool can generate any type of graph for any data set. The graphing used in Cacti is the standard used by various open-source and commercial tools.
Cacti allows you to add more users and to give them access with or without edit permissions. This is just perfect for service providers and enterprises with a large NOC team.
⇒ Get Cacti
NTOP (NTOPng)
This is a traffic probe that uses libpcap for packet capture to report on network traffic.
You can install it on a server with various interfaces and use port mirroring on a network tap to feed ntopng with the data packets from the network for analysis.
The software can analyze traffic even at 10G speeds; to report on IP addresses, volume, and bytes for each and every transaction.
It can also sort traffic based on IP, protocol, and port, it generates reports for usage and even on AS information.
Such a level of traffic analysis will help you make some informed decisions about capacity planning and QoS design, and it will also help you find bandwidth-hogging users and apps in your network.
The tool has a commercial version that is called ntopng pro which comes with some additional features, but the open-source version seems to be good enough to quickly gain insight into traffic behavior.
The tool will integrate with external monitoring apps such as Nagios for alerting and it will provide data for monitoring.
The program also features some limitations, but its level of network traffic visibility makes it worth your money and efforts.
⇒ Get NTOP
CrystalDiskInfo
This is an excellent program for monitoring the temperature and health of your hard drive. The software is able to warn you if the temperature and if the health of your drive is deteriorating.
The program’s default temperature warning is set to 50 degrees Celsius, and it can also be adjusted.
It features graphs of the accumulated S.M.A.R.T. data, and it doesn’t have any problems telling users anything there is to know about the drive.
CrystalDiskInfo lists both the Power On Count and the total Power On Hours. The software is open-source, and there is a portable version of the program and also an installer.
The main advantages of the program include resident monitoring, alarm for temperature and health, showing the temperature for each and every drive in the system tray, S.M.A.R.T. and general info about internal/external hard drives and setting for adjusting AAM/APM.
Its minuses include the fact that you must set it up to be a resident and to startup in the system tray for constant monitoring.
⇒ Get CrystalDiskInfo
HDDScan
This is quite an amazing piece of software even if its interface needs a little getting used to. One of its best features is the Graph when you are scanning the surface for unreadable blocks of data.
It is able to list the blocks by response time and this way you will get to see how many blocks are getting close to being unreadable before the data in those blocks is lost. It will warn you about un-checking the box that disables the maps dynamic update.
You are advised not to have any other programs running at the same time you are scanning, and there is also the Conveyance text that will turn out to be great in case you receive a new or an old internal/external hard drive.
The program also features settings for adjusting the AAM (Automatic Acoustic Management), the PM (Power Management), and the APM (Advanced Power Management).
Its main features include monitoring temperature, alarm for temperature, showing the temperature for each drive, S.M.A.R.T. offline conveyance and more tests, surface scan, information about internal and external hard drives, and the ones that we have already described above.
The temperature monitor must be selected for each and every drive for it to be able to be continuously monitored and this must be done each time you start the program.
⇒ Get HDDScan
HD Tune
HD Tune is quite a useful benchmark to test your hard drive performance. Its free version provides block scanner capabilities, and it works with both internal and external hard drives.
This utility features a graphical benchmark to bench internal/external hard drives performances and it scans for bad data blocks on internal and on external drives with graphical diagrams.
It can also display power-on hours, S.M.A.R.T., and general info only for internal drives.
You can also make the program portable, and all you have to do for this is to copy HDTune.exe to the folder you like after you install the program.
The program’s free version is not updated anymore, and you have to go for a paid-for Pro version with some more complex features.
The free version of the program does not include any external USB hard drive S.M.A.R.T. monitoring, temperature, and information as it is not updated.
⇒ Get HD Tune
Whenever you buy a new piece of computer hardware, whether it is the memory, a CPU, a hard drive and so on, one of the main factors that will help you determine your buying decision would be the performance of that certain component.
Regarding the hard drives and the SSD drives you will have to look at their capacity and read/write speeds.
The story will be quite similar in case you decide on purchasing a removable memory card or a USB flash drive.
Besides from having to worry about USB drives being at their full capacity and not being fake in case you get them from places such as eBay, the performance of a flash drive can vary by massive amounts.
This will strongly depend on the manufacturer and the type of memory that is used.
Now, the modern devices are reaching up to 64GB and even more than this and, if you purchase a slow USB flash drive with a high capacity, this could literally take hours to fill it up completely.
Besides being incredibly frustrating, this could also turn out to be a total waste of cash if you have to go and buy something else that will be faster and will fit all of your needs.
Many users make their purchases based on the storage size without considering the speed of the drive.
In case you already have some USB flash drives you might like to be able to find out how fast they actually are at writing and reading. In case a 16GB drive only writes at 3-4MB/s it could take forever to fill it.
If you own a fast USB3 flash drive it could do exactly the same tasks in only a matter of minutes.
Check out these tools to benchmark your USB flash drives or also your media cards to find out just how fast they actually are.
Browse through all the software tools listed above and choose the ones that best suit your needs for monitoring the performance of your hard/USB drives and of your network.
Still having issues? Fix them with this tool:
SPONSORED
If the advices above haven’t solved your issue, your PC may experience deeper Windows problems. We recommend downloading this PC Repair tool (rated Great on TrustPilot.com) to easily address them. After installation, simply click the Start Scan button and then press on Repair All.
![]()
Newsletter
При работе любого жёсткого диска HDD или современных SSD дисков, рано или поздно на них могут возникать ошибки, что со временем может приводить к различным последствиям: от простых зависаний при запуске программ и подтормаживаний в работе системы до внезапных перезагрузок компьютера.
Ошибки могут быть различными и появляются по разным причинам. К примеру, выполняете копирование файлов с жёсткого диска и внезапно отключается питание и компьютер сразу выключается. Подобное приводит к ошибкам файловой системы.
Также возможно появление так называемых битых секторов (бэд блоков), которые можно разделить на физические и логические. Первые появляются в результате физических повреждений диска, например, при падении, и относятся только к HDD дискам, поскольку у SSD нет механических движущихся частей. Вторые — это последствия вирусных заражений, неправильной записи на диск и подобного рода проблем.

Множество ошибок можно поправить самостоятельно при помощи встроенной в Windows программы, которая в консоли (командной строке CMD) называется CHKDSK (Check Disk). Работает во всех версиях Windows одинаково!
Данная программа не вылечит ваш диск от всех недугов! Например, понятно, что невозможно исправить проблемы с диском HDD, вызванные его физическими повреждениями, но зато можно поправить ошибки файловой системы и подобные как на HDD, так и на SSD. А ведь когда этих ошибок много, то это очень заметно и может существенно сказываться на работе компьютера.
Программу для проверки диска и исправления ошибок на нём можно запустить двумя способами:
- Через обычный графический интерфейс Windows;
Через командную строку (консоль CMD).
В этой статье я покажу оба варианта работы с программой, на всякий случай
Как часто запустить проверку диска на ошибки?
Если компьютер ваш начал глючить, подтормаживать, то лучше запустите проверку всех локальных дисков, имеющихся к системе (c, d, e и прочих). Но важнее всего проверить системный диск, который, как правило, имеет букву «C:».
Для профилактики можно запускать проверку диска хотя бы раз в 3 месяца (лично мой опыт!).
ВАРИАНТ 1. ЗАПУСК ПРОВЕРКИ ДИСКА ИЗ ГРАФИЧЕСКОЙ ОБОЛОЧКИ WINDOWS
Это самый простой вариант запуска проверки диска, практически не имеющий никаких настроек. Отлично подойдёт для новичков. Да и для опытных пользователей, которым нужно лишь проверить диск через стандартные настройки.
Для запуска нужно перейти в раздел «Компьютер» вашей системы, где отображаются все локальные диски ваших жёстких дисков и SSD, подключенных к компьютеру. Затем кликнуть правой кнопкой мыши (далее ПКМ) по нужному диску и выбрать «Свойства».

Далее перейдите в подраздел «Сервис» и нажмите «Проверить»:

Система сразу подскажет, имеются ли проблемы с выбранным вами разделом диска и если нет, то так и будет сказано «Сейчас проверка этого диска не требуется». Тем не менее можно всё равно запустить проверку диска, нажав «Проверить диск»:

После этого начнётся сканирование диска, которое обычно занимает несколько минут и система выдаст результат.
Если ошибок нет, то система сообщит, что диск проверен и ошибки не найдены. В этом случае останется только закрыть окно:

Если же на диске после сканирования будут обнаружены ошибки, то система об этом сообщит в окне «Восстановить диск». В таком случае сначала закройте это окно:

А после, в следующем окне нажмите «Восстановить диск»:

Для того чтобы начать процесс восстановления, нужно чтобы выбранный вами диск никак не был занят системой, т.е. с ним не велось никакой работы. Если диск на данный момент чем-либо занят, то система сможет сама закрыть программы, которые использую на данный момент диск или же проверить его при следующей перезагрузке ПК. Нажмите либо «Восстановить», чтобы система закрыла все процессы, использующие выбранный диск, и начала восстановление, либо «Восстановить при следующей перезагрузке», для того чтобы проверка диска запустилась сразу после того, как перезагрузите компьютер, в удобное вам время.

После восстановления в окошке программы получите соответствующее уведомление.
ВАРИАНТ 2. ЗАПУСК ПРОВЕРКИ ДИСКА ИЗ КОМАНДНОЙ СТРОКИ (КОНСОЛИ). КОМАНДА CHKDSK
Этот вариант запуска программы проверки диска имеет больше возможностей различных настроек, но в основном ими пользуются профессионалы. Для новичков достаточно будет варианта №1.
Чтобы запустить проверку через консоль, сначала в эту самую консоль нужно перейти. Откройте поиск Windows, наберите «cmd» [1], после чего кликните правой кнопкой по найденной программе «Командная строка» и выберите «Запуск от имени администратора» [2].

Для простой проверки нужного вам локального диска и исправления ошибок на нём, в командной строке напишите:
chkdsk c: /f
Где вместо d: укажите букву диска, который хотите проверить.

Для запуска проверки, нажмите клавишу Enter.
Если диск в данный момент используется какой-либо программой или системой, то появится сообщение, что не удаётся заблокировать диск и будет предложено проверить его после следующей перезагрузки системы (когда вам удобно). В таком случае наберите Y, если согласны или N, если отказываетесь от проверки. Написав нужный символ, нажмите клавишу Enter.

Если ввели Y, то появится сообщение «Этот том будет проверен после следующей перезагрузки системы».
Вам останется перезагрузить компьютер в удобное вам время и система сама запустит проверку.
Также полезной опцией может стать добавление в команду ключа /r, что позволяет проверить диск на наличие ещё и повреждённых секторов. Программа их отметит и диск более не будет пытаться записывать на них информацию.
Внимание! Добавление ключа /r увеличивает время проверки диска многократно! То есть проверка одного диска может занять несколько часов.
Пример:
chkdsk c: /f /r

Команда chkdsk в командной строке имеет также множество других опций, которые вы можете использовать если необходимо. Но, как правило, ими пользуются уже профи.
Для вывода полного списка доступных опций для chkdsk, наберите:
chkdsk /?

ЗАКЛЮЧЕНИЕ
Не игнорируйте средство Windows для проверки диска на ошибки. Есть, конечно, множество специализированных программ для работы с жёсткими и SSD дисками, но для простой проверки и исправления ошибок более чем достаточно встроенной программы в Windows, тем более она очень проста в использовании.
Регулярно запускайте проверку диска, чтобы поддерживать его работу в нормальном режиме.
Источник
На чтение 4 мин Просмотров 1.5к. Опубликовано 14.10.2021
Содержание
- Введение.
- Сканирование в сетевую папку.
- Диагностика в Wirehsark.
- Заключение.
Введение.
Иногда бывает, что по какой-то причине не подключается сетевая папка или МФУ перестает сканировать и долгий поиск в интернете по коду ошибки не дает результата. В таких случаях я считаю самое первое и лучшее решение это применить Wireshark, как один из лучших анализаторов сетевого трафика.
Сканирование в сетевую папку.
Я покажу пример сканирования МФУ в SMB папку. Этот процесс ничем не будет отличаться при диагностики проблем подключениявхода в сетевую папку.
Установку самого Wireshark я опущу. Это производиться на уровне Next Next Finish.
У меня есть МФУ ECOSYS M2640idw.
Его настройка сканирования в сетевую папку:
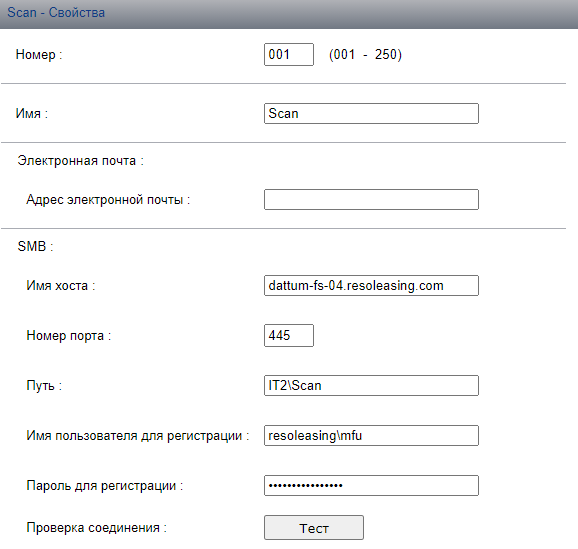
Всё, что говорит вэб интерфейс при тестировании подключения:

Особо не информативно. Физически на панели МФУ просто говориться проверить сетевые настройки.
Специалист тех. поддержки, который настраивал, утверждает, что всё введено верно.
На мой первый взгляд, всё верно, путь, учетная запись корректны, пароль так же заново вводился. Далее для более детальной информации я перехожу к Wireshark.
Диагностика в Wirehsark.
1. Идем на сервер куда происходит скан. Запускаем Wireshark. Выбираем наш активный сетевой адаптер.
Установим фильтр. В качестве фильтра будем использовать условие ‘IP адрес МФУ и ошибки статуса протокола SMB’, чтоб отсеять лишний мусор в выводе.
Фильтр:
ip.addr == 10.0.5.3 && ( smb2.nt_status > 0 || smb.nt_status > 0 )![]()
ip.addr – Включает для IP адреса как входящий так и исходящий трафик.
smb – Протокол версии 1.
smb2 – Протокол версии 2. Но и так же включает протокол версии 3.
Если посмотреть заголовок SMB:
2.2.3.1 The SMB Header
Есть поле Status, которое возвращает сообщения об ошибках от сервера клиенту.
Посмотрим как это выглядит в Wireshark:
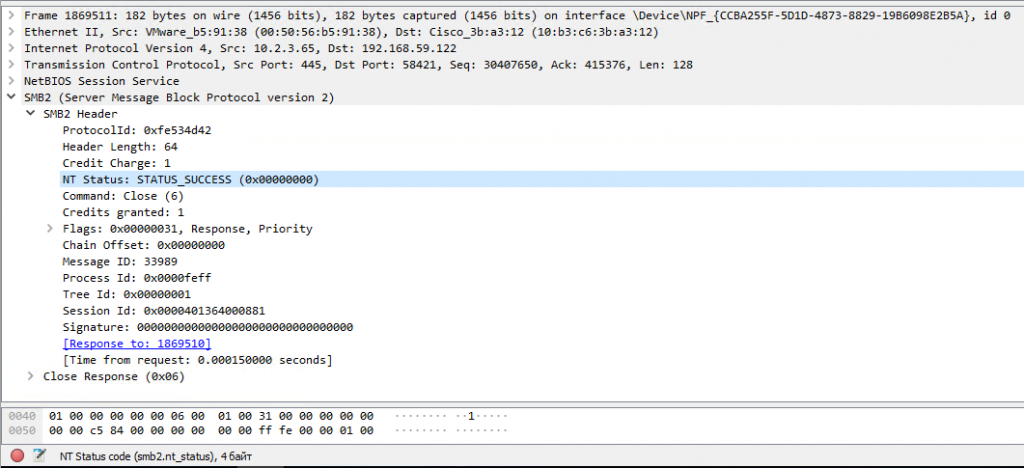
Поле NT Status: STATUS_SUCCESS (0x00000000) – говорит об успешном выполнении:
2.3.1 NTSTATUS Values
На картинке выше, мы видим в самом низу, что Wireshark может сделать фильтр на это событие с помощью кода smb2.nt_status. А зная, что 0 это успешное выполнение, мы можем сделать условие, всё, что больше нуля. Итого конечное условие smb2.nt_status > 0, получив тем самым только вывод об ошибках.
2. В МФУ повторно тестируем соединение и смотрим вывод в Wireshark.
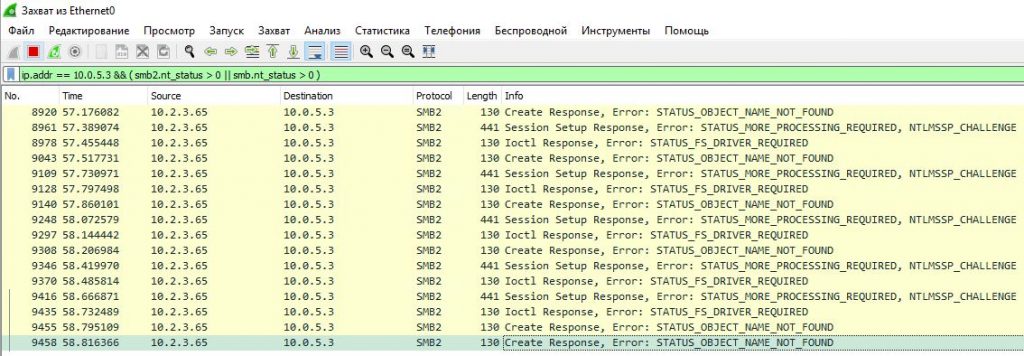
Видим статус ответа: STATUS_OBJECT_NAME_NOT_FOUND
Находим описание данного статуса по ссылке выше и видим: The object name is not found.
Имя объекта недействительно.
Логика говорит, что какая-то проблема в имени пути.
Я пробую скопировать в проводник адрес, который прописан в МФУ.
Проводник говорит мне, что Windows не может получить доступ. Я пытаюсь зайти на папку ниже dattum-fs-04.resoleasing.comIT2 и всё удачно, так же я после попадаю в Scan.
Я скопировал путь с проводника и вставил в МФУ, еще раз сделал проверку и всё прошло успешно.
Как оказалось, в пути был русский символ. Даже не могу предположить, как это вышло.
3. Рассмотрим другой сценарий. Все МФУ перестали сканировать. Идем в Wireshark, делаем скан с прежним фильтром и видим:
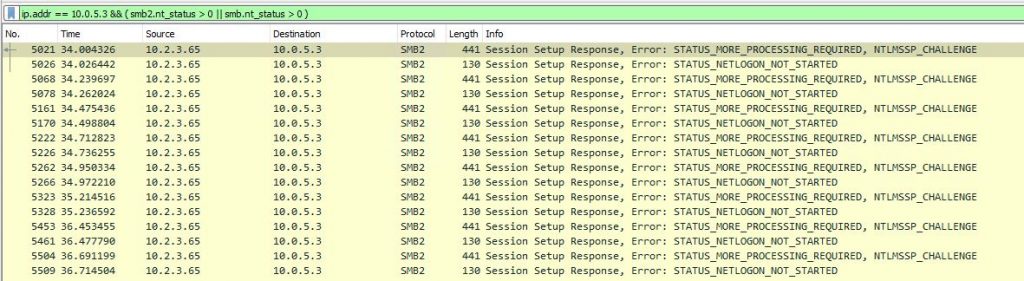
Код ошибки: STATUS_NETLOGON_NOT_STARTED. В коде ошибки уже все понятно, но обратимся к документации и посмотрим описание: An attempt was made to logon, but the NetLogon service was not started.
По какой-то причине упала служба netlogon. После её запуска МФУ вновь начали сканировать.
C:Windowssystem32>net start netlogon
Служба "Сетевой вход в систему" запускается.
Служба "Сетевой вход в систему" успешно запущена.
Заключение.
Как видно, Wireshark одно из лучших решений, которое может просто и эффективно помочь решить какие-либо неполадки в сети и Вы сэкономите время и нервы для решения проблемы.
Спасибо, что дочитали. С Уважением, Андрей.
Время на прочтение
13 мин
Количество просмотров 118K
Эта статья по сути будет подборкой «Best practiсe» для системных администраторов Samba. Основой статьи является глава Troubleshooting Techniques из книги Sam’s Teach Yourself Samba in 24 Hours. Мы постараемся рассмотреть наиболее распространенные ошибки при настройке Samba.
Согласитесь, ужасно поменять двигатель в машине, а потом выяснить, что не ехала она из-за отсутствия бензина! Может, это и не лучшая метафора, но многие системные администраторы тратят время зря, не проверив в первую очередь самые очевидные вещи. Посмотрите, как примерно должен выстраиваться процесс поиска и решения проблем с Samba:

Проблемы, представленные на нижних уровнях этой «пирамиды», являются «фундаментом» для более высоких уровней. Не удивительно, что Windows-клиент не может получить доступ к файловому северу на Samba, если сервер отключен от сети. Конечно, не стоит воспринимать этот рисунок буквально, как руководство к действию (скажем, лог-файлы можно посмотреть всегда), но начинать стоит все-таки с проблем нижних уровней. Чем выше мы поднимаемся, тем больше углубляемся в принципы работы Samba.
В поисках решения проблемы с Samba стоит в первую очередь обратиться к следующим ресурсам:
•HOWTO, опубликованные на сайте;
•тематические сайты и форумы, например: http://samba-doc.ru/, http://citforum.ru/operating_systems/linux/samba/;
•разделы документации по Samba для того или иного дистрибутива (например, http://help.ubuntu.ru/wiki/samba, http://www.centos.org/docs/5/html/Deployment_Guide-en-US/ch-samba.html или http://wiki.russianfedora.ru/index.php?title=Samba);
•http://stackoverflow.com/ — не забывайте про этот сайт, если у вас есть конкретный вопрос или проблема;
•вспомогательные утилиты, входящие в состав Samba, а также различные программы-анализаторы трафика (например, Wireshark).
Мы в первую очередь рассмотрим самостоятельное решение возникающих проблем, но не стоит забывать про возможную помощь сообщества. Это может серьезно сэкономить вам время и силы.
Описание тестовой среды
Для начала — несколько слов о тестовой среде. Условия следующие:
•Samba-сервер называется TROUBLE и имеет IP-адрес 192.168.7.75 и маску 255.255.255.0.
•smbd и nmbd запускаются как демоны.
•Windows-клиент называется win-client.
•Windows-клиент использует адрес 192.168.7.135 с сетевой маской 255.255.255.0.
•И win-client, и TROUBLE находятся в одной подсети, так что широковещательный запрос дойдет с одного хоста на другой.
•И win-client, и TROUBLE являются членами рабочей группы LAB.
•Samba-сервер использует следуюший smb.conf:
[global] netbios name = TROUBLE
workgroup = LAB security = user encrypt passwords = yes
[public] path = /tmp
read only = no
УРОВЕНЬ 1
Работоспособность сетевого соединения и файла конфигурации
Основание нашей «пирамиды» составляют три основных проблемы:
•корректно работающее TCP/IP подключение;
•соответствие маски и широковещательных адресов на серверах и клиентах;
•работоспособность файла smb.conf.
TCP/IP
Для проверки TCP/IP в первую очередь используется команда ping. Если описать протокол ICMP очень упрощенно, то хост отправляет запрос на сервер и спрашивает «Ты жив?». Если сервер не отвечает, хост приходит к выводу, что тот не подключен к сети и, следовательно, недоступен.
$ ping win-client
PING win-client (192.168.7.135) from 192.168.1.74 : 56(84) bytes of data.
64 bytes from win-client (192.168.7.135): icmp_seq=0 ttl=255 time=2.138 msec
64 bytes from win-client (192.168.7.135): icmp_seq=1 ttl=255 time=2.181 msec
64 bytes from win-client (192.168.7.135): icmp_seq=2 ttl=255 time=2.263 msec
--- ping statistics --- 3 packets transmitted, 3 packets received, 0% packet loss round-trip min/avg/max/mdev = 2.138/2.194/2.263/0.051 ms
Также очень важным является правильное функционирование DNS. Если не удастся разрешить имя, появится сообщение вроде этого:
$ ping win-client
ping: unknown host win-client
Если такое происходит, первое, что стоит сделать — это повторить команду ping, но используя уже не имя, а адрес:
$ ping 192.168.7.135
Если команда выполнится успешно, то стоит обратить внимание на конфигурацию DNS. Наиболее распространенные причины ошибки:
•неверное содержание файла конфигурации DNS /etc/resolv.conf;
•на сервере DNS нет записи, связанной с win-client;
•сервер DNS недоступен в данный момент.
Если же ping по IP-адресу успешно не выполняется, то стоит проверить работоспособность сетевого оборудования на сервере, клиенте и между ними.
Широковещательный адрес на сервере и клиенте
Возможно, ping выполнится и успешно, но при этом сетевая маска (netmask) и широковещательный адрес (broadcast address) будут сконфигурированы неверно.
В NetBIOS крайне важно для правильного разрешения имени и поиска машин в сетевом окружении, чтобы сервер и клиент находились в одной подсети, т.е. использовали одну маску подсети и широковещательный адрес.
В нашем случае сетевая маска должна быть 255.255.255.0, а широковещательный адрес — 192.168.7.255.
Если вы используете Linux, то можно проверить, какие используются широковещательный адрес и маска, при помощи команды ifconfig с именем интерфейса в качестве аргумента:
$ /sbin/ifconfig eth0
eth0 Link encap:Ethernet HWaddr 00:04:5A:0C:1C:19
inet addr:192.168.7.75 Bcast:192.168.255.255 Mask:255.255.255.0
inet6 addr: fe80::204:5aff:fe0c:1c19/10 Scope:Link
UP BROADCAST RUNNING MULTICAST MTU:1500 Metric:1
RX packets:68006 errors:0 dropped:0 overruns:0 frame:0
TX packets:100783 errors:0 dropped:0 overruns:0 carrier:0
collisions:0 txqueuelen:100
RX bytes:12186135 (11.6 Mb) TX bytes:121642120 (116.0 Mb)
Interrupt:3 Base address:0x100
1
Если в выводе этой команды вы увидите, что широковещательный адрес или сетевая маска заданы неверно, следует зайти под учетной записью root и установить верные значения, используя команду ifconfig:
root# ifconfig eth0 192.168.7.75 netmask 255.255.255.0 broadcast 192.168.7.255
В Windows аналогичную информацию можно получить информацию, выполнив команду ipconfig /all.
Проверка корректности файла smb.conf
Так как Samba использует огромное количество параметров из файла smb.conf, разработчики создали утилиту командной строки, которая проверяет синтаксис этого файла. Утилита называется testparm, она очень полезна при поиске ошибок в конфигурационном файле.
Можно использовать утилиту testparm с параметром -s для анализа конкретного конфигурационного файла. Эта опция очень хорошо подходит для проверки файла конфигурации перед его «боевым» использованием.
$ testparm -s /usr/local/samba/lib/smb.conf.new
Load smb config files from /usr/local/samba/lib/smb.conf.new
Processing section “[public]”
Loaded services file OK.
# Global parameters
[global]
coding system =
client code page = 850
code page directory = /usr/local/samba/lib/codepages
<...остальной вывод опущен...>
После анализа заданного конфигурационного файла testparm выводит все значения файла smb.conf, включая значения по умолчанию. Это помогает убедиться, что используются ожидаемые значения параметров конфигурации smbd и nmbd.
Стоит отметить, что значения по умолчанию меняются от версии к версии, так что необходимо использовать версию Samba, соответствующую версии testparm.
УРОВЕНЬ 2
Серверное и клиентское ПО
Второй уровень подразумевает проверку конфигурации клиентского и серверного ПО. Наша цель — убедиться, что и клиент, и сервер корректно отвечают на запросы NetBIOS и CIFS. Пока мы рассматриваем изолированно каждый из хостов. (На третьем уровне мы уже начнем рассматривать их взаимодействие.)
smbd
В первую очередь, smbd должен быть запущен. Проверить это можно, используя команду ps. Аргументы этой команды могут отличаться в зависимости от версии Linux.
$ ps -ef | grep smbd
 root 28592 1 0 12:37 ? 00:00:00 /usr/local/samba/bin/smbd -D
Убедившись, что smbd запущен (или, при необходимости, запустив его), используем утилиту smbclient для проверки работоспособности сервера. Параметр -L используется для вывода списка ресурсов сервера. Ключ -N используется для анонимного подключения к серверу, чтобы не создавать лишних проблем с авторизацией. Все эти действия должны выполняться локально на Samba-сервере.
smbclient -L TROUBLE -N added interface ip=192.168.7.75 bcast=192.168.1.255 nmask=255.255.255.0 Anonymous login successful Domain=[LAB] OS=[Unix] Server=[Samba 2.2.2]
Sharename Type --------- ---- public Disk IPC$ IPC
Comment -------
IPC Service (Samba 2.2.2)
smbclient -L TROUBLE -N added interface ip=192.168.7.75 bcast=192.168.1.255 nmask=255.255.255.0 Anonymous login successful Domain=[LAB] OS=[Unix] Server=[Samba 2.2.2]
Sharename Type --------- ---- public Disk IPC$ IPC
Comment -------
IPC Service (Samba 2.2.2)
ADMIN$
Server --------- TROUBLE
Workgroup --------- LAB
Disk
IPC Service (Samba 2.2.2)
Comment ------- Samba 2.2.2
Master ------- TROUBLE
Существуют две распространенные ошибки, которые могут возникнуть при выполнении этой проверки.
Первая ошибка выглядит следующим образом:
error connecting to 192.168.7.75:139 (Connection refused) Connection to <server> failed
Она возникает, если smbd не запущен или не может подключиться к порту 139. Причиной этому могут быть ранее установленные и некорректно удаленные компоненты Samba. Прежде всего следует убедиться, что smbd стартует как демон и не завершается тут же с ошибкой. Особенность в том, что nmbd не выводит ошибки в консольное окно, так что следует посмотреть последние несколько строк log-файла. Позже мы рассмотрим анализ логов более подробно.
Вторая часто встречающаяся ошибка выглядит так:
session request to <server> failed (Not listening for calling name)
Можно подумать, что причиной этой ошибки является неверное NetBIOS-имя, но это не так. Эта ошибка не может быть вызвана «битой» установкой nmbd, nmbd в данном случае даже не обязательно должен быть запущен.
Причиной возникновения этой ошибки при локальном подключении чаще всего являются неверно сконфигурированные параметры hosts allow или hosts deny в файле smb.conf. Сервер разрывает создающуюся NetBIOS-сессию.
Если нам удалось увидеть список общих ресурсов, мы можем проверить возможность Samba авторизовать пользователей. В этом тесте аккаунт с именем пользователя user1 и паролем secret подключается к общему ресурсу [public].
$ smbclient //TROUBLE/public -U user1%secret added interface ip=192.168.7.75 bcast=192.168.1.255 nmask=255.255.255.0 Domain=[LAB] OS=[Unix] Server=[Samba 2.2.2] smb: >
Если Samba не сможет авторизовать пользователя, вы увидите сообщение об ошибке:
session setup failed: ERRSRV - ERRbadpw (Bad password - name/password pair in a Tree Connect or Session Setup are invalid.)
Причин этой ошибки может быть много. Это может быть неверное имя или пароль, или отсутствующая запись smbpasswd для пользователя, если задан параметр encrypt password = yes, или недействительная учетная запись guest, если разрешен доступ без аутентификации.
Если пользователь корректно авторизовался, но не смог получить доступ к запрошенной службе, smbclient выведет следующее сообщение:
tree connect failed: ERRDOS - ERRnosuchshare (You specified an invalid share name)
Это может быть вызвано неверно написанным именем службы, настройками доступа к общему ресурсу или неверным выражением path в описании общего ресурса в файле smb.conf.
nmbd
Чтобы проверить, запущен ли nmbd, мы снова используем команду ps.
$ ps -ef | grep nmbd
root 29054 1 0 15:53 ? 00:00:00 /usr/local/samba/bin/bin/nmbd -D
Если ps покажет, что nmbd не запущен, стоит зайти под учетной записью root и запустить его (/usr/local/samba/bin/nmbd -D).
Для теста мы будем использовать утилиту Samba — nmblookup. У каждого Samba-сервера есть особое имя, _Samba_, на которое они откликаются всегда. Послав запрос по этому имени, мы можем проверить работоспособность nmbd. Ключ -U используется для того, чтобы отправить запрос на конкретный адрес.
$ ./nmblookup -U 127.0.0.1 __Samba__ querying __Samba__ on 127.0.0.1 192.168.7.75 __Samba__<00>
Если nmbd при этом не запущен, результатом будет ошибка:
name_query failed to find name __Samba__
Также причиной ошибки может быть тот факт, что loopback-интерфейс не включен в smb.conf при включенном параметре bind interfaces only = yes.
После этого мы проверим, может ли nmbd зарегистрировать имя TROUBLE.
$ nmblookup -U 127.0.0.1 TROUBLE querying TROUBLE on 127.0.0.1 192.168.7.75 TROUBLE<00>
Сообщения об ошибках, например, “name query failed”, скорее всего, вызваны неудачным запросом к имени _Samba_. Другой причиной может быть то, что сервер не может зарегистрировать имя NetBIOS. В этом случае стоит найти сервер, которому принадлежит данное имя, отправив широковещательный запрос.
$ nmblookup -B 192.168.1.255 TROUBLE querying TROUBLE on 192.168.1.255 192.168.1.98 TROUBLE<00> ошибка
Например, в данном случае это имя принадлежит сторонней машине, а не нашему Samba-серверу. Очевидно, решением данной проблемы является переименование этой машины или сервера.
NetBIOS-интерфейс Windows
Утилита, использующаяся в Windows для NetBIOS-запросов — nbtstat.exe — имеет еще несколько опций, которых нет в nmblookup. Одна из них (-n) позволяет «спросить» у NetBIOS-интерфейса, какие имена он успешно зарегистрировал:
C:WINDOWS> nbtstat -n
Node IpAddress: [192.168.7.135] Scope Id: [] NetBIOS Local Name Table
Name Type Status ---------------------------------------------
WIN-CLIENT LAB WIN-CLIENT
<00> UNIQUE <00> GROUP <03> UNIQUE
Registered Registered Registered
Если компонент “Client for Microsoft Networks” не был установлен, nbtstat.exe сообщит следующее:
Failed to access NBT driver 1
Более тонкая ошибка возникает, когда Windows-клиент сообщает что он зарегистрировал имя рабочей группы, хотя это должно быть уникальное имя рабочей станции.
Name Type Status --------------------------------------------- LAB <00> GROUP Registered
Часто причиной этого является наличие машины с таким же NetBIOS-именем. Windows-клиенту необходимо уникальное имя, чтобы установить NetBIOS-сессию с сервером. Пока клиент не сможет зарегистрировать имя рабочей станции, он будет неспособен, скажем, просматривать сетевое окружение или подключать сетевые диски.
УРОВЕНЬ 3
Удаленный доступ к общим ресурсам
Итак, мы уже выяснили, что и клиент, и сервер имеют доступ к сети, и локально ПО на них работает. На данном уровне мы переходим к диагностике работоспособности их взаимодействия.
Разрешение имен
Мы вновь будем использовать утилиты nmblookup и nbstat.exe, чтобы выяснить, может ли клиент разрешить имя сервера и наоборот. Тест будет состоять из двух фаз. В первой мы будем использовать широковещательный запрос, чтобы протестировать отклики сервера и клиента. Это делается путем задания широковещательного адреса (-B 192.168.7.255) в утилите nmblookup при запросе, что задействует сетевое взаимодействие между сервером и клиентом.
Сначала мы попробуем разрешить имя сервера:
$ nmblookup -B 192.168.1.255 TROUBLE querying TROUBLE on 192.168.1.255 192.168.7.75 TROUBLE<00>
После этого мы попробуем разрешить имя клиента, используя тот же широковещательный адрес.
$ nmblookup -B 192.168.1.255 win-client querying win-client on 192.168.1.255 192.168.7.135 win-client<00>
Если до сих пор все шло хорошо, этот тест, скорее всего, отработает корректно. Если же результатом будет ошибка, стоит еще раз поверить соответствие широковещательного адреса на всех машинах.
После этого мы выполним NetBIOS Node Status Lookup, проверим статус узла. На этом шаге делается прямое обращение к IP-адресу, в котором запрашивается список уникальных и групповых NeBIOS имен, зарегистрированных этим хостом. Начнем с запроса к Samba-серверу от Windows-клиента.
C:WINDOWS> nbtstat -A 192.168.7.75
NetBIOS Remote Machine Name Table
Name Type Status ---------------------------------------------
TROUBLE <00> UNIQUE TROUBLE <03> UNIQUE TROUBLE <20> UNIQUE ..__MSBROWSE__.<01> GROUP
Registered Registered Registered Registered Registered Registered Registered
LAB LAB LAB
<00> GROUP <1D> UNIQUE <1E> GROUP
MAC Address = 00-00-00-00-00-00
Можно выполнить те же действия на Samba-сервере, чтобы собрать информацию о клиенте. Опции для запроса через утилиту nmblookup, в целом, такие же как и в nbtstat.exe.
$ nmblookup -A 192.168.7.135 Looking up status of 192.168.7.135
WIN-CLIENT LAB WIN-CLIENT
<00> - B <ACTIVE> <00> - <GROUP> B <ACTIVE> <03> - B <ACTIVE>
Если какой-то из этих запросов не выполняется, следует еще раз провести проверки сетевого подключения и NetBIOS-интерфейсов, которые мы рассматривали раньше.
Просмотр общих ресурсов с Windows-клиента
Мы уже использовали smbclient для просмотра списка общих ресурсов. Здесь мы проделаем то же самое, только удаленно с Windows-клиента.
Утилита net.exe — это универсальная утилита для работы с CIFS. Эта утилита является эквивалентом Linux-команды smbclient -L. Опиция view позволяет просмотреть общие ресурсы рабочей группы, или, если указать конкретное имя сервера (например, \TROUBLE), покажет список общих ресурсов на нем.
Удаленное подключение к общим ресурсам
На самом деле, этот шаг является не столько тестом, сколько целью всего процесса. Если мы зашли в консоль с правильным именем и паролем, то следующая команда подключит диск P: локального клиента к общему ресурсу [public] на сервере TROUBLE.
C:WINDOWS> net use p: \TROUBLEpublic
The command completed successfully.
Чтобы определить, под каким именем подключаться, можно использовать опцию
/user::


C:WINNT>net use \TROUBLEpublic /user:user1
The password or user name is invalid for \TROUBLEpublic.
Type the password for \TROUBLEpublic:
The command completed successfully.
Существует огромное количество проблем, связанных с аутентификацией. Зачастую они могут быть обнаружены только путем анализа лог-файлов, что будет рассмотрено позже.
УРОВЕНЬ 4
Сетевое окружение
Решение проблем с корректной работой Сетевого окружения — очень сложная тема. Скорее всего, если вы добрались до этого уровня, а сетевое окружение не работает или работает некорректно, вам следует еще раз проверить маску подсети и широковещательный адрес, и снова повторить все тесты нижних уровней: ошибка вероятно кроется там.
УРОВЕНЬ 5
Лог-файлы и анализ трафика
Иногда корень проблемы сложно определить даже с помощью специализированных диагностических утилит. Тогда на помощь приходят логи. Первые четыре уровня нашей «пирамиды» можно использовать для подтверждения правильности начальной установки Samba и решения простых проблем. Начиная с пятого уровня, начинается решение серьезных проблем. Рано или поздно вы столкнетесь с проблемой, которая потребует работы с логами.
Лог-файлы Samba
Ниже приведена таблица, в которой описаны уровни детализации логов.

Чтобы узнать текущий уровень логирования smbd (например, с pid 1234), выполним следующую команду из-под учетной записи root:
root# smbcontrol 1234 debuglevel
Current debug level of PID 1234 is 0
Если мы хотим увеличить уровень логирования до 10, чтобы получить всю возможную информацию, используем следующую команду:
root# smbcontrol 1234 debug 10
root# smbcontrol 1234 debuglevel
Current debug level of PID 1234 is 10
Следующий вопрос: «Что же делать с логами?»
Вот пример, в котором логи помогли решению проблемы. Мы пробуем подключиться с Windows-клиента к общему дисковому ресурсу. Однако smbd не принимает пароль для соединения. Когда мы используем smbclient для теста, мы получаем ошибку:
$ smbclient //TROUBLE/public -U testuser%test
session setup failed: ERRSRV - ERRbadpw (Bad password - name/password pair in a Tree Connect or Session Setup are invalid.)
Мы совершенно уверены, что значение smbpasswd верно, и пароль — test. Попробуем подключиться еще раз, добавив
log level = 10 log file = /usr/local/samba/var/log.%m
в секцию [global] файла smb.conf, и мы увидим новые строчки в файле log.TROUBLE:
pdb_getsampwnam: search by name: testuser startsmbfilepwent_internal: opening file /usr/local/samba/private/smbpasswd getsmbfilepwent: returning passwd entry for user root, uid 0 getsmbfilepwent: returning passwd entry for user jerry, uid 786 getsmbfilepwent: returning passwd entry for user guest1, uid 782 getsmbfilepwent: returning passwd entry for user testuser, uid 791 endsmbfilepwent_internal: closed password file. pdb_getsampwnam: found by name: testuser build_sam_account: smbpasswd database is corrupt! username testuser
not in unix passwd database! Couldn’t find user ‘testuser’ in passdb.
Последняя строка и есть ответ на наш вопрос. Samba не смогла найти учетную запись testuser. А это произошло, так как кто-то закомментировал строку в файле /etc/passwd:
#testuser:x:791:100::/dev/null:/bin/false
После того, как мы уберем знак комментария (#) перед строкой с учетной записью, попробуем подключиться снова. И на этот раз успешно.
$ smbclient //TROUBLE/public -U testuser%test Domain=[LAB] OS=[Unix] Server=[Samba 2.2.2] smb: >
Это всего лишь один пример. Вывод в логах может быть запутанным, но можно использовать grep, чтобы находить следующие ключевые слова:
• fail
• error
• unsuccessful
• corrupt
• unknown
Мониторинг сетевого трафика
Еще один способ найти корень проблемы — это просматривать содержимое пакетов, ходящих по сети между сервером и клиентом. Для этого можно использовать такие программы-анализаторы, как Wireshark. С их помощью можно просмотреть и проанализировать в достаточно читаемом виде содержимое пакетов.
УРОВЕНЬ 6
Внутренние проблемы Samba
Если ничего из вышеприведенного не помогло — возможно, вы столкнулись с каким-либо багом Samba. Список известных можно посмотреть на официальном сайте. Чтобы свести к минимуму вероятность появления подобного рода проблем, используйте актуальную и стабильную версию Samba, а также следите за выходом исправлений: исправляются разведанные баги достаточно быстро.
Заключение
Итак, мы разобрали методологию поиска и решения проблем Samba. Проблемы были разнесены по уровням, и каждый уровень зависит от успешной работоспособности более низкого уровня. Еще раз взглянем на них:
•Уровень 1. Сетевое соединение и работоспособный smb.conf.
•Уровень 2. Серверное и клиентское ПО.
•Уровень 3. Удаленный доступ к ресурсам.
•Уровень 4. Сетевое окружение.
•Уровень 5. Логи и анализ трафика.
•Уровень 6. Внутренние проблемы Samba.
Не стоит забывать, что, возможно, с вашей проблемой уже кто-то сталкивался. В этом случае просмотр профильных форумов и других ресурсов может вам сэкономить драгоценное время. Не зацикливайтесь на единственно возможной по вашему мнению причине. Постарайтесь посмотреть на проблему с другой точки зрения. В конце концов решение любой проблемы может быть найдено!
Помогаю со студенческими работами здесь
Организация сетевого хранилища с возможностью работать с ним из Проводника
Всем привет.
Давно мечтаю о сетевом хранилище… да, собственно, оно у меня уже и есть. Из…
Размещение сетевого хранилища Debian на сервере и доступ к нему
Доброго все чего-нибудь!
есть сервер SERVER на домене II. на сервере развернута Hyper-v машина с…
Каким способом можно получить данные на плеере с сетевого хранилища
возможно я не туда пишу, перенесите пожалуйста куда нужно
есть роутер с usb портом и есть dvd…
") Проверка версии файла из облачного хранилища
Проверка версии файла из облачного хранилища
Все доброго времени суток!
Пишу приложение и появилась задача — сделать автообновление…
Искать еще темы с ответами
Или воспользуйтесь поиском по форуму: