
Adobe Premiere Pro — отличная программа для профессионального редактирования видео. Его используют миллионы пользователей вместе с After Effects по всему миру. Хотя это программное обеспечение премиум-класса с ежемесячной подпиской, пользователи никогда не разочаровываются, поскольку функции и возможности редактирования видео, которые оно дает вашей машине, нельзя упустить. При экспорте видео в Premiere Pro некоторые пользователи видят код ошибки 3, ошибка компиляции фильма, ошибка экспорта, ошибка завершения рендеринга на ПК с Windows 11/10. В этом руководстве у нас есть некоторые исправления.
Код ошибки 3 появляется на недавно установленных ПК, где параметры, необходимые для Premiere Pro, настроены неправильно. Эта ошибка в основном возникает, когда пользователь пытается отобразить видео в формате H264. Давайте посмотрим, как мы можем решить эту проблему.
Если вы не можете обработать видео в формате H264 и видите Код ошибки 3, ошибка компиляции фильма, ошибка экспорта, ошибка завершения рендеринга в Premiere Pro, следуйте приведенным ниже инструкциям.
Отключите настройки аппаратного кодирования, установите для режима управления питанием значение «Максимум»Обновите графические драйверыОбновите Premiere Pro
Давайте узнайте подробности о каждом методе.
1] Отключить настройки аппаратного кодирования
Это исправление, которое сработало лично для меня. Вам необходимо отключить настройки аппаратного кодирования. Чтобы отключить их,
откройте Premiere Pro, нажмите Изменить в строке меню и наведите указатель мыши на Настройки в нижней части списка. Затем выберите Медиа в настройках Снимите флажки рядом с кнопками Аппаратное ускорение декодирования H264/HEVC (требуется перезагрузка) и Аппаратное ускорение кодирования H264/HEVC (требуется перезагрузка) Нажмите ОК и закройте Premiere Pro. Затем перезагрузите компьютер.
Проверьте, помогло ли исправление устранить проблему.
2] Установите для режима управления питанием значение Максимум
.
Чтобы избавиться от этой проблемы, вам необходимо установить максимальное управление питанием на графическом процессоре. Вы можете сделать это с помощью панели управления NVIDIA или программного обеспечения AMD Radeon на своем ПК. Если вы являетесь пользователем NVIDIA,
щелкните правой кнопкой мыши на рабочем столе. Нажмите Показать дополнительные параметры. Выберите Панель управления NVIDIA в контекстном меню. Нажмите Управление настройками 3D. Найдите Режим управления питанием в разделе”Настройки”и установите для него максимальную производительность с помощью раскрывающегося меню.
3] Обновите графические драйверы
Некоторые пользователи видят эту ошибку из-за устаревших графических драйверов. Вам необходимо обновить графические драйверы на вашем ПК и устранить проблему.
Вы можете обновить графические драйверы,
4] Обновите Premiere Pro
Проверьте, есть ли доступны ли какие-либо обновления для Premiere Pro. Откройте Adobe Application Updater на своем ПК и нажмите кнопку «Обновить» рядом с Premiere Pro. Он проверит наличие обновлений, загрузит и установит их автоматически.
Как исправить код ошибки 3 в Premiere?
Код ошибки 3 в Premiere Pro можно легко исправить, отключив оборудование ускоренные настройки, обновление графических драйверов, обновление Premier Pro и установка режима управления питанием на максимум.
Как включить аппаратное кодирование в Premiere Pro?
Чтобы включить аппаратное ускорение кодирование в Premiere Pro, нажмите «Редактировать» в строке меню Premiere Pro, наведите указатель мыши на «Настройки» и выберите «Мультимедиа». Затем отметьте кнопку рядом с кодированием с аппаратным ускорением H264/HEVC (требуется перезагрузка). Затем перезагрузите компьютер.
По теме: Как стабилизировать дрожащие видеоматериалы в Adobe Premiere Pro.
I have been getting this error when trying to export media.
I’m running versions 22 of premiere pro and media encoder.
It was working a few days ago, but suddenly getting this error.
I have tried uninstalling/reinstalling and rebooting.
I have also selected the render to software only.
My videos are basic, don’t have any effects or cuts in them.
What is going on?

-
Home
-
Video Converter
- [7+1 Ways] How to Fix Adobe Media Encoder Error Code 3?
By Helen | Follow |
Last Updated June 9, 2023
Adobe Media Encoder is a powerful tool that allows users to convert and export video and audio files to a wide range of formats. However, sometimes users may encounter errors while using the software. One such error is the «Adobe Media Encoder error code 3» or «Adobe Media Encoder failed error code 3» or «Media Encoder WebM error code 3» or «9 error code 3 Adobe Media Encoder». In this article offered by MiniTool video recording software, we will discuss what these errors mean and how to fix them.
Error code 3 in Adobe Media Encoder usually indicates that there is an issue with the encoding process, which prevents the software from completing the task. This error can occur due to various reasons, including unsupported media format, corrupt media files, incorrect settings, and hardware or software issues.
One of the common reasons for Adobe Media Encoder error code 3 is the use of unsupported media formats. Adobe Media Encoder supports a wide range of formats, but not all formats are compatible with the software. Therefore, before starting the encoding process, make sure that the media files are in a supported format. You can check the list of supported formats on Adobe’s website.
Another reason for error code 3 is corrupt media files. If the media files are damaged or incomplete, Adobe Media Encoder may fail to encode them, resulting in an error. In such cases, you should try to repair the media files or use a backup copy of the files.
Incorrect settings can also cause Adobe Media Encoder error code 3. The software offers various options to customize the encoding process, and if the settings are not configured correctly, it can lead to errors. You should double-check the settings before starting the encoding process and ensure that they match the requirements of the output format.
Hardware or software issues can also cause Adobe Media Encoder error code 3. If your system does not meet the minimum requirements for Adobe Media Encoder or if there are compatibility issues with other software or hardware, you may encounter errors while using the software. You should check the system requirements and ensure that the software is compatible with your hardware and other software.
After knowing the causes that may result in the Adobe error code 3 problem, to fix Adobe Media Encoder error code 3, you can try the following solutions:
- Check the media files for any damage or corruption and repair them if possible.
- Verify that the media files are in a supported format.
- Double-check the settings in Adobe Media Encoder and ensure that they are correct. For example, change the encoding method from hardware to software.
- Update Adobe Media Encoder to the latest version.
- Check your system for any compatibility issues with Adobe Media Encoder and other software or hardware. If there is any hardware that can’t meet the minimum requirement of Media Encoder, just update it such as updating GPU drivers. Or you may need to switch the GPU driver from other modes to studio mode.
- Use as many computer resources as you can on Media Encoder. For instance, set power management mode to maximum or close all other background running programs.
- Restart your system and try encoding the media files again.
In addition to the above solutions, another method to solve Adobe Media Encoder Error Code 3 problem is to take advantage of one of the Media Encoder’s alternatives like free MiniTool Video Converter, which is a professional and powerful media encoder that enables you to decode and encoder video and audio files from one format to another.
MiniTool Video ConverterClick to Download100%Clean & Safe
MiniTool Video Converter support 1000+ media file formats (both input and output) including but not limited to the following ones.
- Video formats: MP4, MOV, MKV, AVI, WMV, MPEG, VOB, WEBM, FLV, HEVC/H265, AVC/H264…
- Audio formats: MP3, WAV, WMA, AAC, M4A, OGG, AIFF, AC3, M4B…
Besides, MiniTool Video Converter supports converting media files to formats that are compatible with certain hardware devices including Apple iPhone/iPad, Huawei Honor/Mate smartphones, Samsung Galaxy mobiles, as well as Android devices. Batch conversion is available.
Moreover, MiniTool Video Converter also provides a screen recording feature for its users to capture their computer screens into a video to share with others.
To Wrap Things Up
In conclusion, Adobe Media Encoder error code 3 can be caused by various reasons, including unsupported media formats, corrupt media files, incorrect settings, and hardware or software issues. If you encounter this error, you can try the solutions mentioned above to fix the issue. By following these steps, you can ensure a smooth encoding process and avoid any errors in Adobe Media Encoder. Or you can just make use of a replacement of Adobe Media Encoder like MiniTool Video Converter to do your media file encoding work.
Also Read
- [7 Fixes] Error Compiling Movie in Premiere Pro in Various Cases
- [Causes + Solutions] How to Fix Premiere Pro Export Error Code 3?
- [5 Ways] How to Fix Adobe Media Encoder Not Working Issues?
- Fix Adobe Media Encoder Error Code: -1609629695 and Similar Issue
- [Solved] How to Fix “Adobe Media Encoder Is Not Installed”?
About The Author

Position: Columnist
Helen Graduated from university in 2014 and started working as a tech editor in the same year. Her articles focus on video creation, editing, and conversion. She also has a good knowledge of disk management and data backup & recovery. Through an in-depth exploration of computer technology, Helen has successfully helped thousands of users solve their annoying problems.
I’m having the exact same issue over the last week. Constant render failures on the same project at completely random times. Sometimes it will make it 90% through a video, other times 5 seconds. The around timecode in the error is almost always between to frames.
I’ve tried making changes at that point
I’ve take lumetri off of clips
I’ve tried rendering previews of the entire timeline. I’ve moved my source files and project files to different drives
I’ve tried rendering to different drives
I’ve turned Hardware acceleration off, back on, cleared media cache
I’ve tried dozens of recommendations made on this forums and other places.
I’ve tried changing bit rate to below what’s in the default YouTube presets
I’ve tried turning off/on Max Render Depth and other similar properties
It fails on clips that are extremely basic un-edited clips straight from my 90D. It fails on some clips with lumetri, some with out. It fails on dynamic linked clips from AE. It fails on images, it fails on pretty much just text rendered to the screen I’ve made dozens of adjustments and it isn’t helping. The places where it fails seems completely random. My graphics drivers are up-to-date.
I’ve noticed a couple other very similar posts this weekend. I wonder if there’s possibly an issue with a AME or NVIDIA driver’s? It’s quite frustrating.
https://community.adobe.com/t5/adobe-media-encoder/media-encoder-fails/td-p/11556268?page=1
Windows 10 Pro, build 19041.572
NVIDIA 457.09 Drivers
Intel i7 5960x
64 GB DDR4
GTX 1070 FE
— Encoding Time: 00:04:46
10/31/2020 10:30:57 AM : Encoding Failed
————————————————————
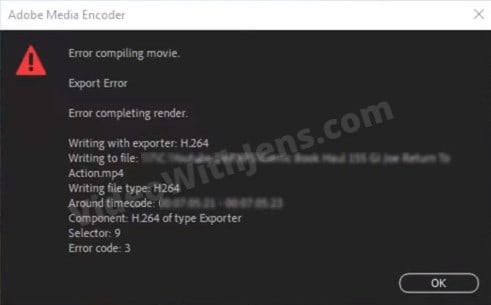
Export Error
Error compiling movie.
Export Error
Error completing render.
Writing with exporter: H.264
Writing to file: \?C:UserscarboVideosplease-work.mp4
Writing file type: H264
Around timecode: 00:01:54:18 — 00:01:54:19
Component: H.264 of type Exporter
Selector: 9
Error code: 3
————————————————————
— Encoding Time: 00:37:52
10/31/2020 11:11:07 AM : Encoding Failed
————————————————————
Export Error
Error compiling movie.
Export Error
Error completing render.
Writing with exporter: H.264
Writing to file: \?C:UserscarboVideosplease-work_1.mp4
Writing file type: H264
Around timecode: 00:32:46:15
Component: H.264 of type Exporter
Selector: 9
Error code: 3
————————————————————
— Encoding Time: 00:24:18
10/31/2020 02:23:18 PM : Encoding Failed
————————————————————
Export Error
Error compiling movie.
Export Error
Error completing render.
Writing with exporter: H.264
Writing to file: \?C:UserscarboVideosMain_Sequence.mp4
Writing file type: H264
Around timecode: 00:16:28:04 — 00:16:28:05
Component: H.264 of type Exporter
Selector: 9
Error code: 3
————————————————————
— Encoding Time: 00:09:40
10/31/2020 08:12:09 PM : Encoding Failed
————————————————————
Export Error
Error compiling movie.
Export Error
Error completing render.
Writing with exporter: H.264
Writing to file: \?C:UserscarboVideosMain_Sequence.mp4
Writing file type: H264
Around timecode: 00:05:00:18 — 00:05:00:19
Component: H.264 of type Exporter
Selector: 9
Error code: 3
————————————————————
— Encoding Time: 00:23:23
10/31/2020 10:07:16 PM : Encoding Failed
————————————————————
Export Error
Error compiling movie.
Export Error
Error completing render.
Writing with exporter: H.264
Writing to file: \?D:Main_Sequence.mp4
Writing file type: H264
Around timecode: 00:33:27:04
Component: H.264 of type Exporter
Selector: 9
Error code: 3
————————————————————
— Encoding Time: 00:01:42
10/31/2020 10:59:03 PM : Encoding Failed
————————————————————
Export Error
Error compiling movie.
Export Error
Error completing render.
Writing with exporter: H.264
Writing to file: \?E:Main_Sequence.mp4
Writing file type: H264
Around timecode: 00:00:35:19 — 00:00:35:20
Component: H.264 of type Exporter
Selector: 9
Error code: 3
————————————————————
— Encoding Time: 00:02:17
11/01/2020 12:32:57 AM : Encoding Failed
————————————————————
Export Error
Error compiling movie.
Export Error
Error completing render.
Writing with exporter: H.264
Writing to file: \?C:UserscarboDesktopMain_Sequence.mp4
Writing file type: H264
Around timecode: 00:00:36:23
Component: H.264 of type Exporter
Selector: 9
Error code: 3
————————————————————
— Encoding Time: 00:12:24
11/01/2020 12:45:34 AM : Encoding Failed
————————————————————
Export Error
Error compiling movie.
Export Error
Error completing render.
Writing with exporter: H.264
Writing to file: \?C:UserscarboDesktopMain_Sequence_1.mp4
Writing file type: H264
Around timecode: 00:09:20:14 — 00:09:20:16
Component: H.264 of type Exporter
Selector: 9
Error code: 3
————————————————————
When trying to export from Premiere Pro, are you faced with the “Error Code 3”?
If so, it’s your lucky day, as that’s exactly what we will fix in this article.
Error code 3 is an export/render error part of the “Error compiling movie” category.
This is one of the most common errors in Premiere, and because of that, I’ve spent the last weeks doing intense research and testing on how to fix it.
Here’s a video format of the video:
I’ve arranged the solutions from which I would try first to last:
1. Meet Hardware Recommendations
Error code 3 in Premiere Pro usually occurs when there is not enough available VRAM on your GPU to encode your video.
For encoding video in Premiere Pro, Adobe recommends…
- 4GB VRAM for exporting 1080p.
- 6GB VRAM for exporting 4K.
- 8GB VRAM for exporting 6K or higher.
Reference: https://helpx.adobe.com/x-productkb/multi/gpu-acceleration-and-hardware-encoding.html
Here’s how to check your GPU’s amount of VRAM:
If you’re not meeting the VRAM recommendation, this is likely causing the error.
In that case, I would try exporting using only the CPU; jump to that solution here.
However, if your graphics card has enough VRAM, I recommend trying the methods in the order I’ve written them, EXCEPT number 4; save that one for last. That’s because we want to utilize your GPU if it’s possible.
2. Reboot Your Computer
Rebooting your computer is an easy fix known to solve many bugs. Therefore, it’s worth giving it a shot, just in case.

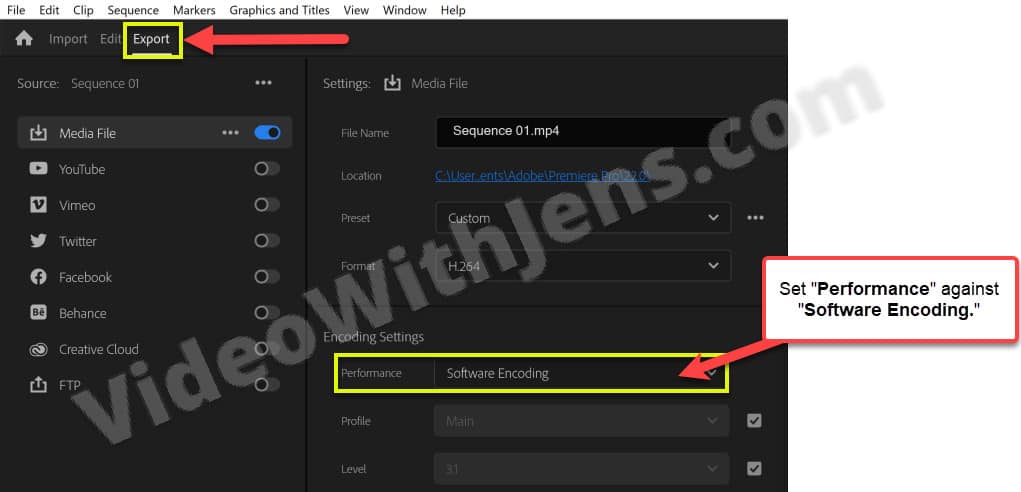
3. Change from Hardware Encoding to Software Encoding
If your GPU does not have enough VRAM, this solution will likely solve the issue for you!
If your GPU met the requirements, I would first test out the other solutions in the article. Not utilizing an excellent GPU would be a shame!
Using Software Encoding means that instead of using both the graphics card and the processor to export your video, Premiere will only be using the CPU.
- Pros: known to make your video higher quality.
- Cons: exporting takes 2-4 times longer.
To do this, open the “Export” tab inside Premiere, and then the “Video” sub-tab and click on “More.”
You should see the “Performance” option under “Encoding Settings,” like in the image below. Set it against “Software Encoding,” and try exporting your project.
4. Set Power Management Mode to Maximum
Setting power management mode to maximum will tell Windows that Premiere can use all the GPU capacity available, meaning there are no power restrictions.
According to the internet, you don’t have this option if you use a Mac. However, I found an article on something similar for a 16-inch MacBook PRO with M1 Max (opens in a new tab).
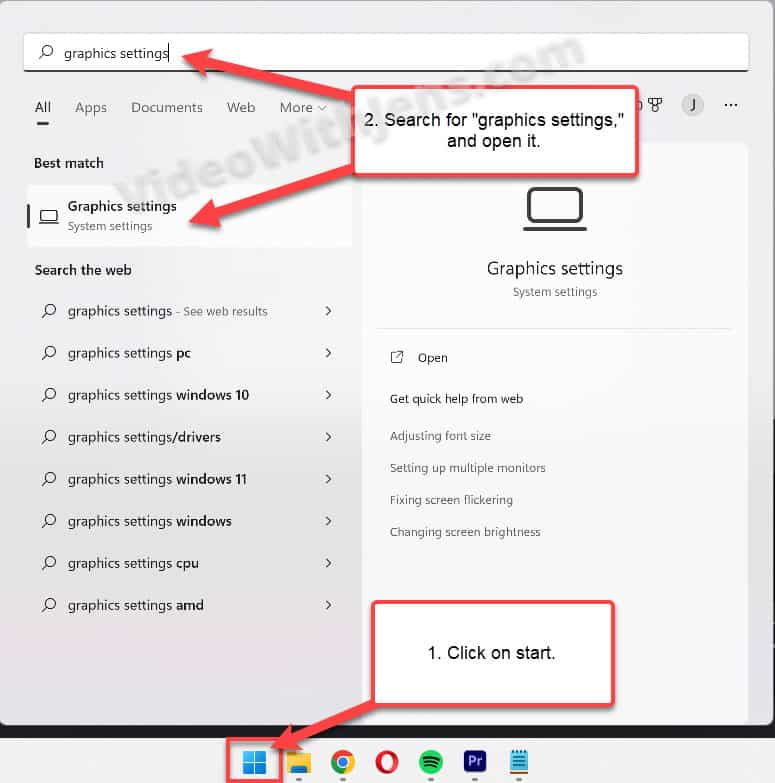
In Windows, open the “Start” menu by clicking on the “Windows” button on your keyboard or the windows icon in the taskbar.
Then search for “graphics settings” and open “Graphics settings.”
Now, we will add Premiere to the applications in the Graphics settings.
To do this, click on “Browse” and locate the “Adobe Premiere Pro” application file (the one that you can click to start Premiere). It should be found in the installation destination in your file system.
Select the application file, and click on “Add.”
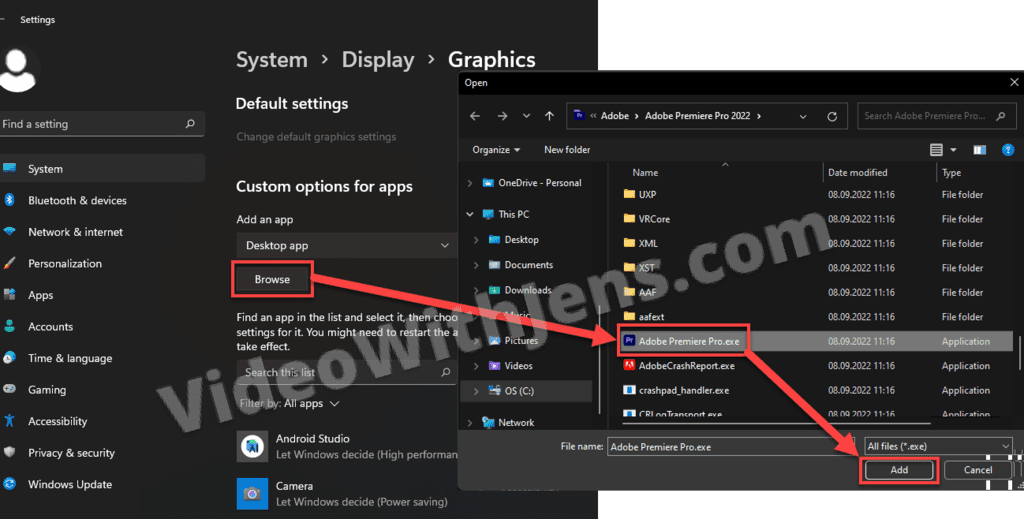
Now you should be able to see Premiere Pro in the graphics settings!
Click on it, and then open “Options.”
Enable the “High performance” option, click “Save,” and reboot your computer.
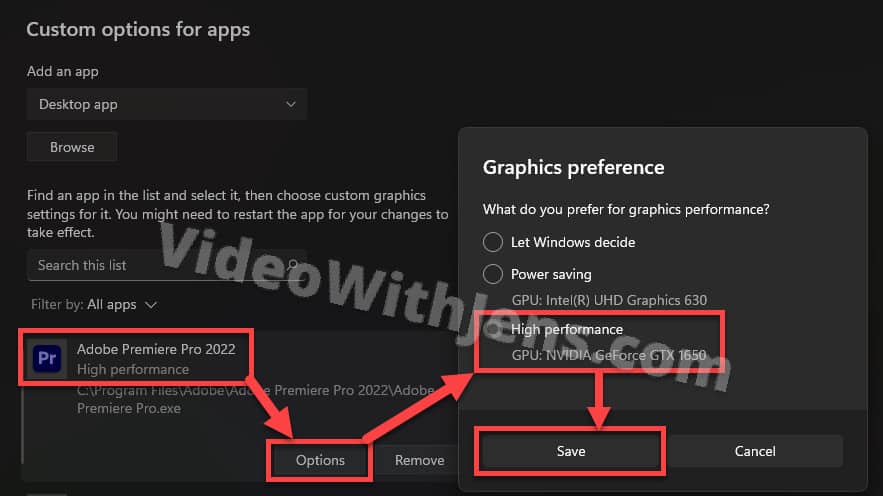
Hopefully, this gave the GPU enough power not to trigger error code 3!
If not, there’s an easy way to delegate even more of the VRAM Premiere:
5. Close Applications Running in the Background
There may be applications running in the background that you are unaware of, and even worse, using part of your graphics card’s VRAM.
To prevent this from happening, open the “Task Manager” on Windows or the “Activity Monitor” on macOS.
To open it:
- Windows: Press “Start” and search for “task manager.”
- macOS: Press “Command + Spacebar” and search for “activity monitor.”
Now, end applications that you don’t need and consume a lot of power.
Click on the application and then click on “End task” (Windows) or the cross icon (macOS.)
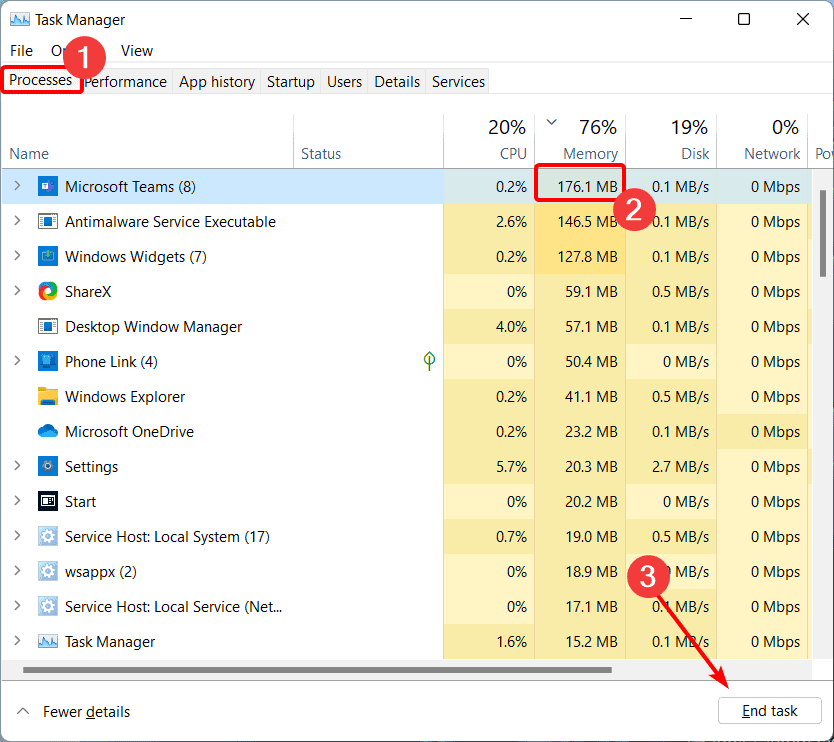
After doing the steps above, try exporting your project from Premiere Pro.
If you’re still facing the error code 3, check out the next solution:
6. Adjust Video at the Timecode
When the error message pops up, it says at what point the error occurred when encoding your video.
You can check this next to “Around timecode,” like in the image below:

There can be many reasons for what’s causing the error, but knowing when it occurred gives you tons of information.
Here are a couple of examples of what you should look for:
- Effects.
- Color adjustments.
- Sound design.
- Titles/text.
- Clips that start around the time code.
If you find anything like that, troubleshoot by removing it and exporting the video.
You can also try trimming the ends of the clip or make some minor adjustments to it in case it’s a bug or something.
7. Update GPU Driver(s)
Make sure that your graphics card’s driver is up to date.
Generally, if you have the latest OS version, your drivers should also be up to date.
However, sometimes it helps to get the drivers directly from the manufacturer, as these are usually newer versions.
Manufacturer’s official website: (will direct you to the driver page)
- AMD drivers.
- NVIDIA drivers.
- Intel drivers.
8. Update to the Latest Version of Premiere Pro
Usually, whenever there is found a bug in Premiere Pro, they will be fast to release a new update fixing it.
Thus, updating Premiere Pro is a standard solution to various issues.
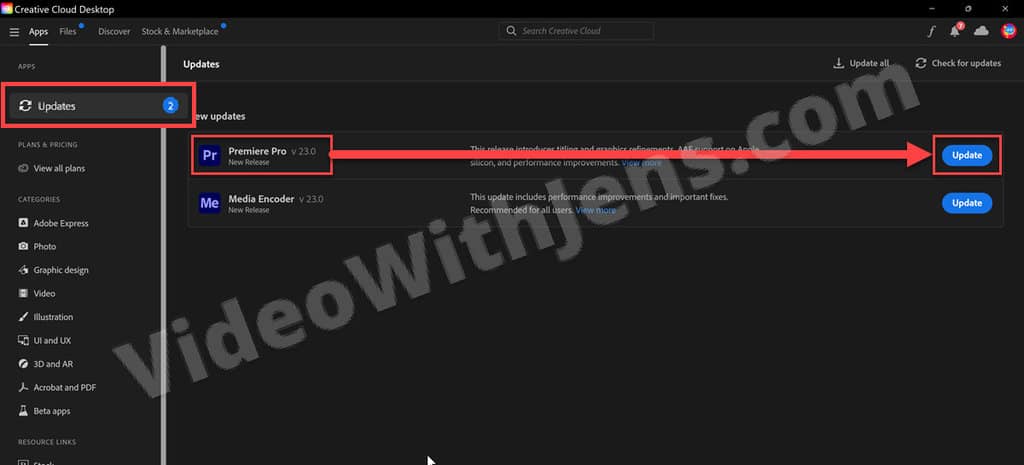
Open the Adobe Creative Cloud application on your computer to update the software.
Then, open “Updates” and click on “Update” next to Premiere Pro (you won’t see the update button if you are already up to date).
9. NVIDIA GPU: Switch from Gaming to Studio Driver
If you have an NVIDIA graphics card, many people have reported problems using the “Game Ready Driver” instead of the “Studio Driver.”
To get the studio version, open GeForce Experience on your computer and then open the “Drivers” section.
In the top right-hand corner, you should be able to see three dots, which, when clicked upon, give you the option to choose “Studio Driver”:
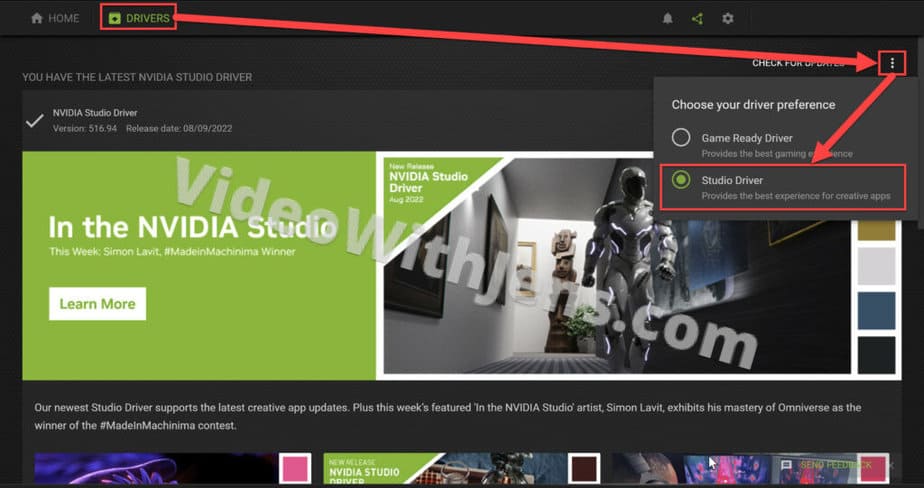
If you are unable to see the three dots, re-install GeForce Experience.
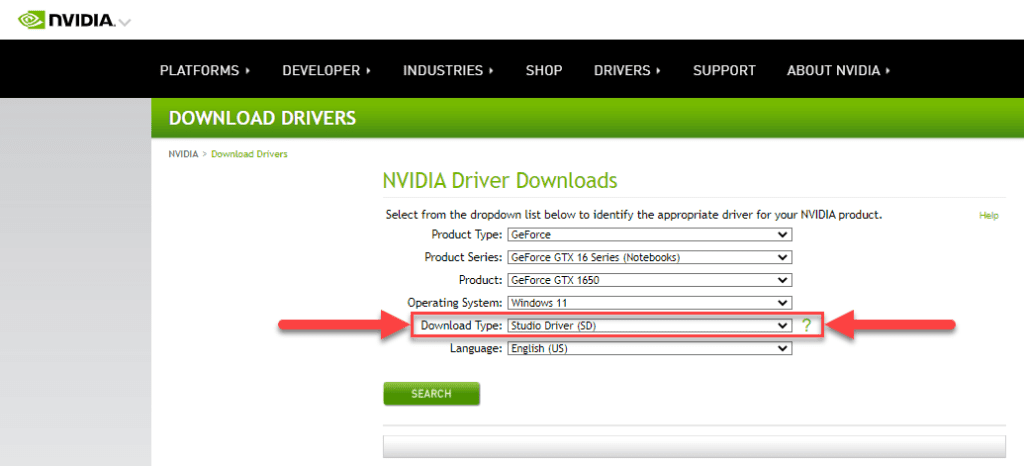
To do this, head over to NVIDIA’s official website (opens in a new tab), fill out your GPU’s technical details, and also set “Download Type” against “Studio Driver.”
Then download the latest driver version, and you’ll also get asked to install GeForce Experience (which you want) when installing.
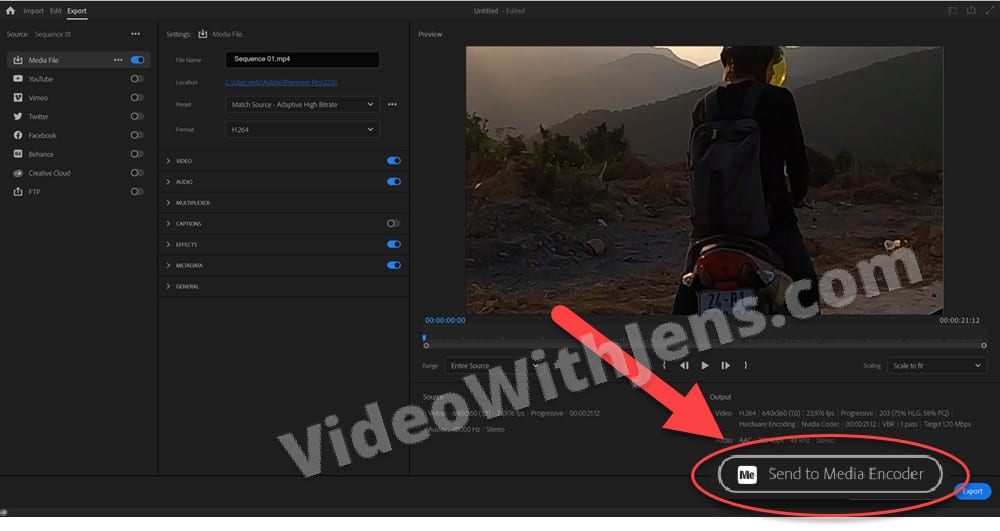
People have reported that exporting with Media Encoder instead of directly from Premiere Pro has solved their error code 3.
Media Encoder is a software that’s included in your Premiere Pro subscription.
Next to the “Export” button in Premiere, there is another button that says “Send to Media Encoder,” click on that one.
Then, set the correct settings over there, and export your project!
Error code 3 is part of the “Error compiling movie” group of errors, which I’ve written more about here.